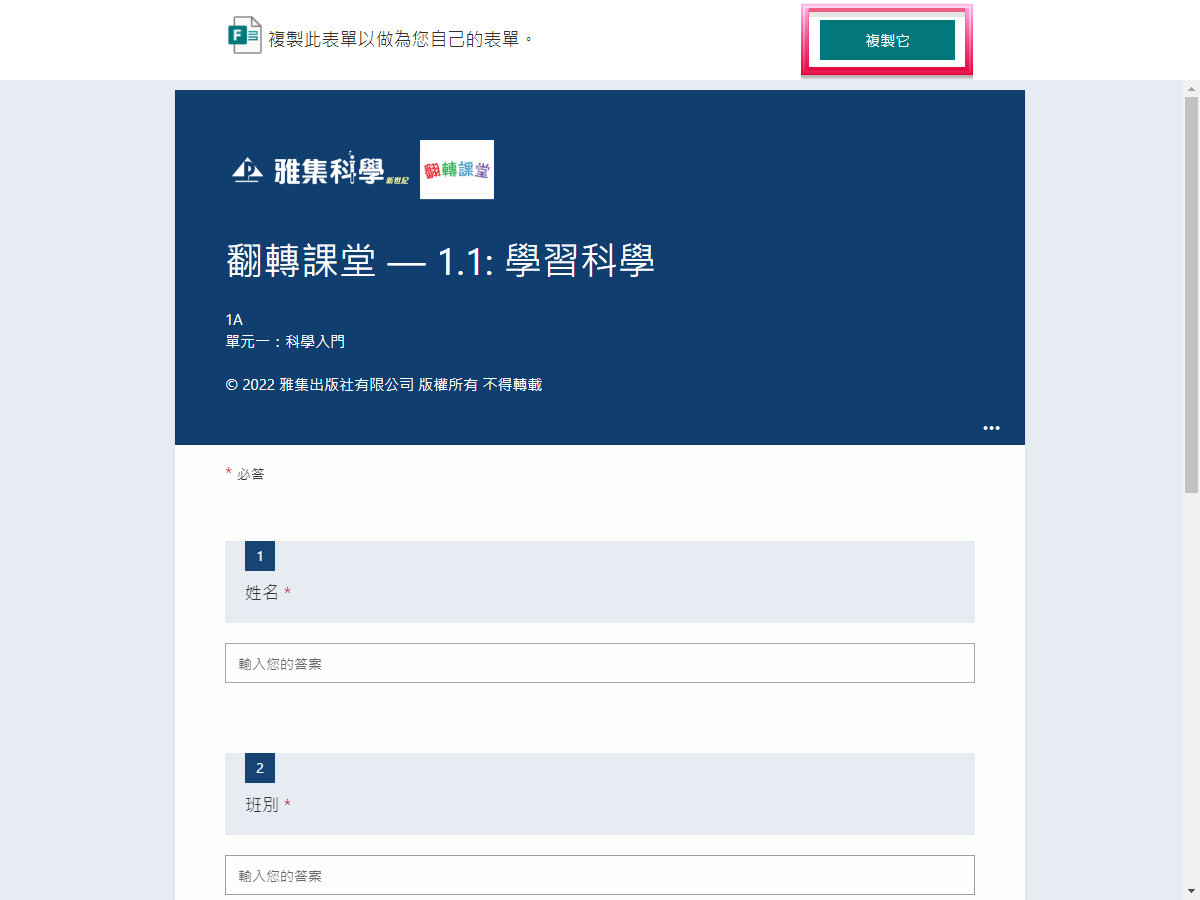
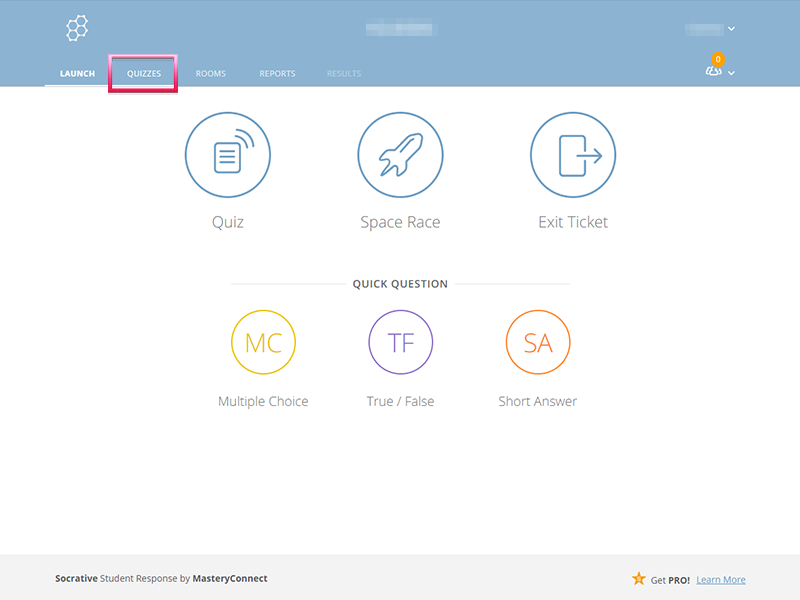
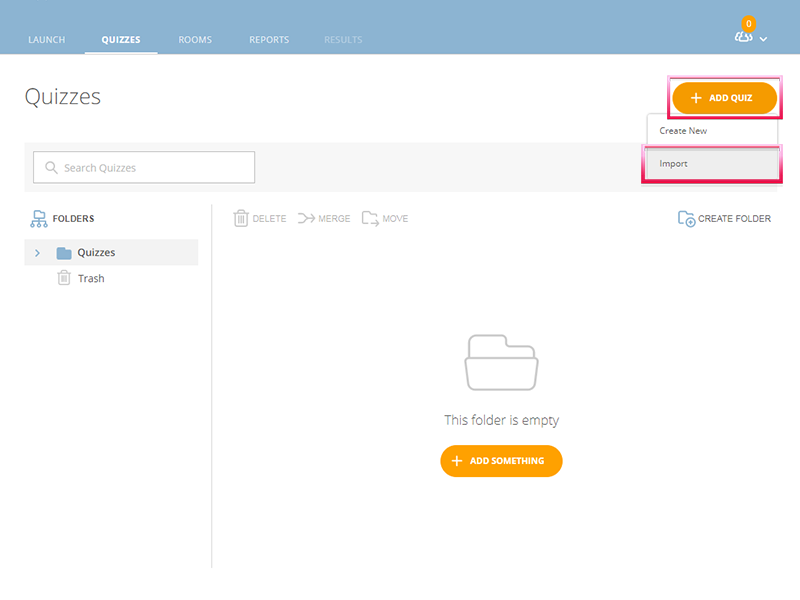
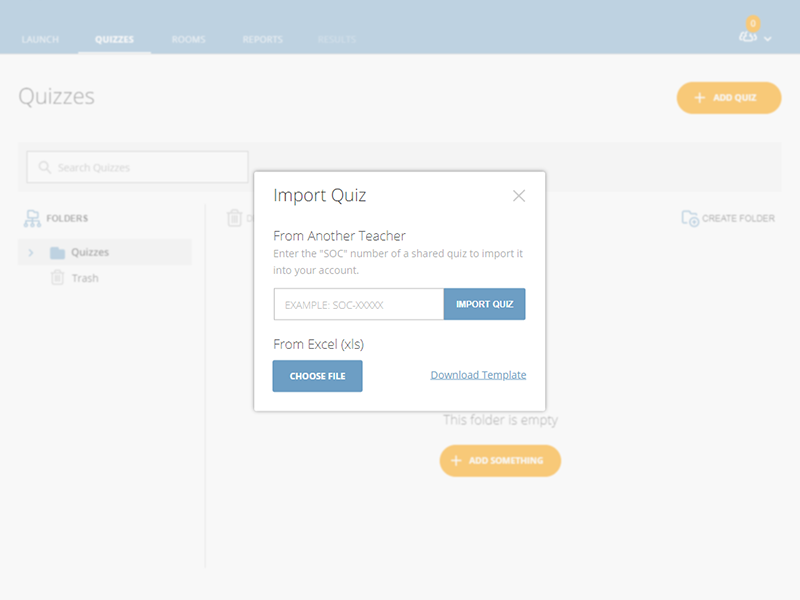
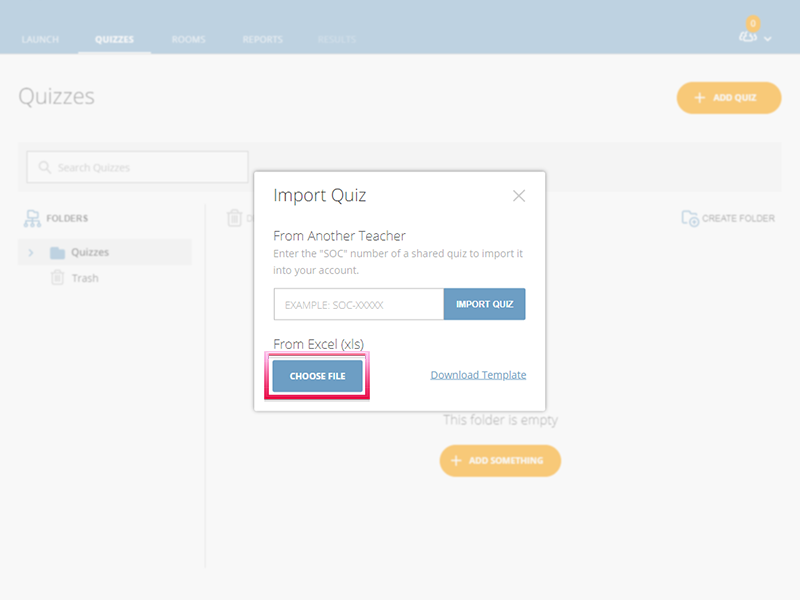
(To create a Google account, click here.)


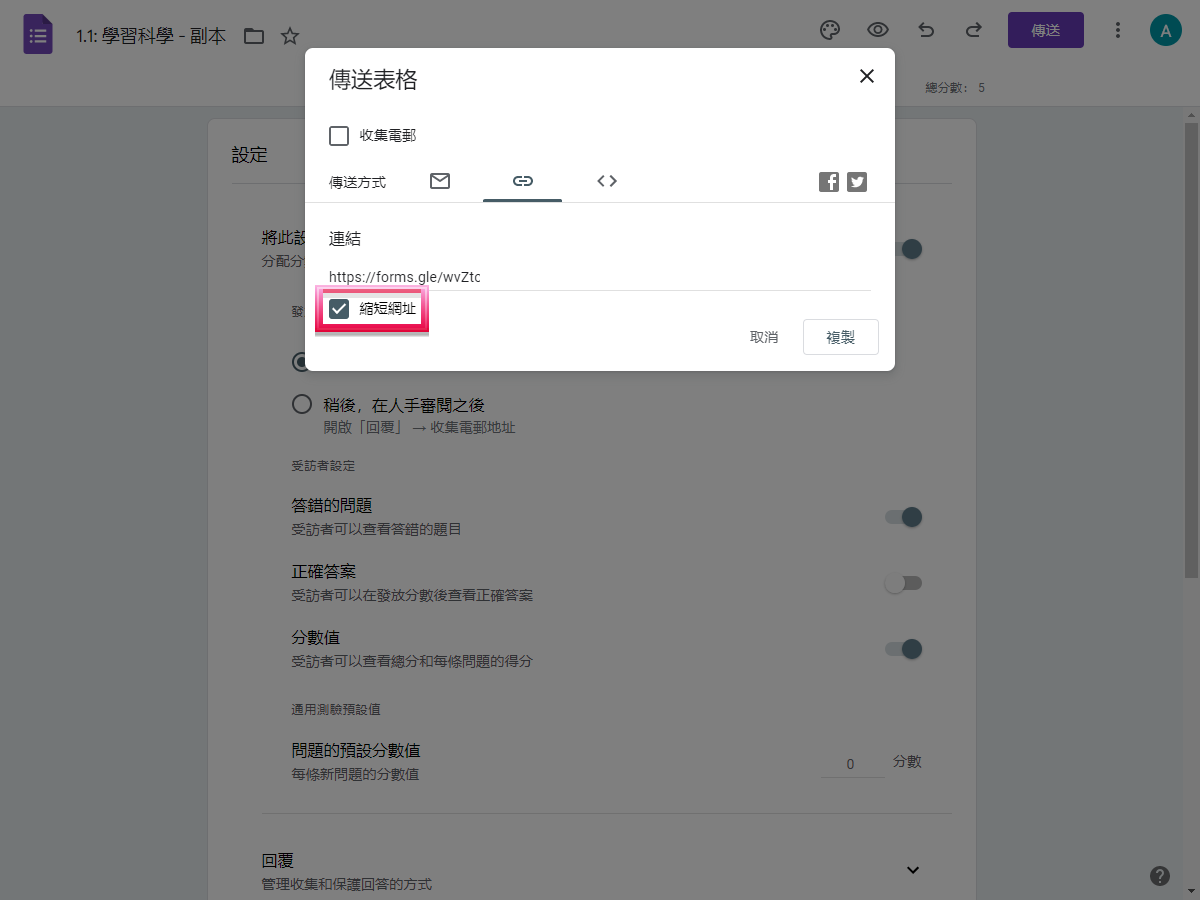


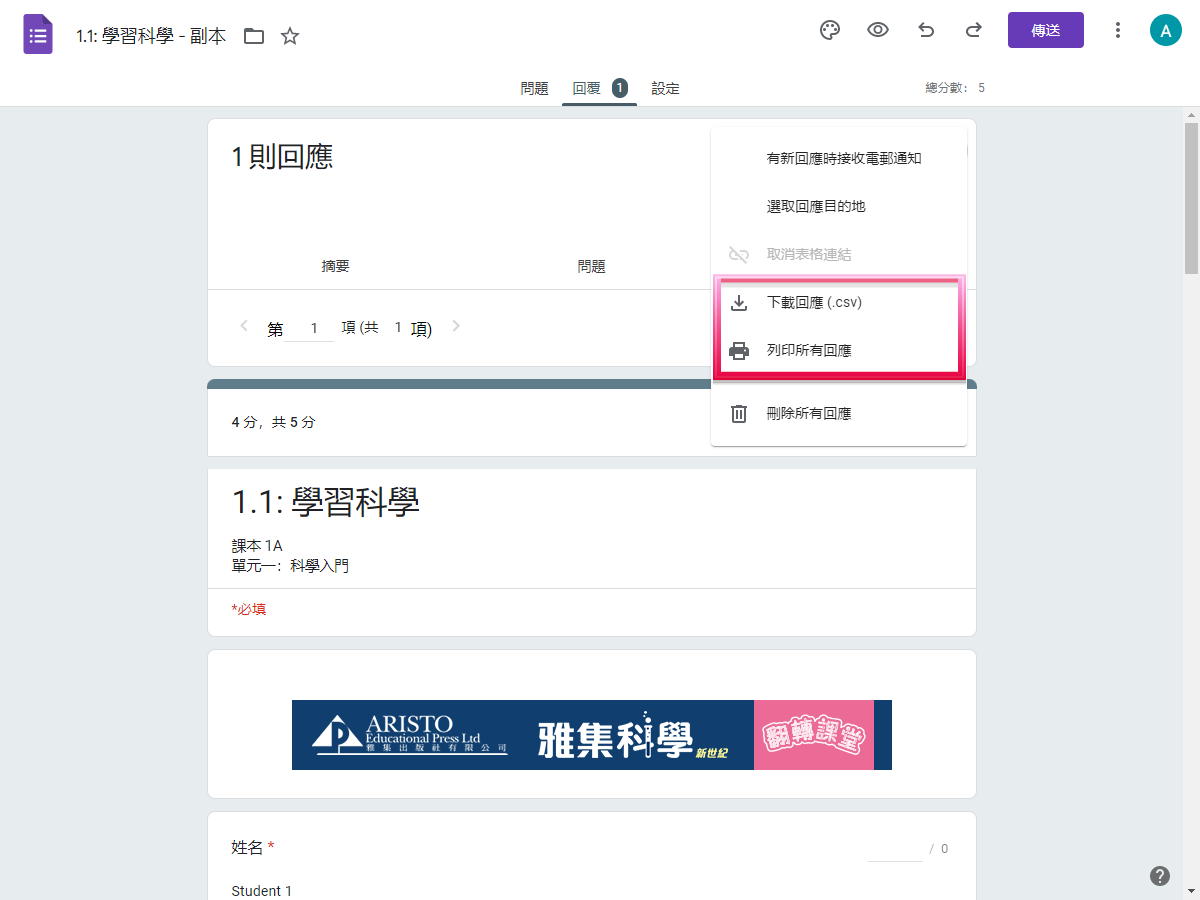
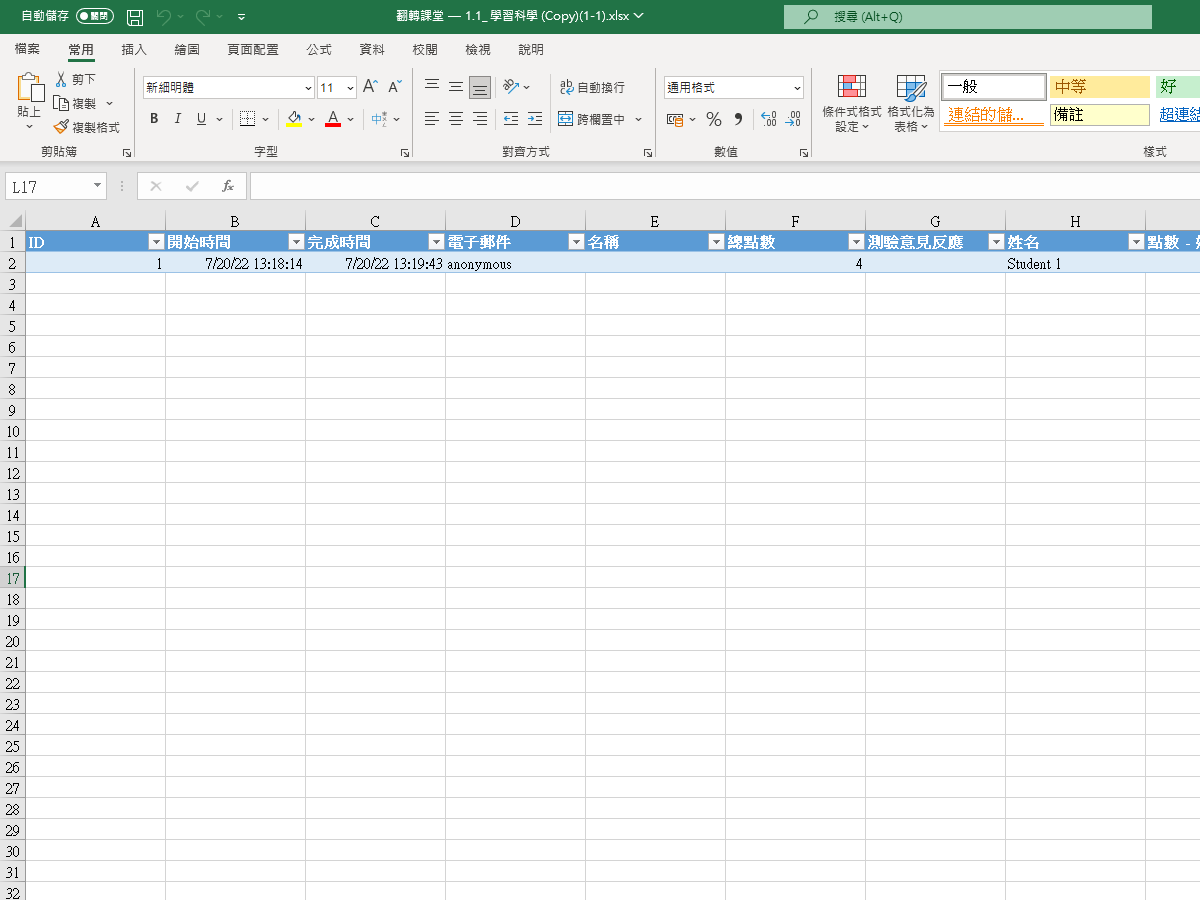
| • | 下載回應 (.csv)(Download responses (.csv))– 可使用 Excel 開啟 Download responses (.csv)(下載回應 (.csv)) - a format that can be opened in Microsoft Excel. |
| • | 列印所有回應(Print all responses) Print all responses(列印所有回應). |


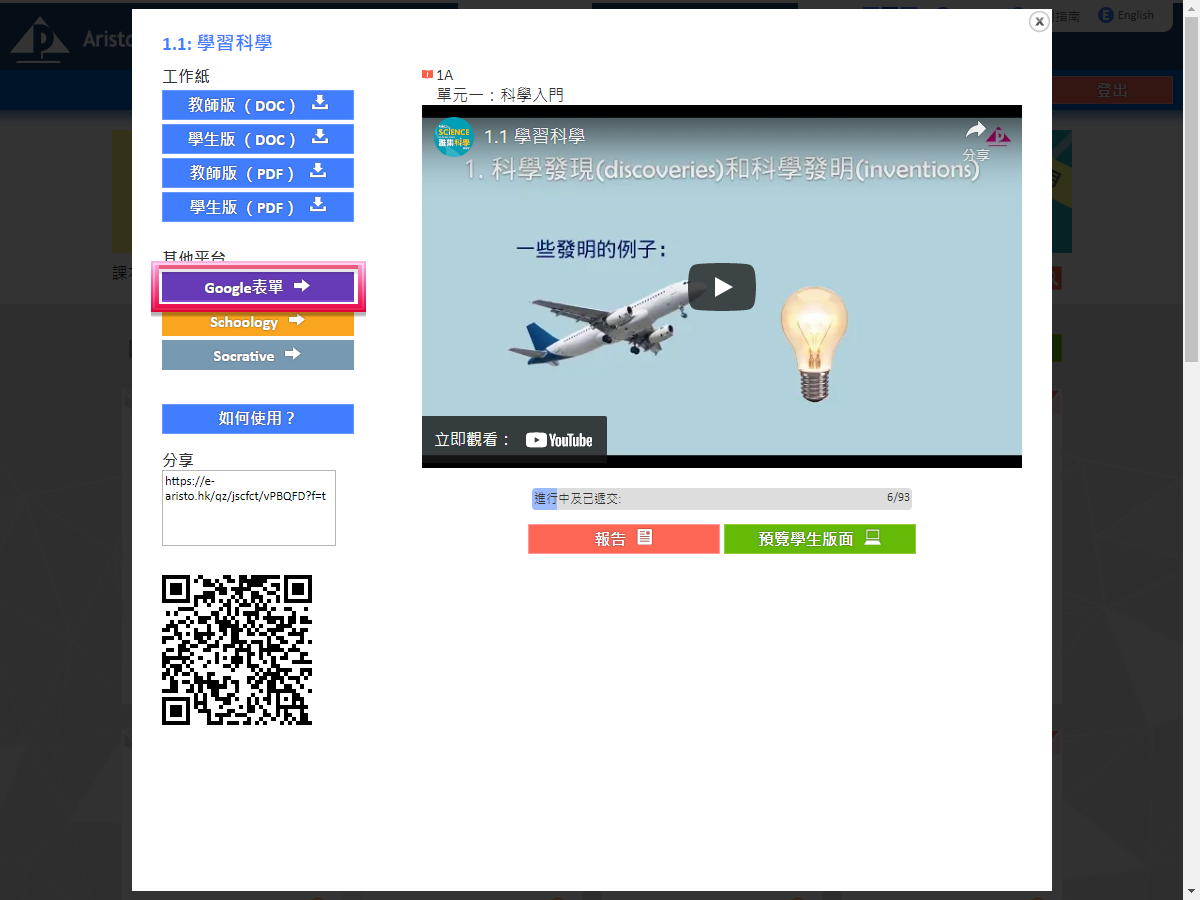
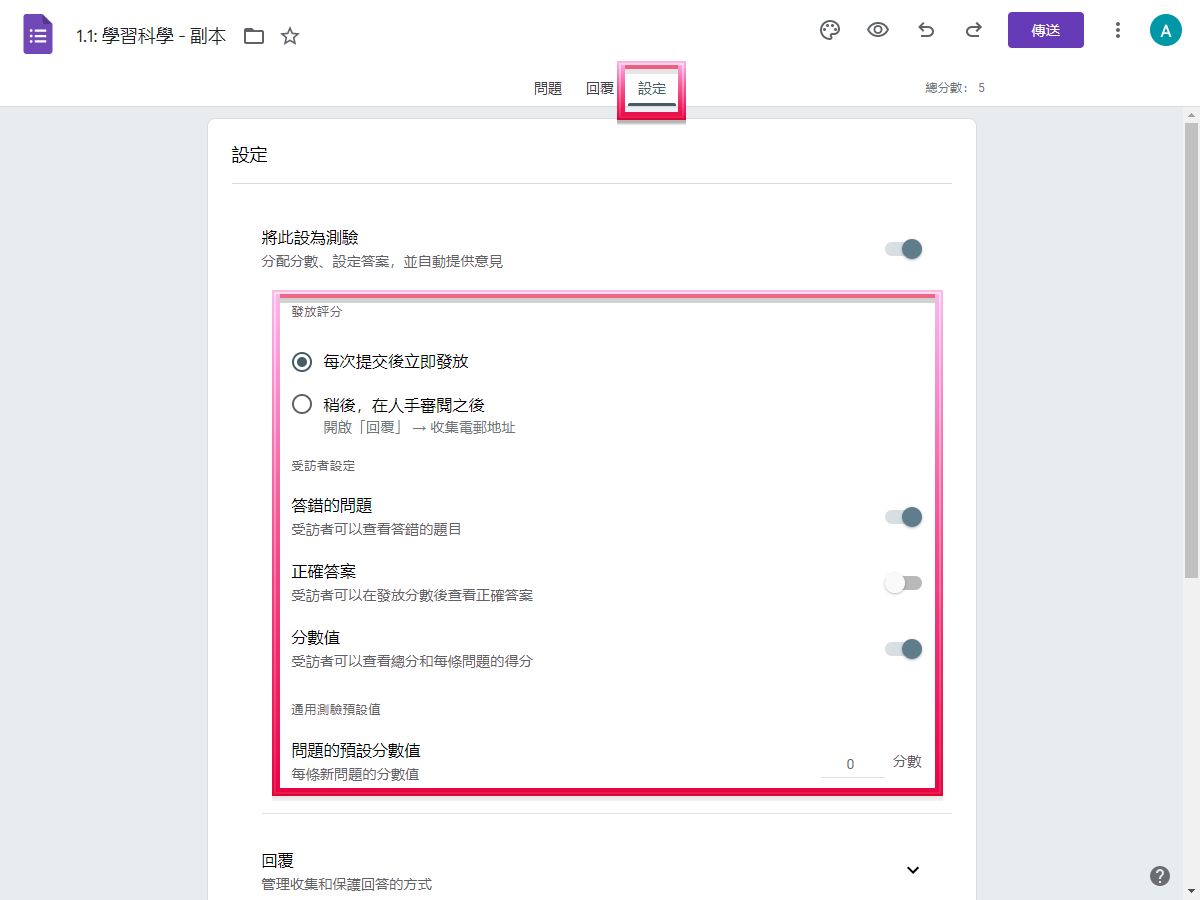
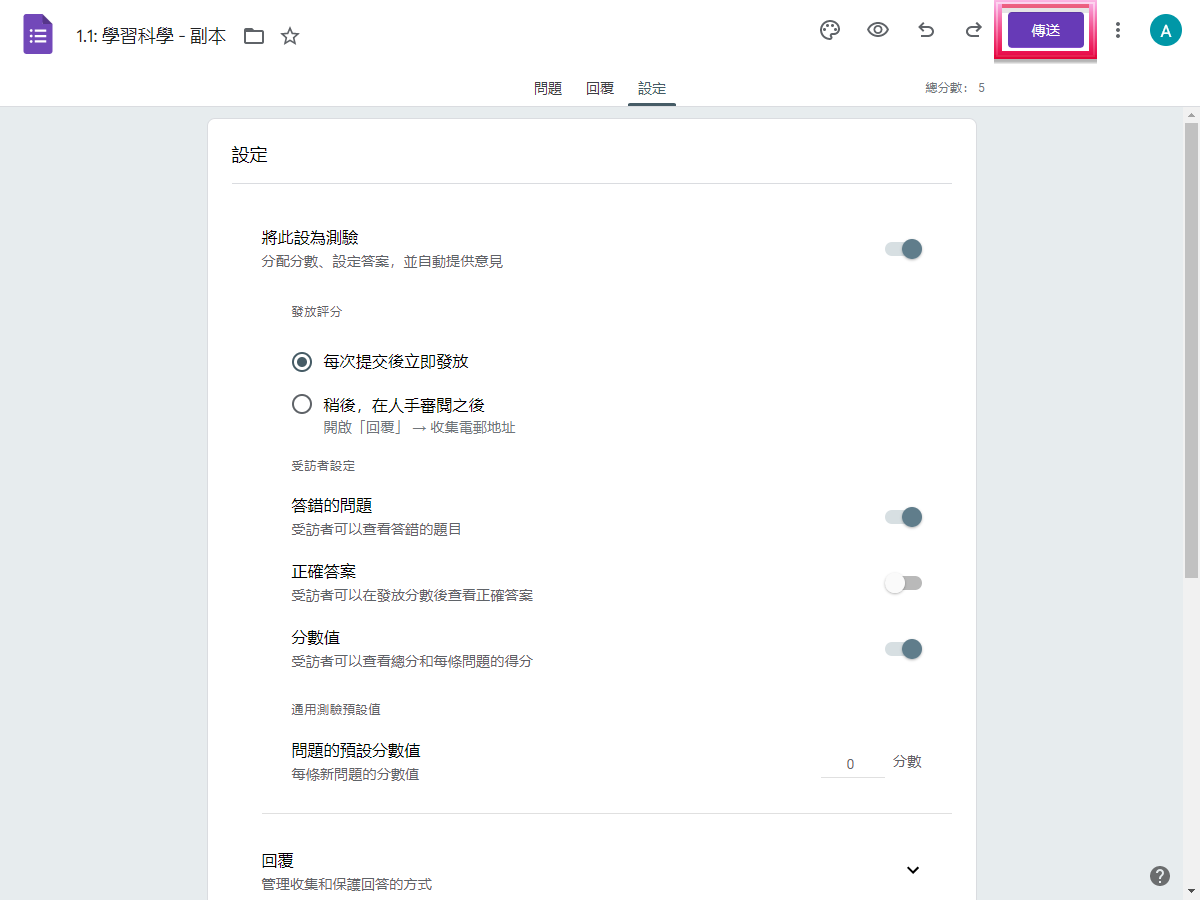
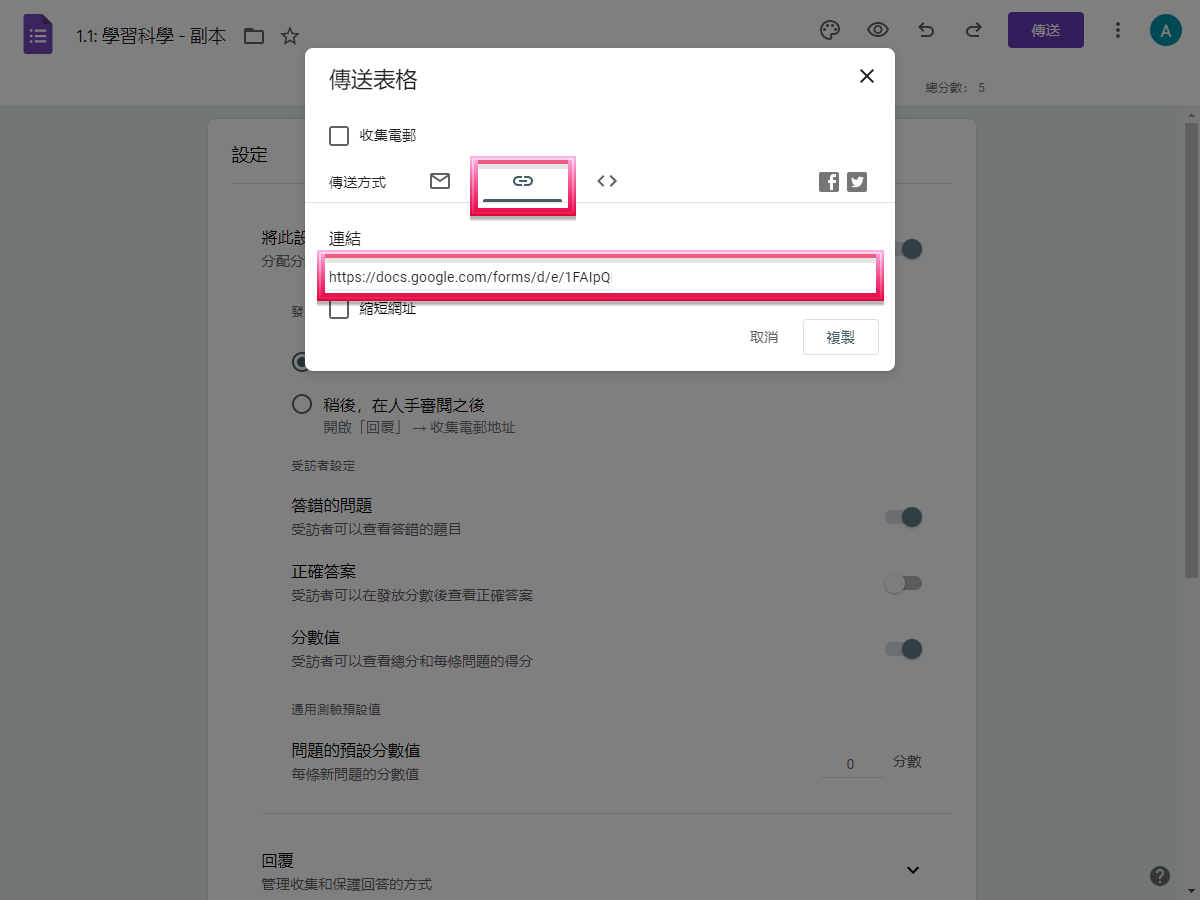
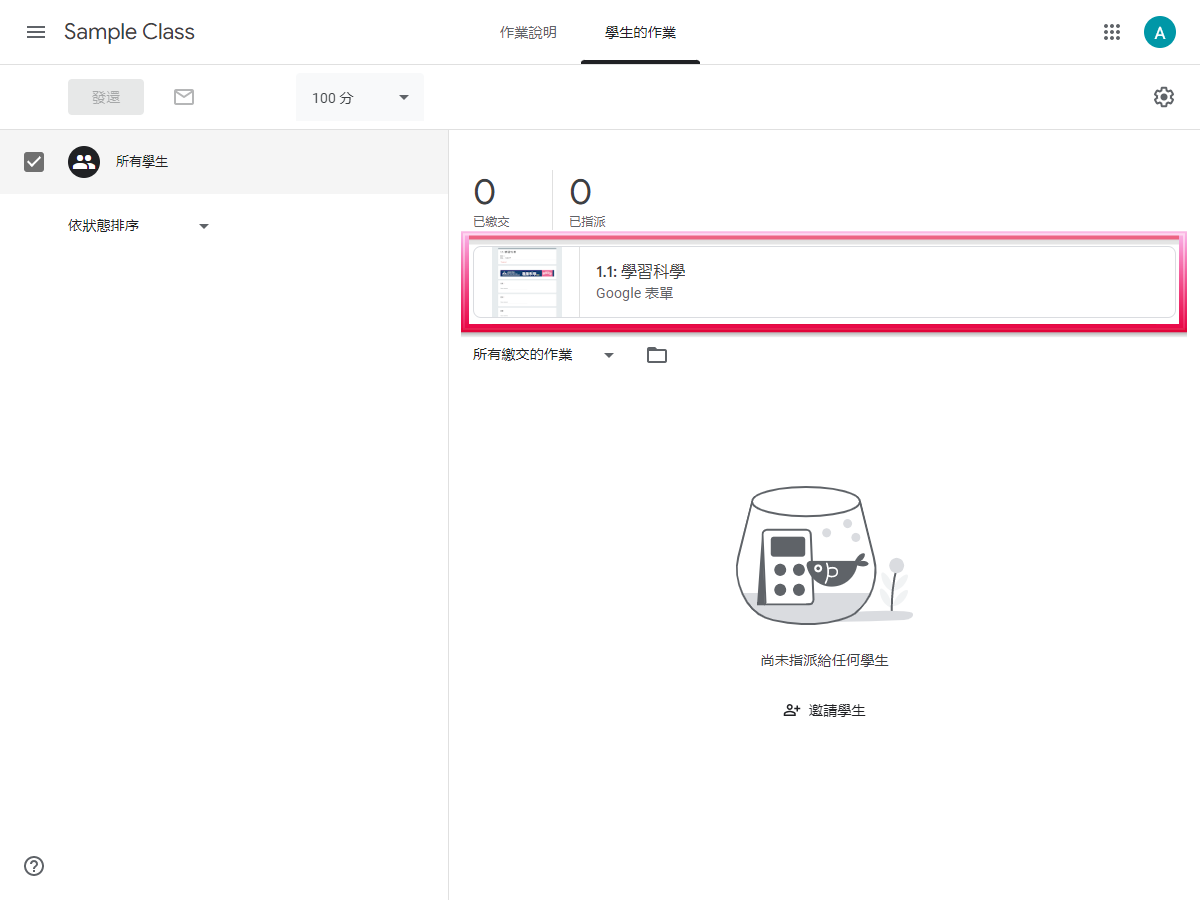
發放 Google 表單
Assign Google Forms
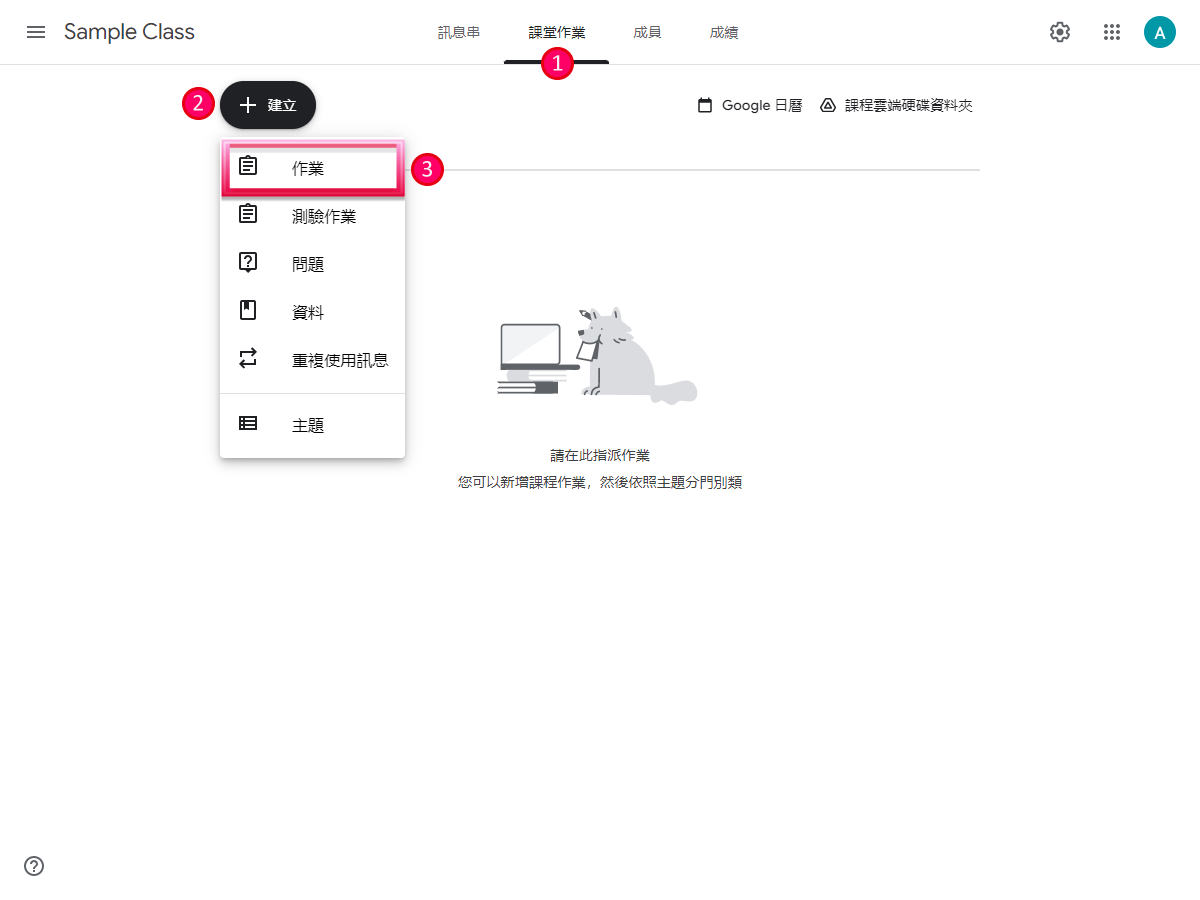

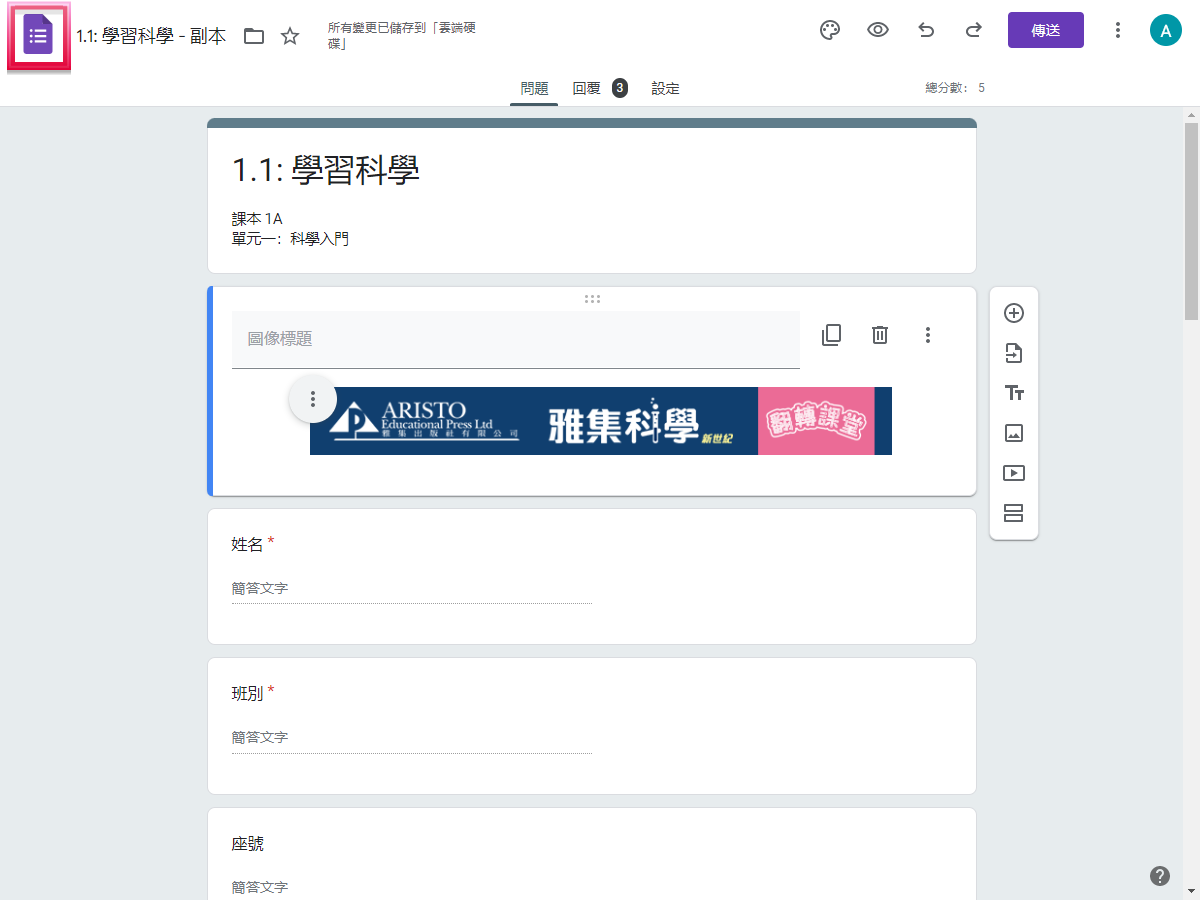
| 1 | 在 Google Classroom 進入課程 (Class) 後,點按「課堂作業 (Classwork)」; After entering a ‘class(課程)’ in Google Classroom, click ‘Classwork(課堂作業)’; |
| 2 | 點按「+ 建立 (Create)」; Click ‘+ Create(+ 建立)’; |
| 3 | 選擇「作業 (Assignment)」; Select ‘Assignment(作業)’; |
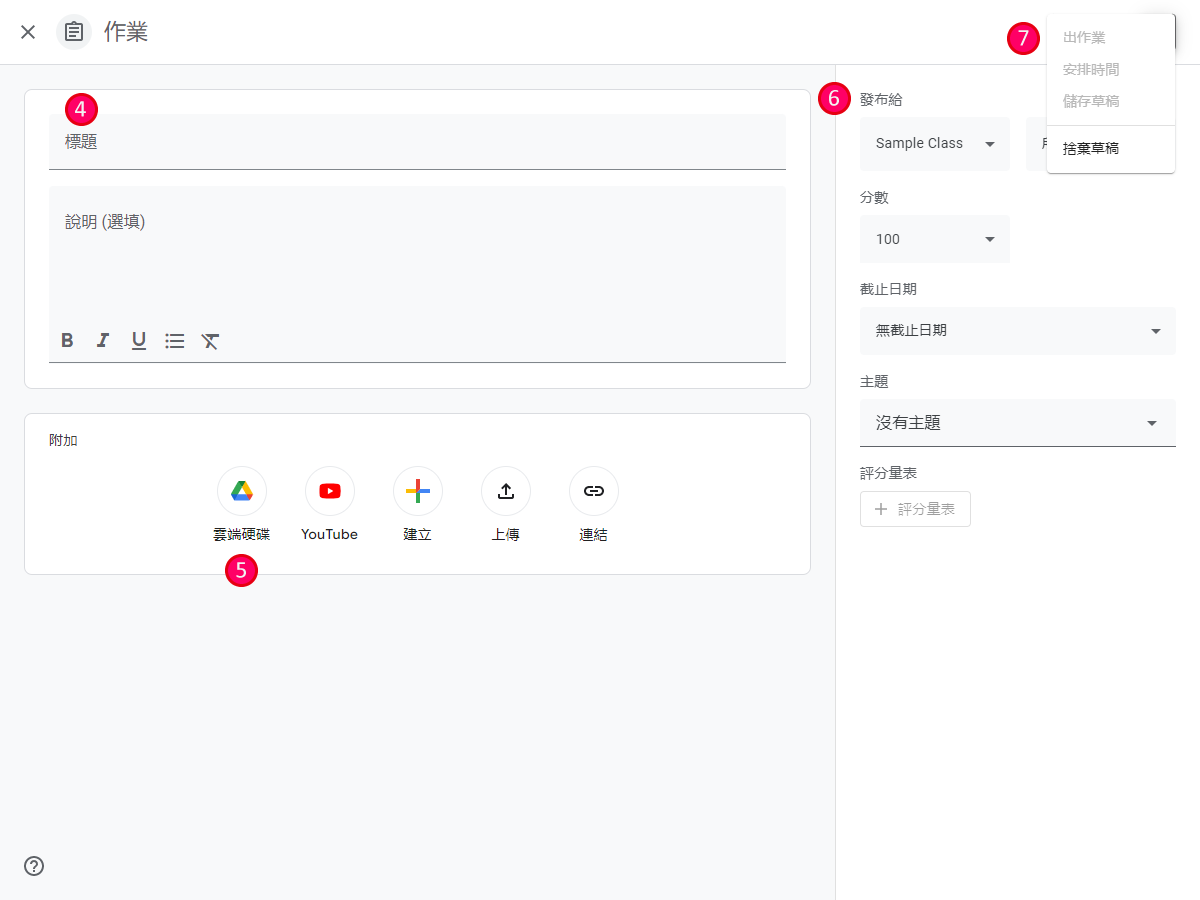

| 4 | 輸入標題等資料; Enter the title and other information; |
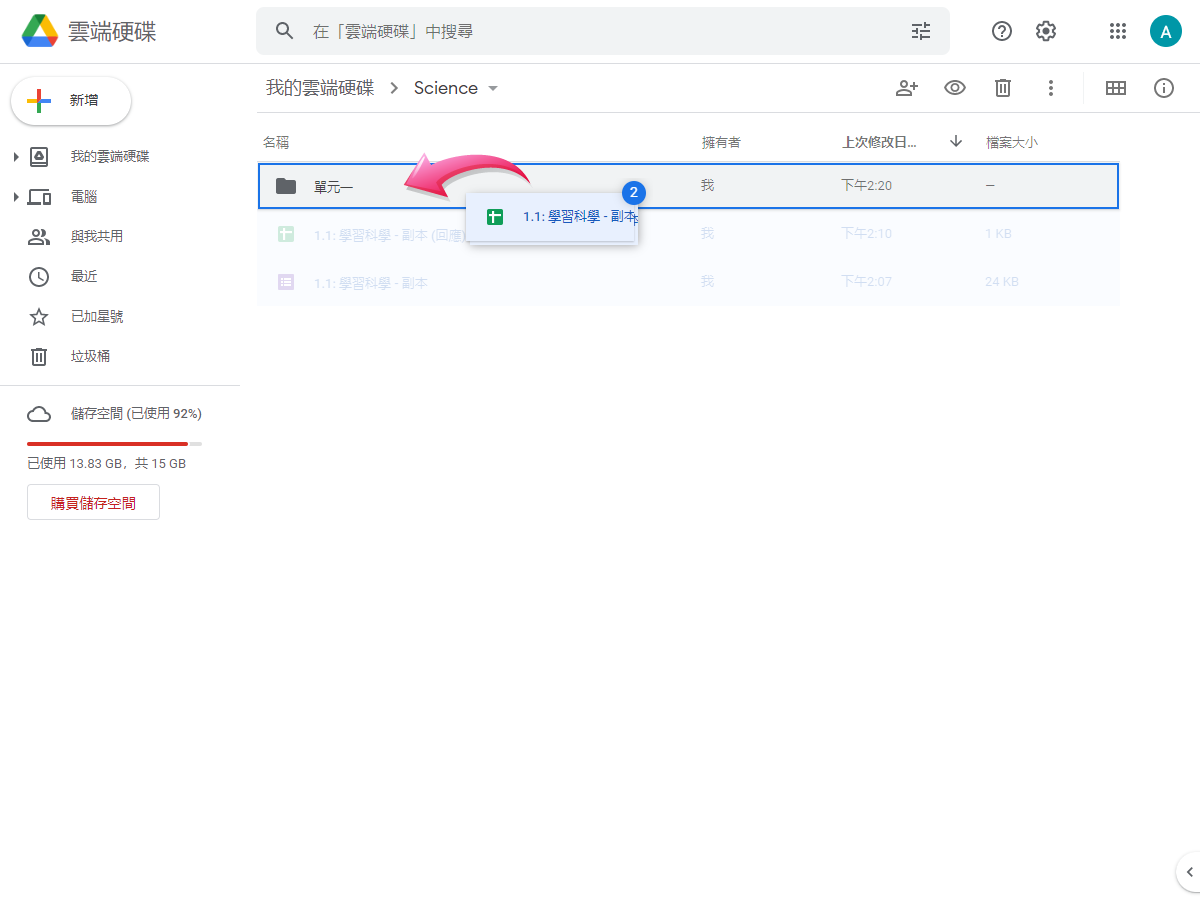
| 5 | 點按「雲端硬碟 (Drive)」,再選擇已複製的Google表單; Click ‘Drive(雲端硬碟)’ and select the copied Google Forms; |
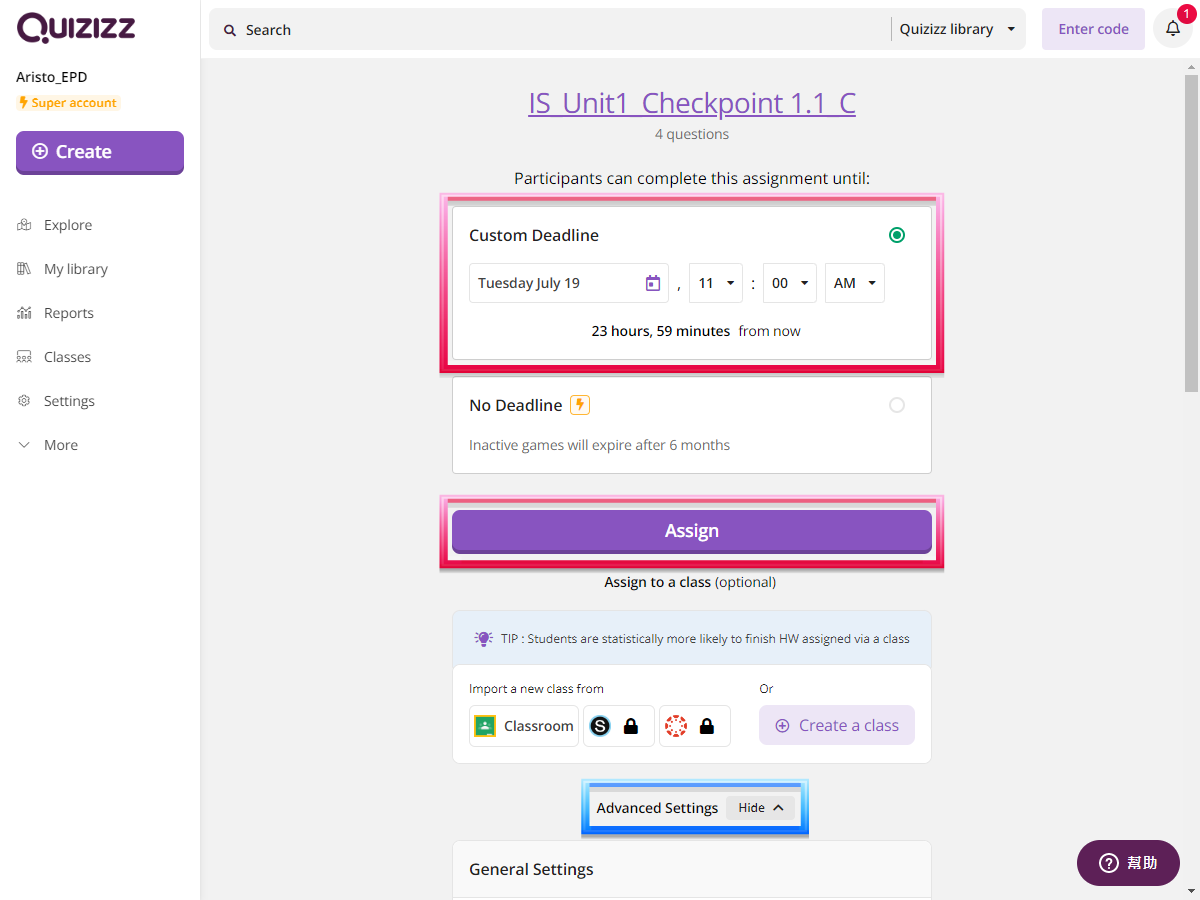
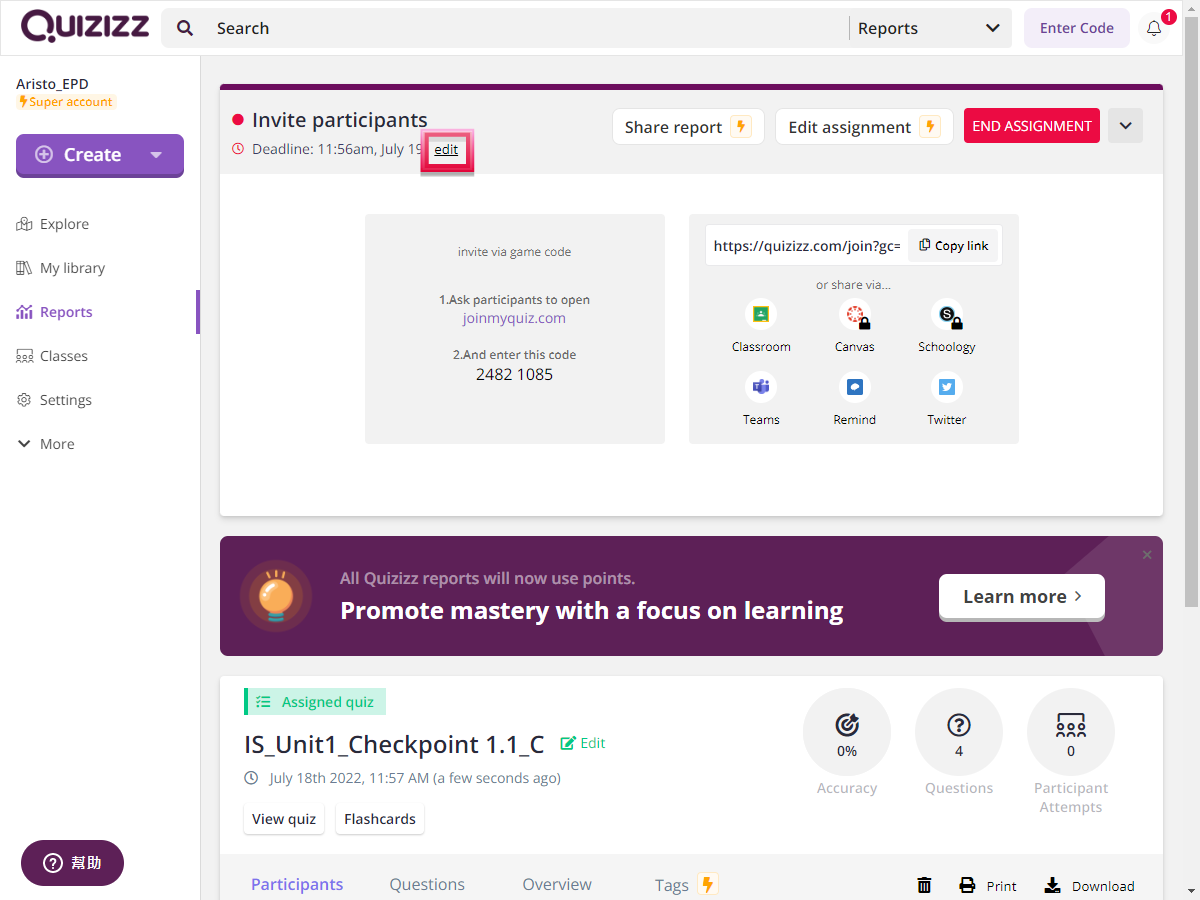
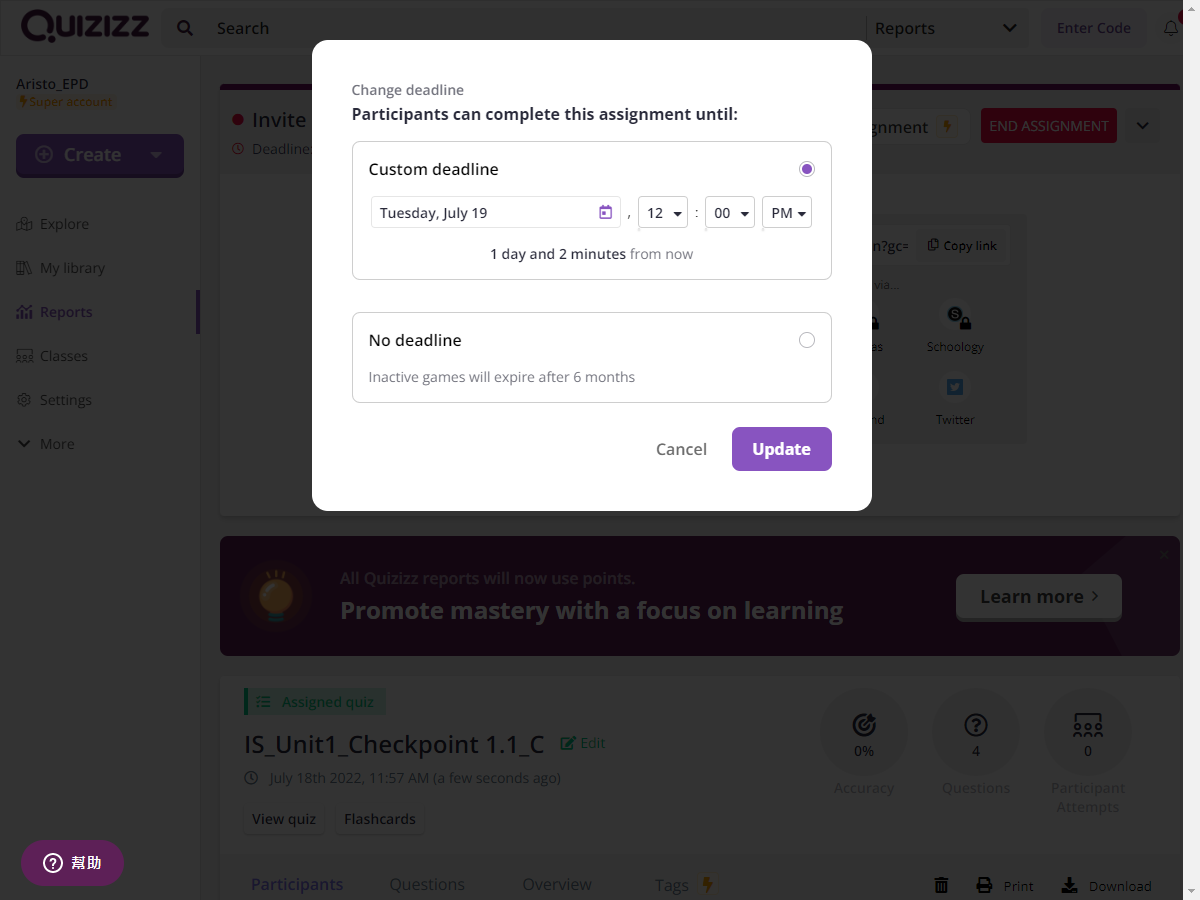
| 6 | 選擇發布到所需的課程 (Class),並輸入截止日期等資料; Select the required class(es) to release, then enter the due date and other information; |
| 7 | 點按「出作業 (Assign)」,或選擇「安排時間 (Schedule)」設定發放日期。 Click ‘Assign(出作業)’ or select ‘Schedule(安排時間)’ to set a release date. |
查閱成績報告
Check the performance report


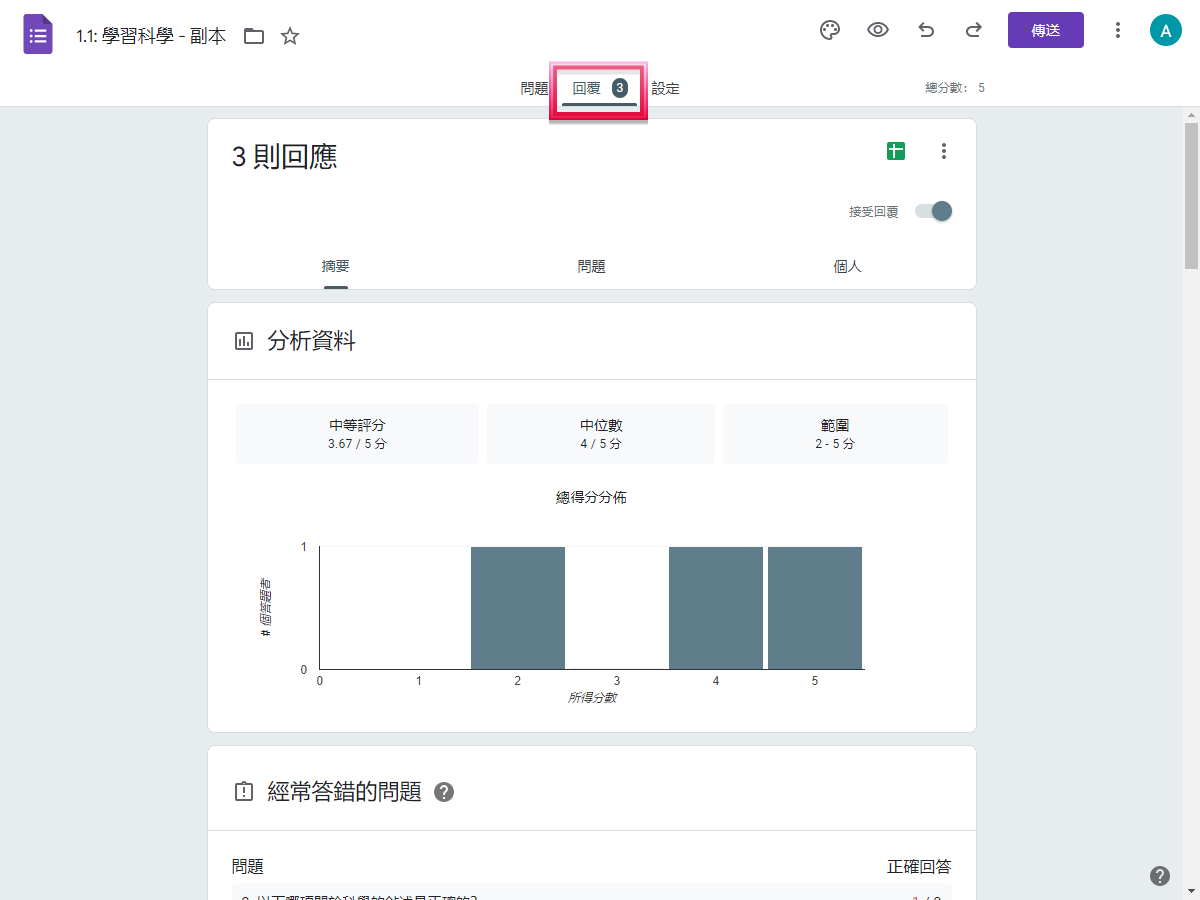
(暫只提供中文版本)
(Only the Chinese version is provided now.)


-
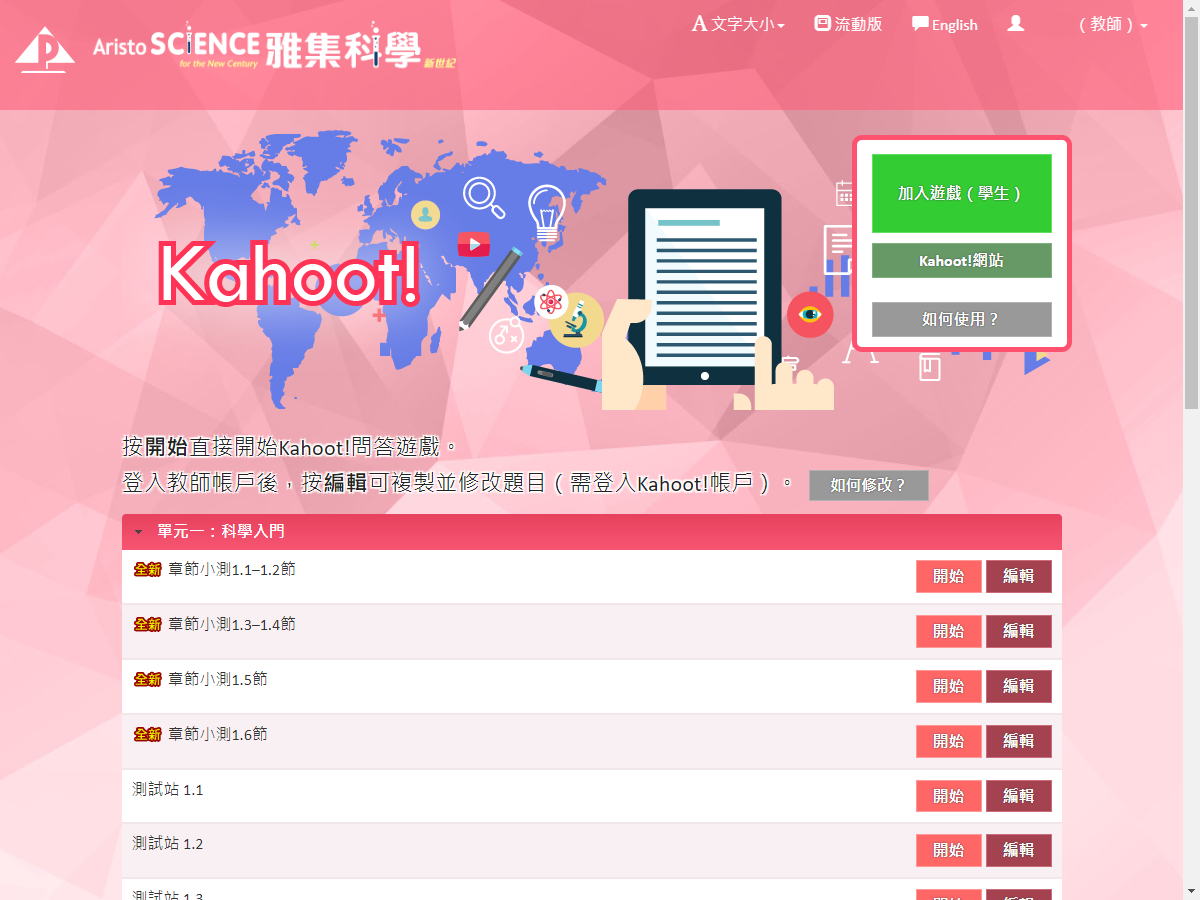
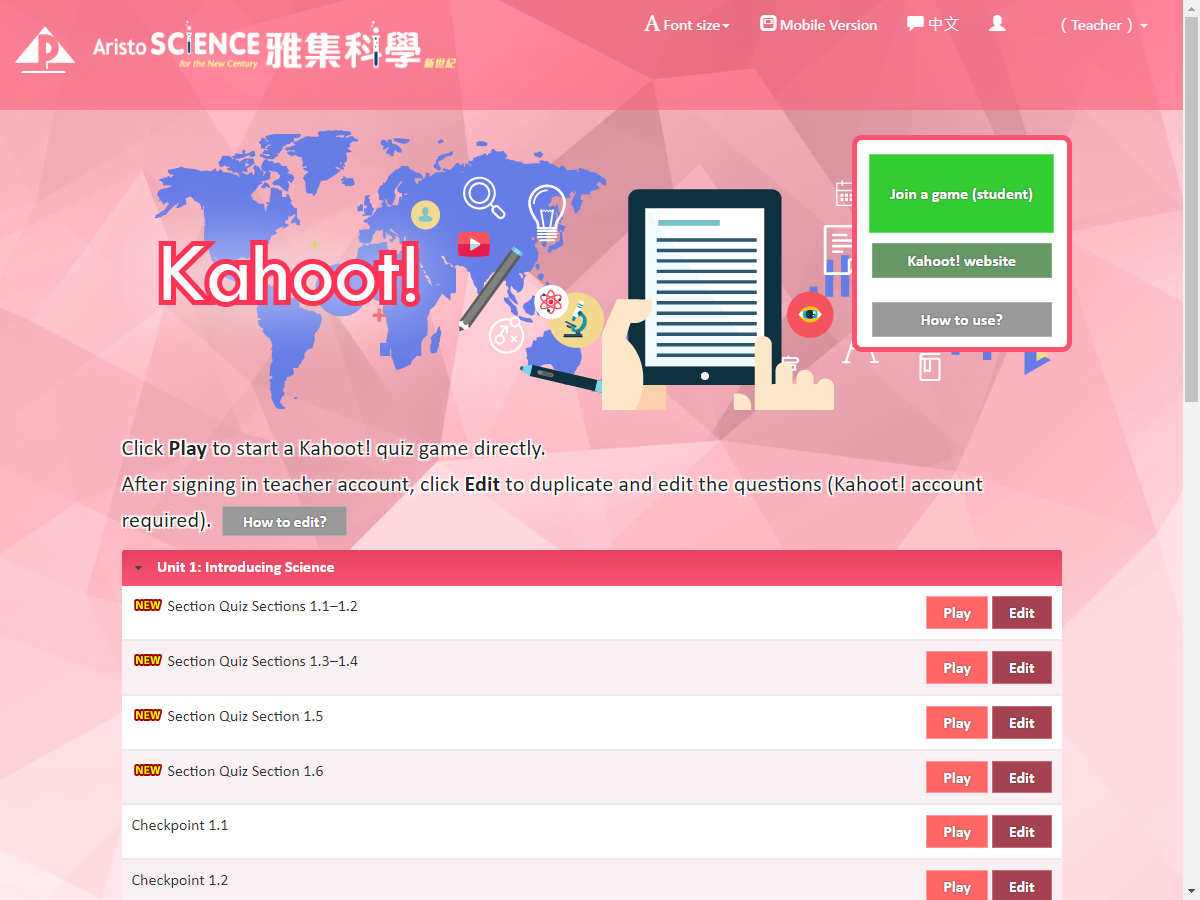
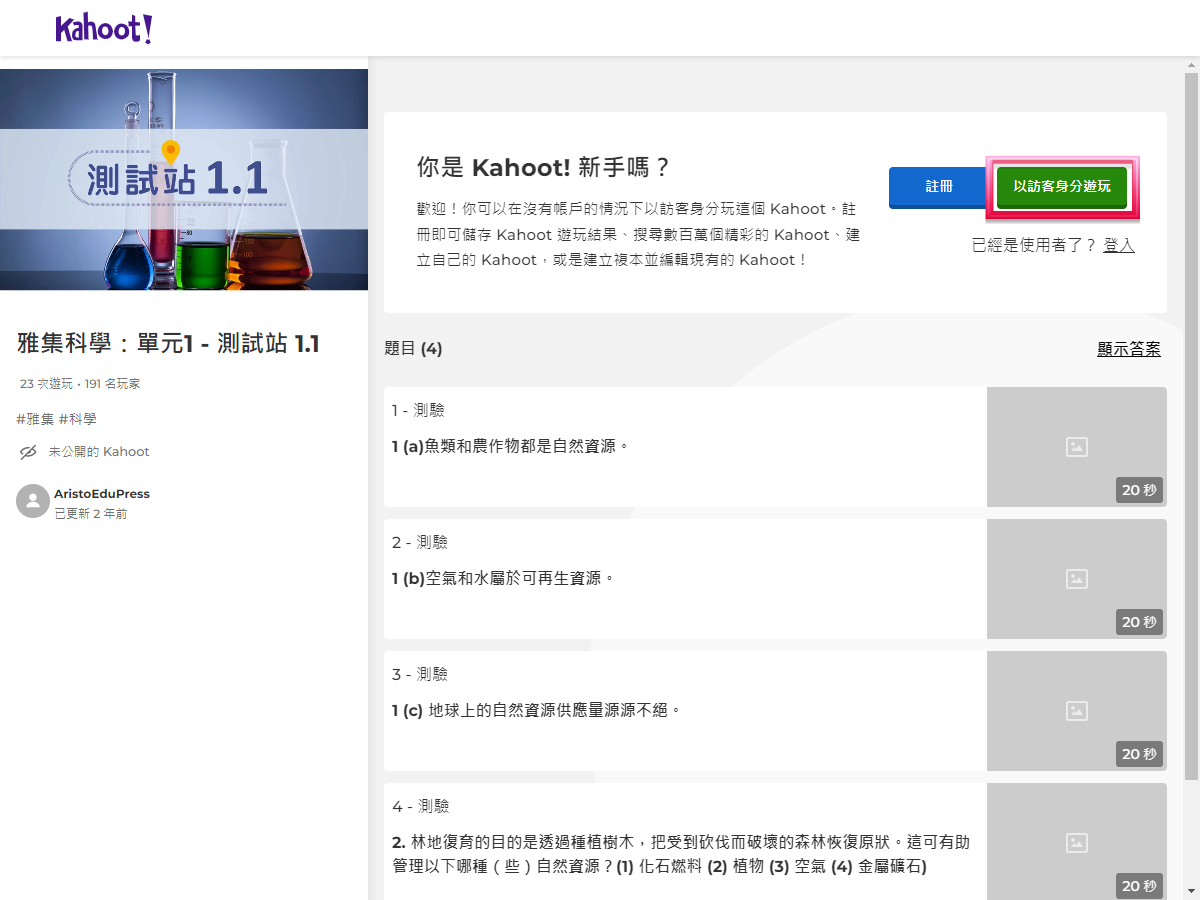
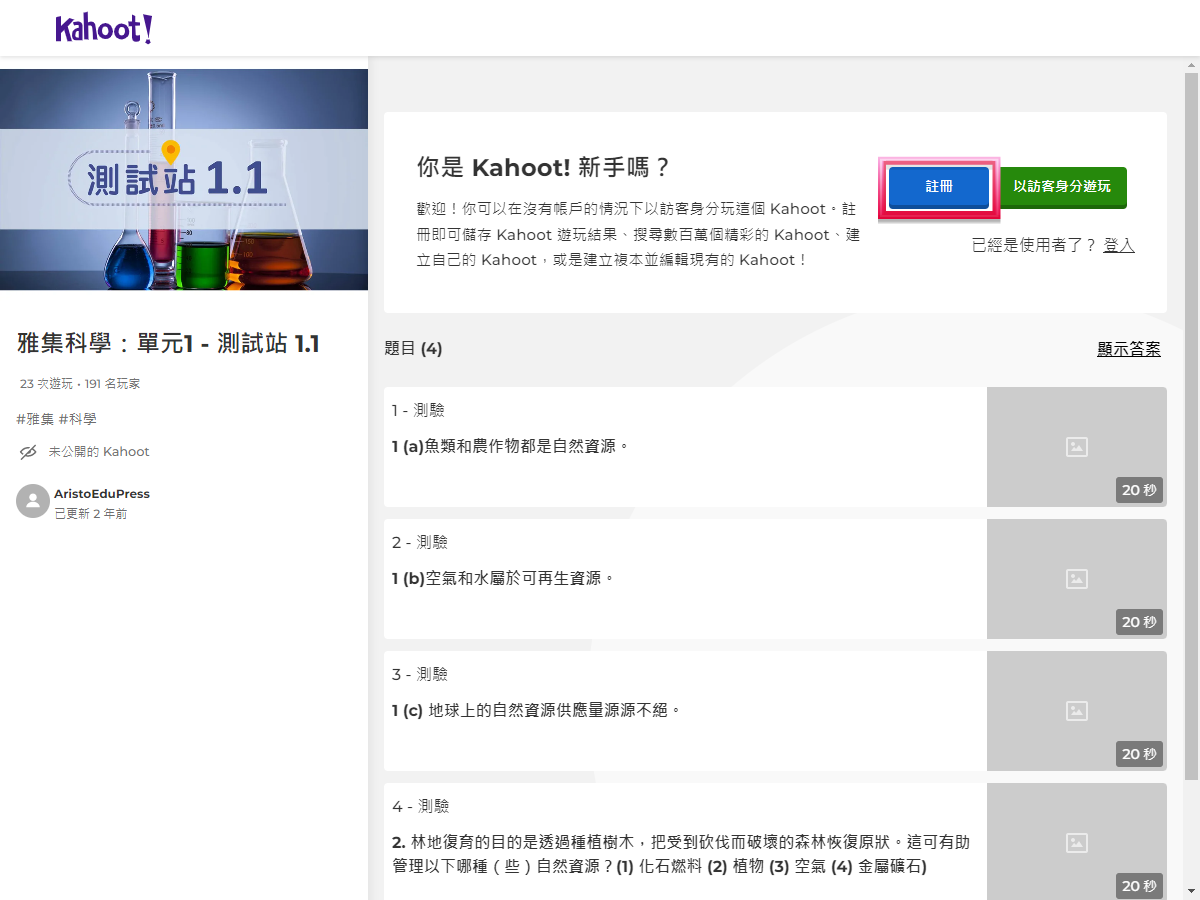
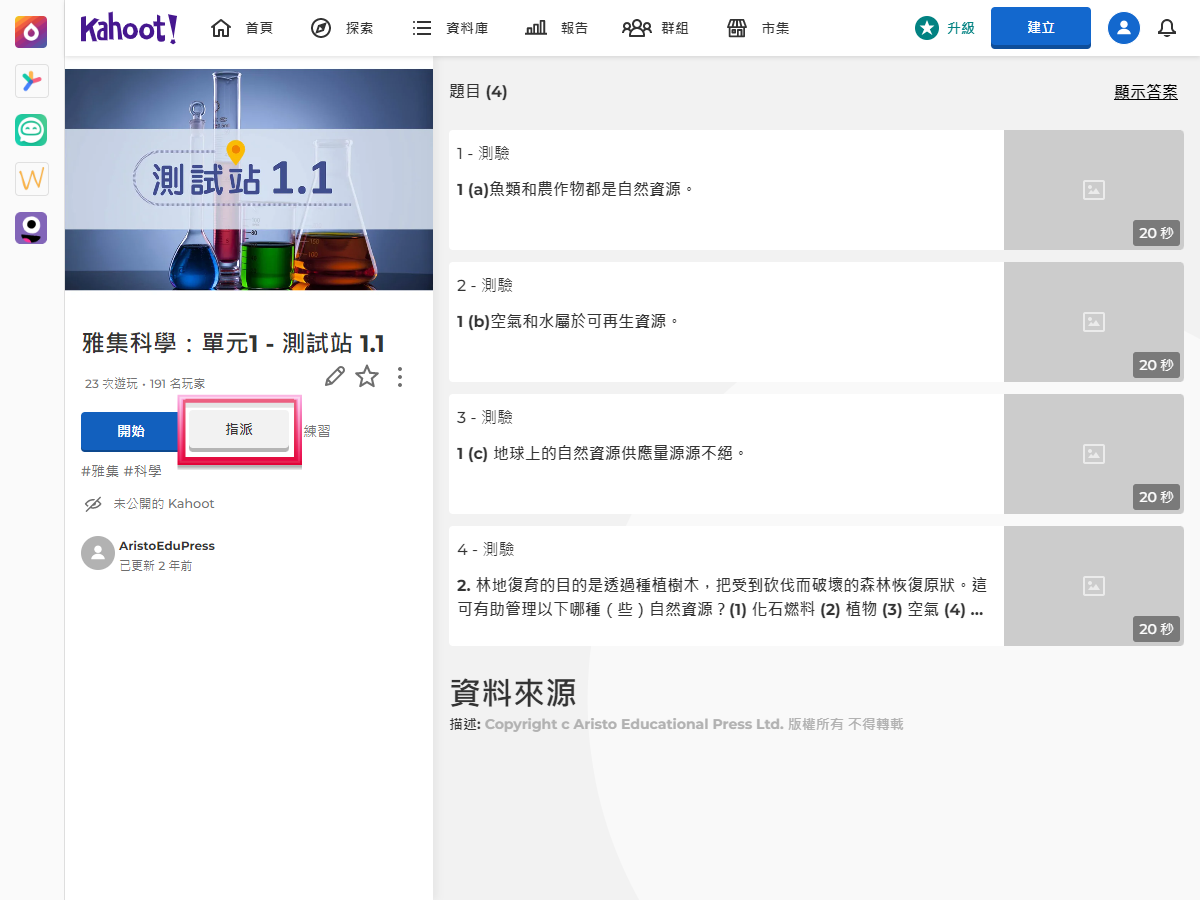
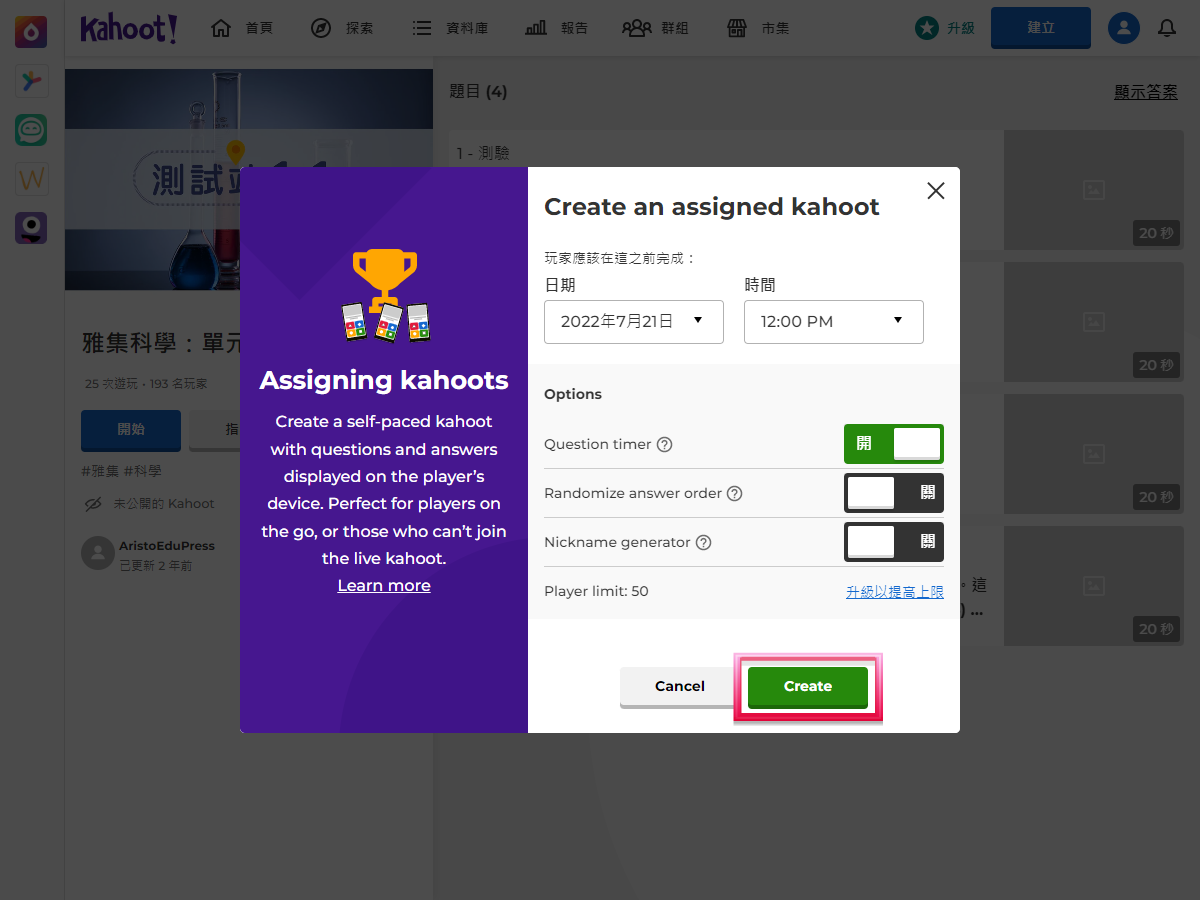
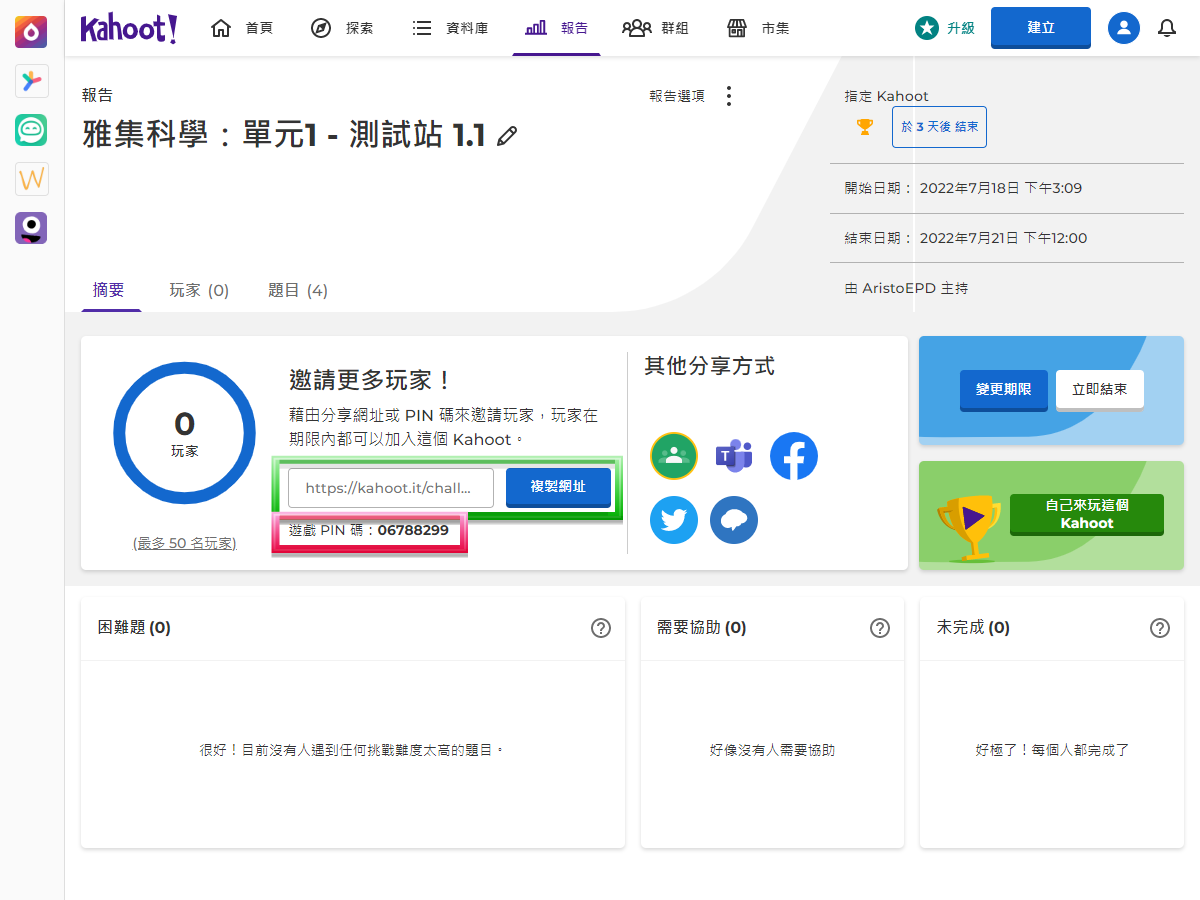
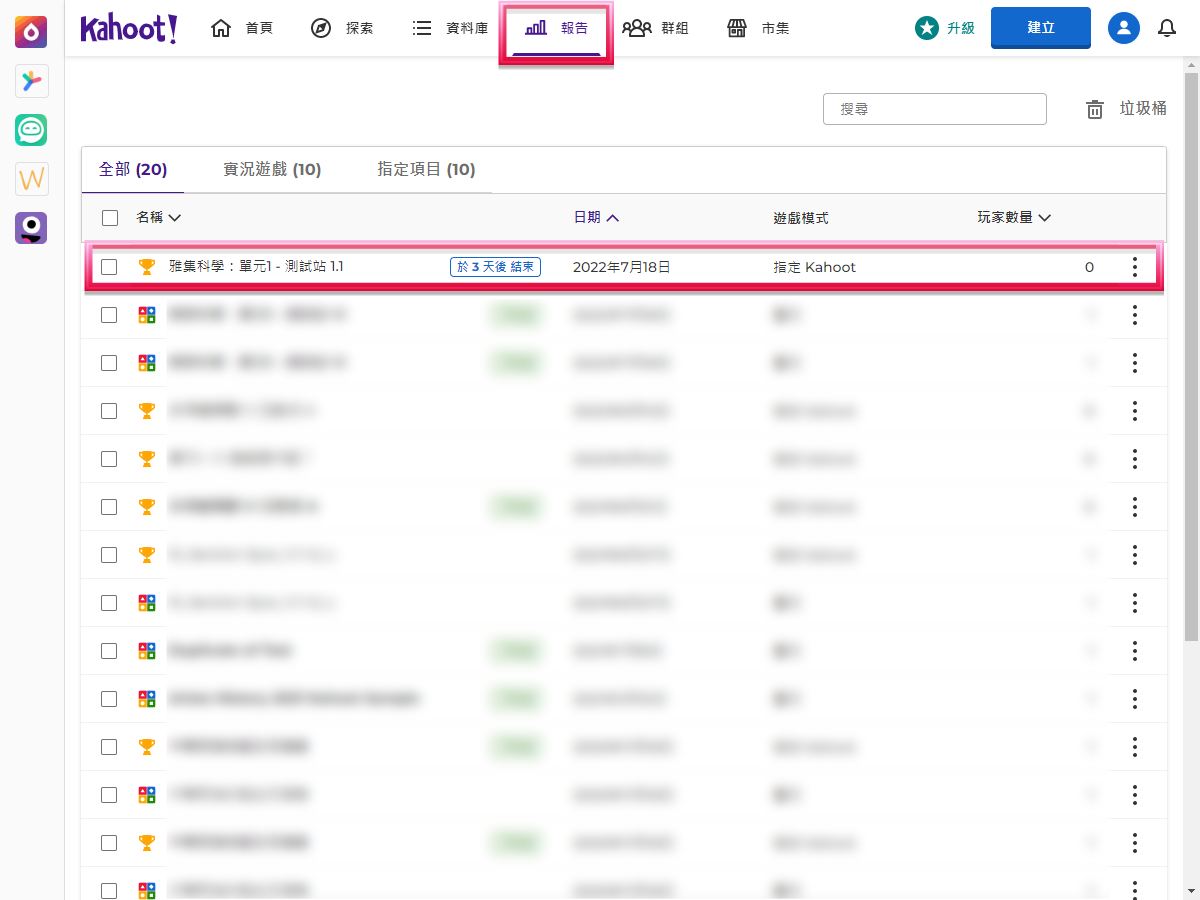
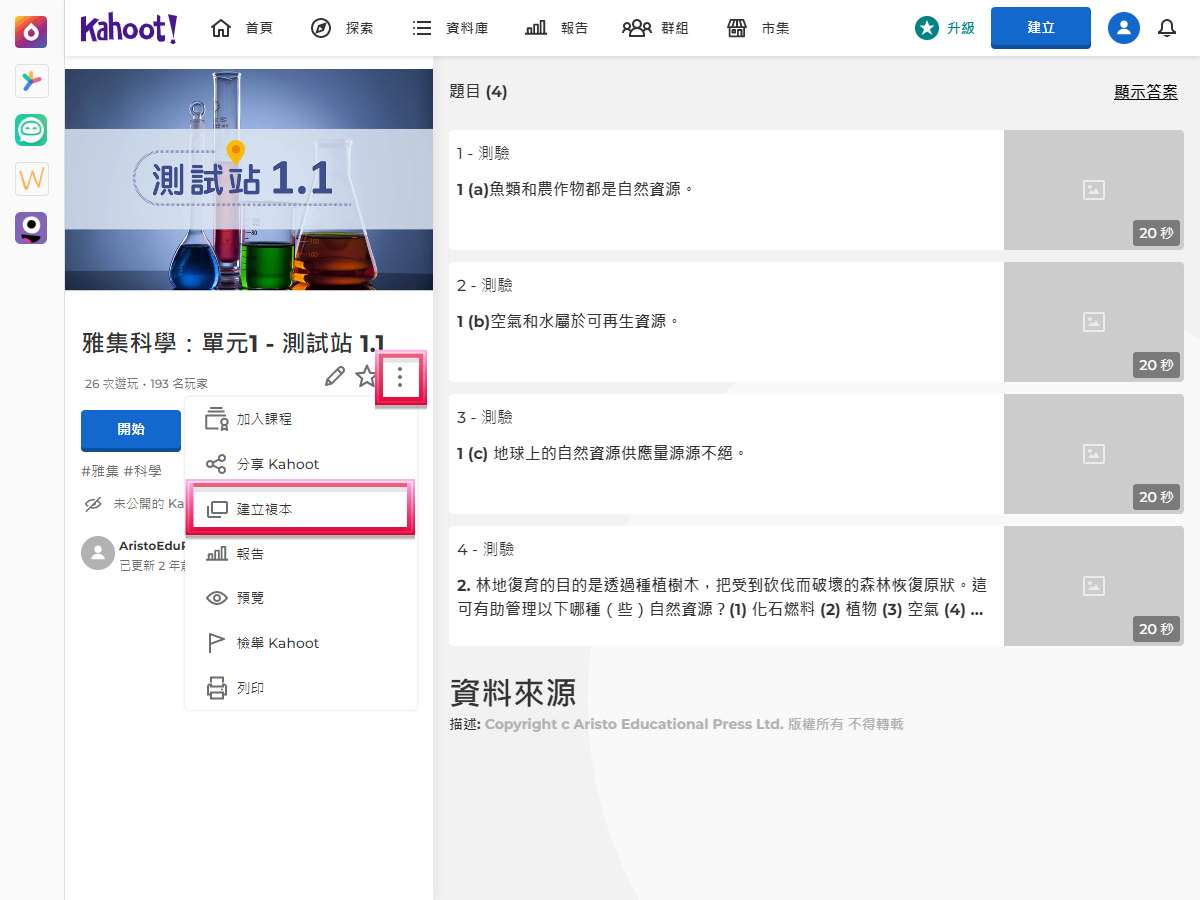
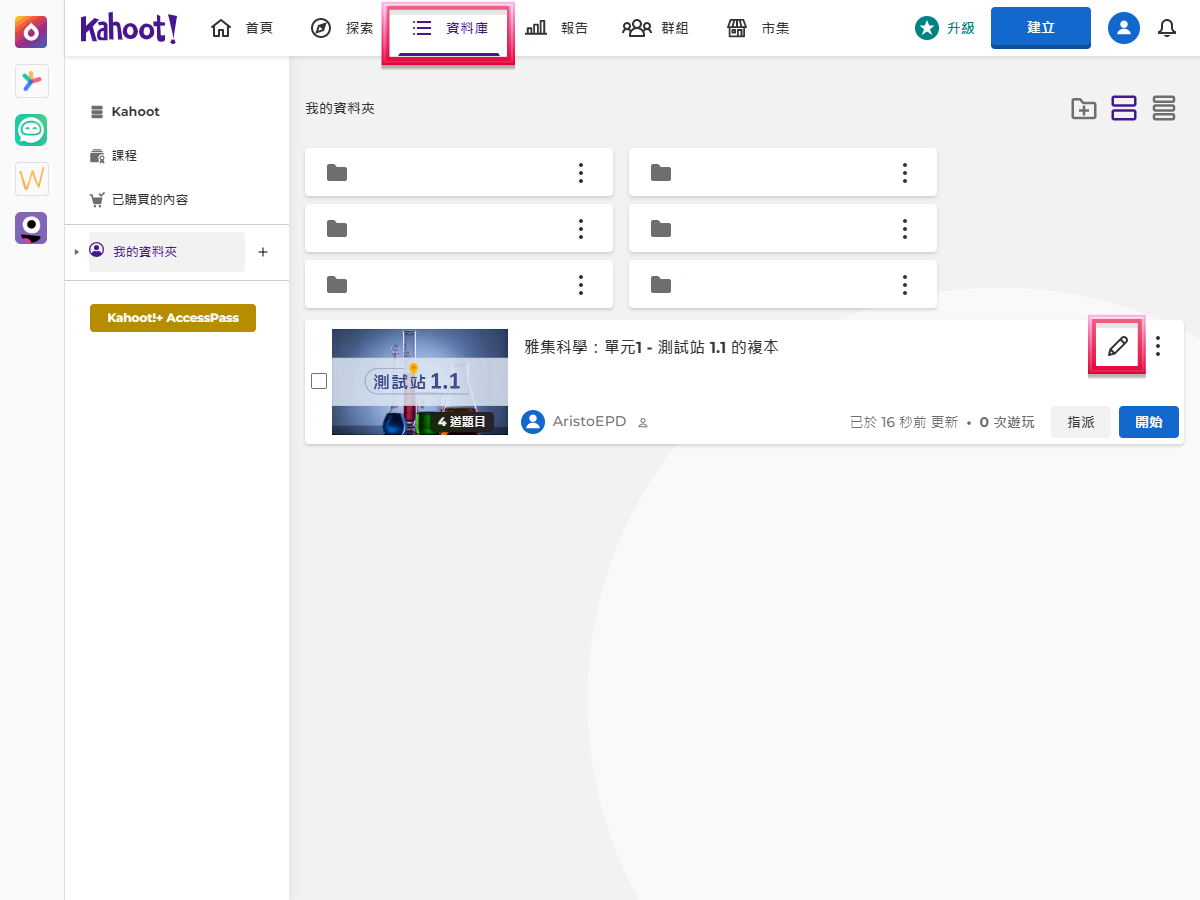
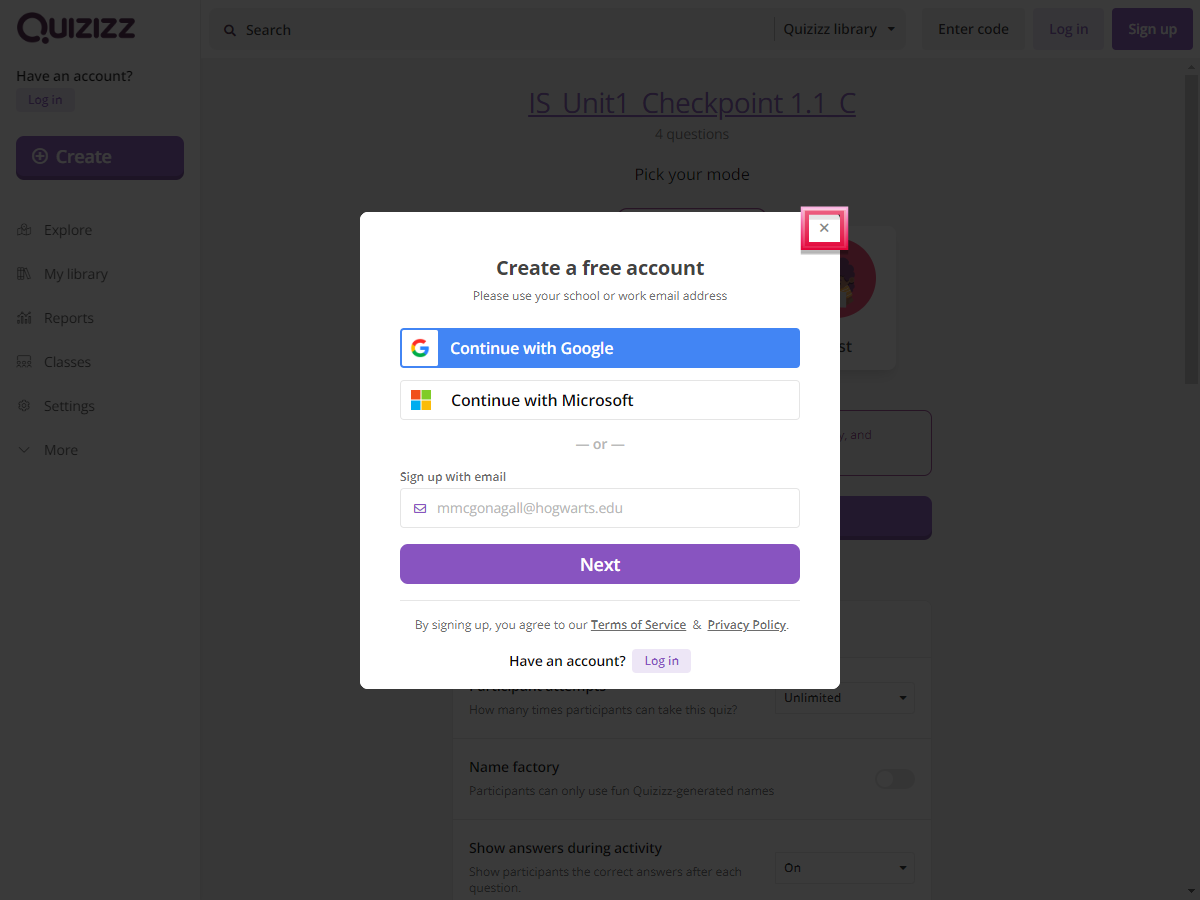
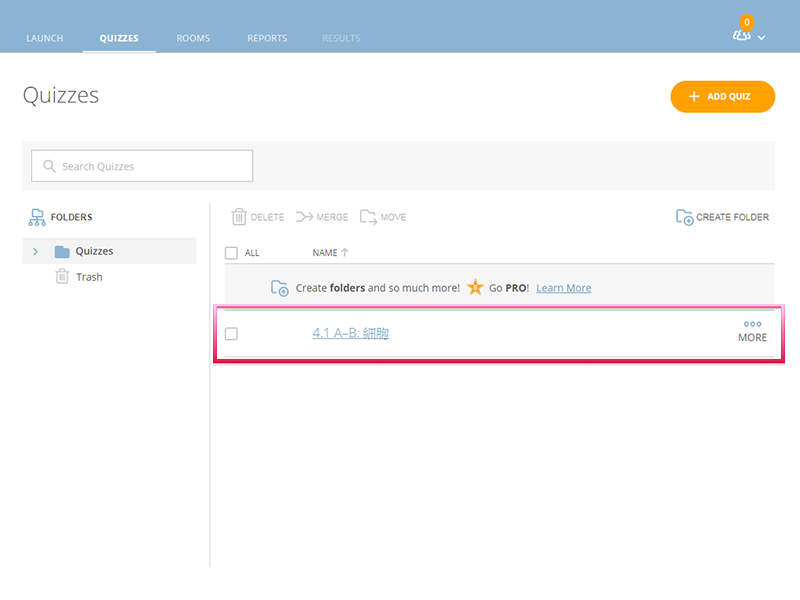
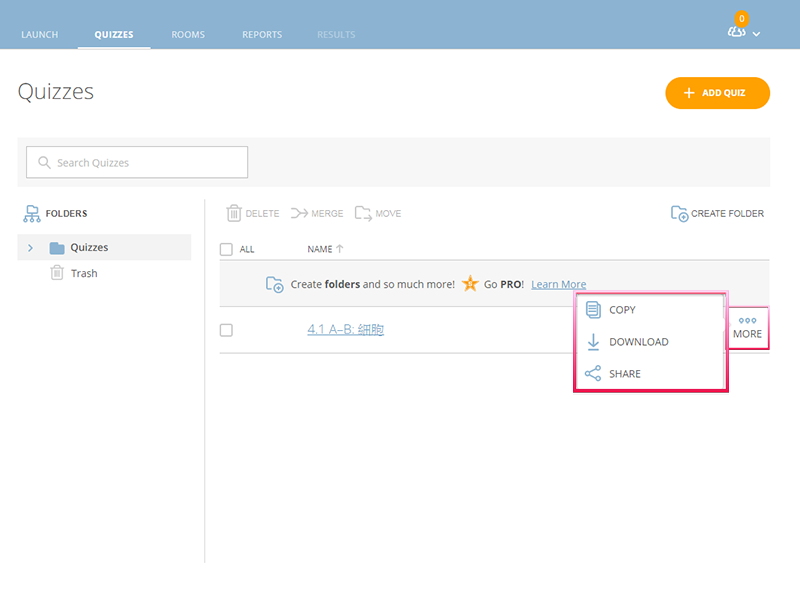
如要下載成績報告、使用「指派 (Assign)」模式、複製或修改本社的 Kahoot! 練習,教師必須使用自己的帳戶登入 Kahoot!。 Logging in with a Kahoot! account is needed for teachers to download reports, use ‘Assign’ mode, copy or modify our Kahoot! quizzes.
 如未有帳戶,可按此登記。(可使用 Google 或 Microsoft 帳戶申請) Click here to register (Sign-up with a Google or Microsoft account is available).
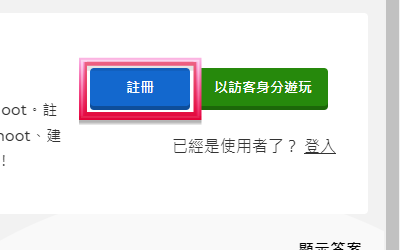

-
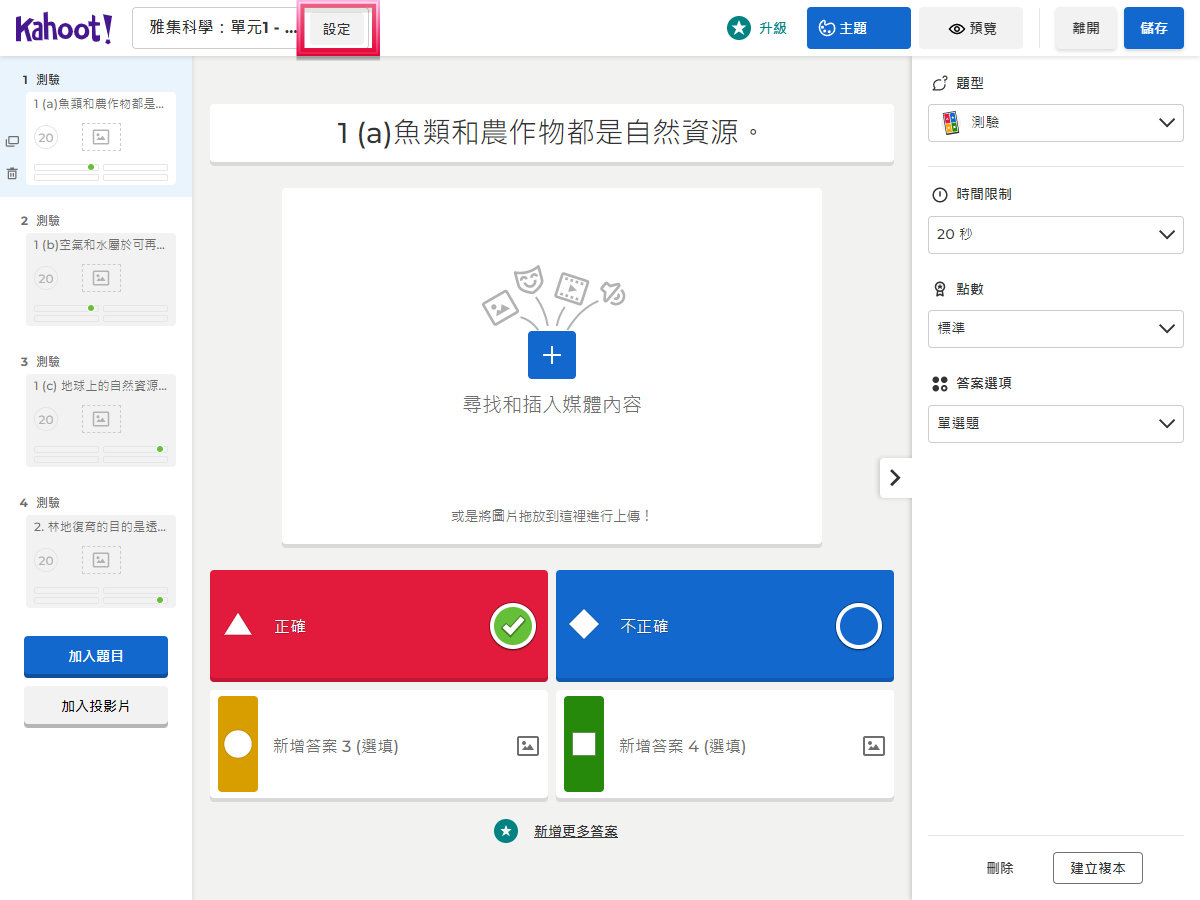
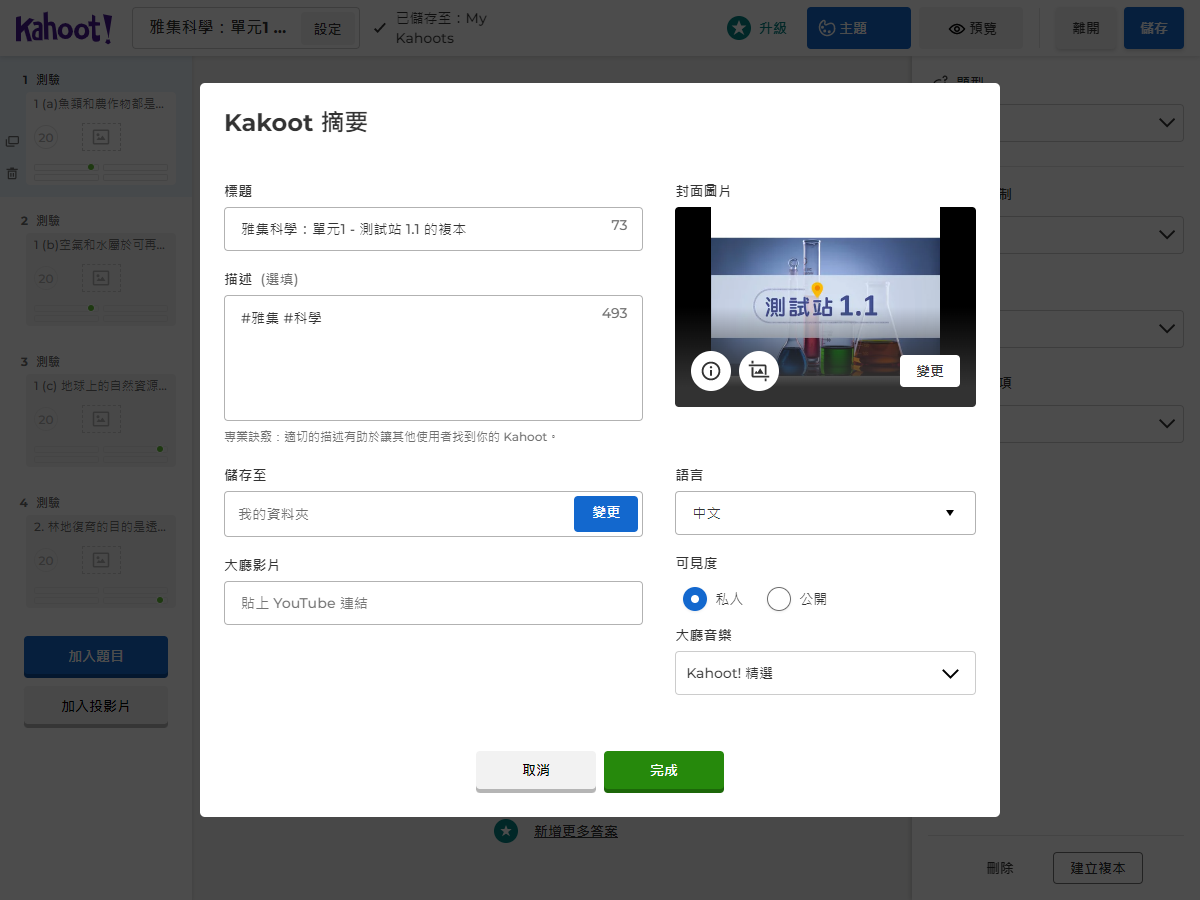
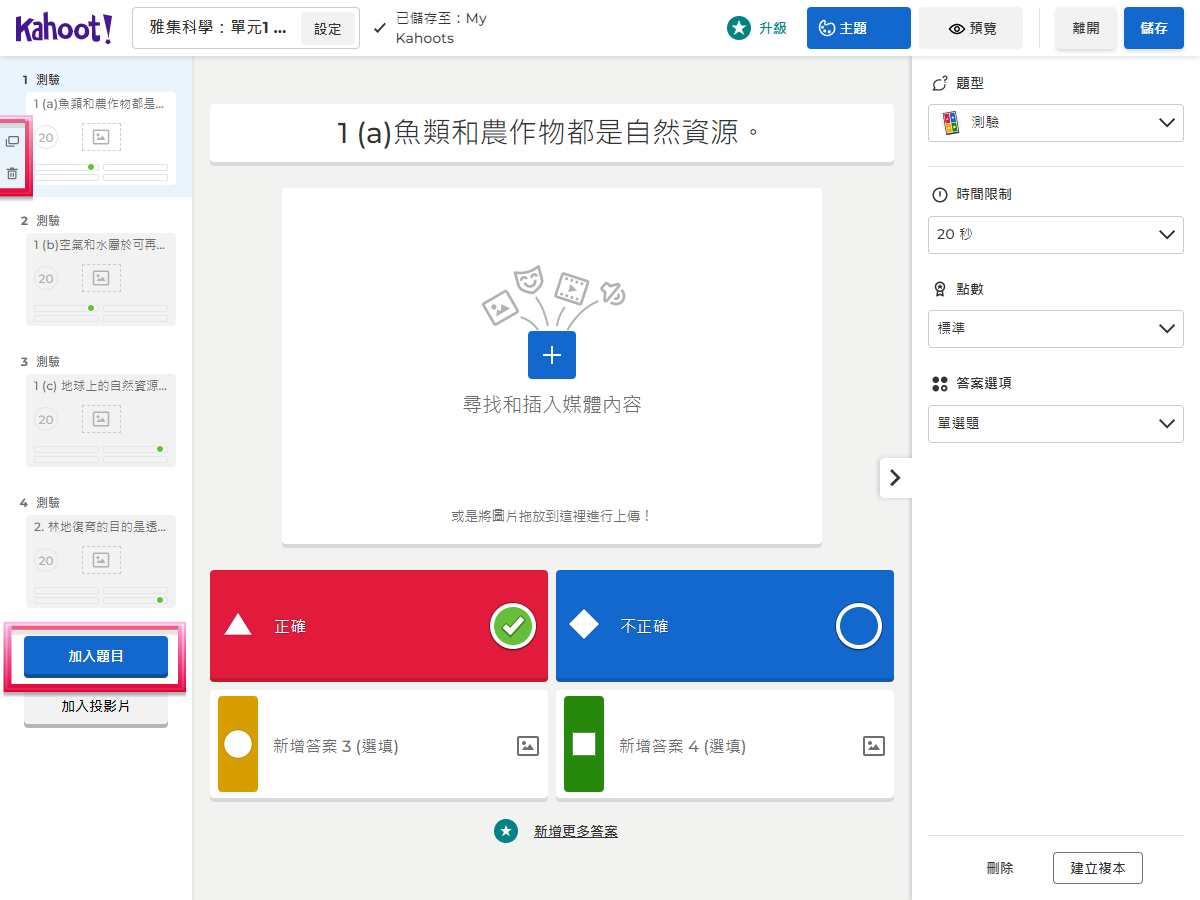
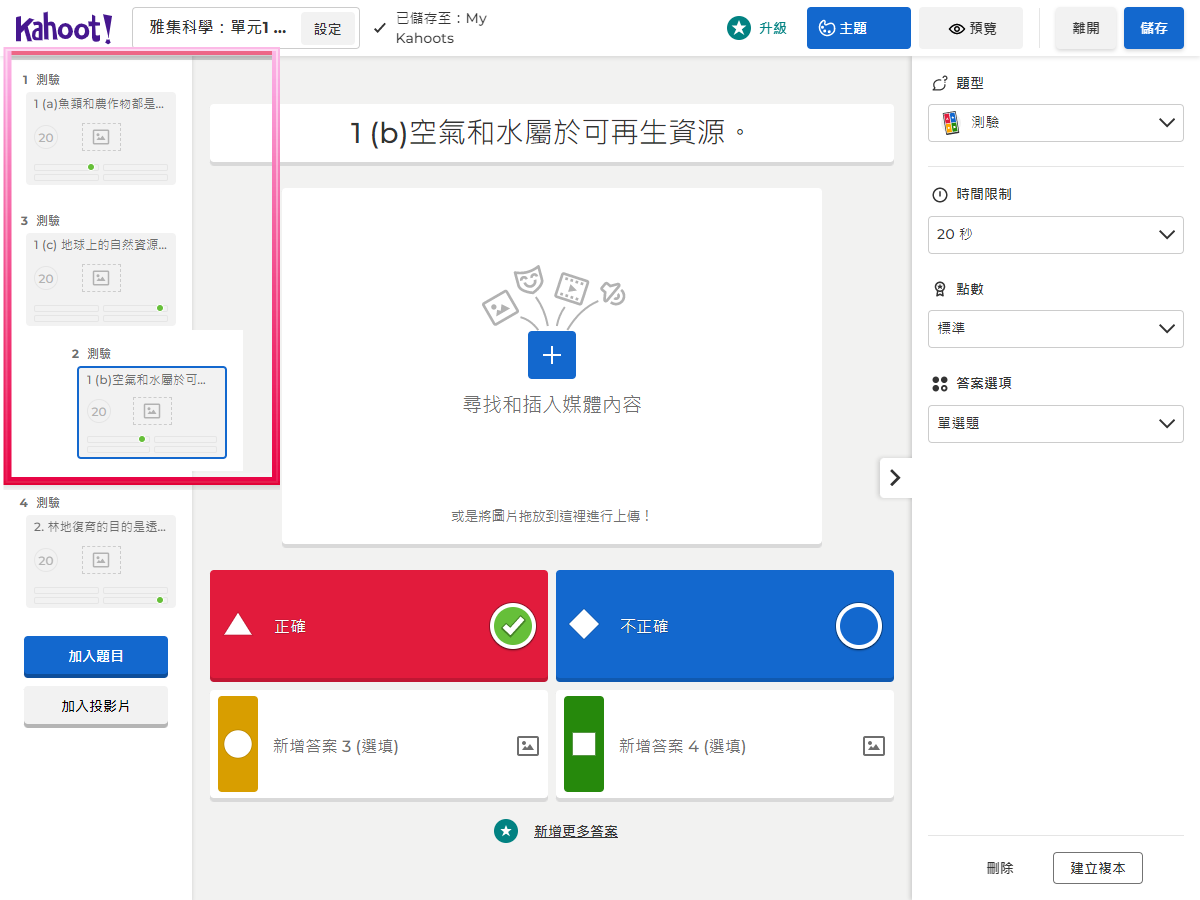
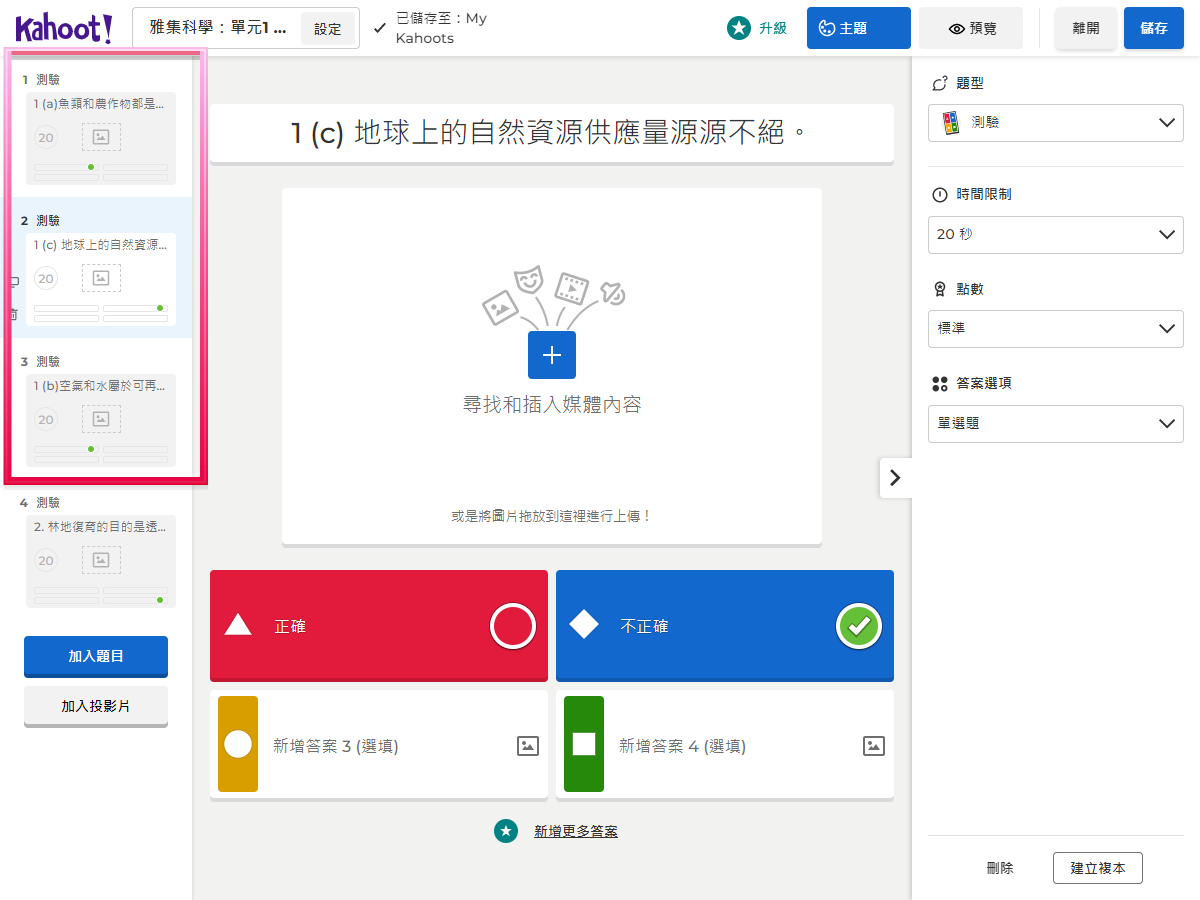
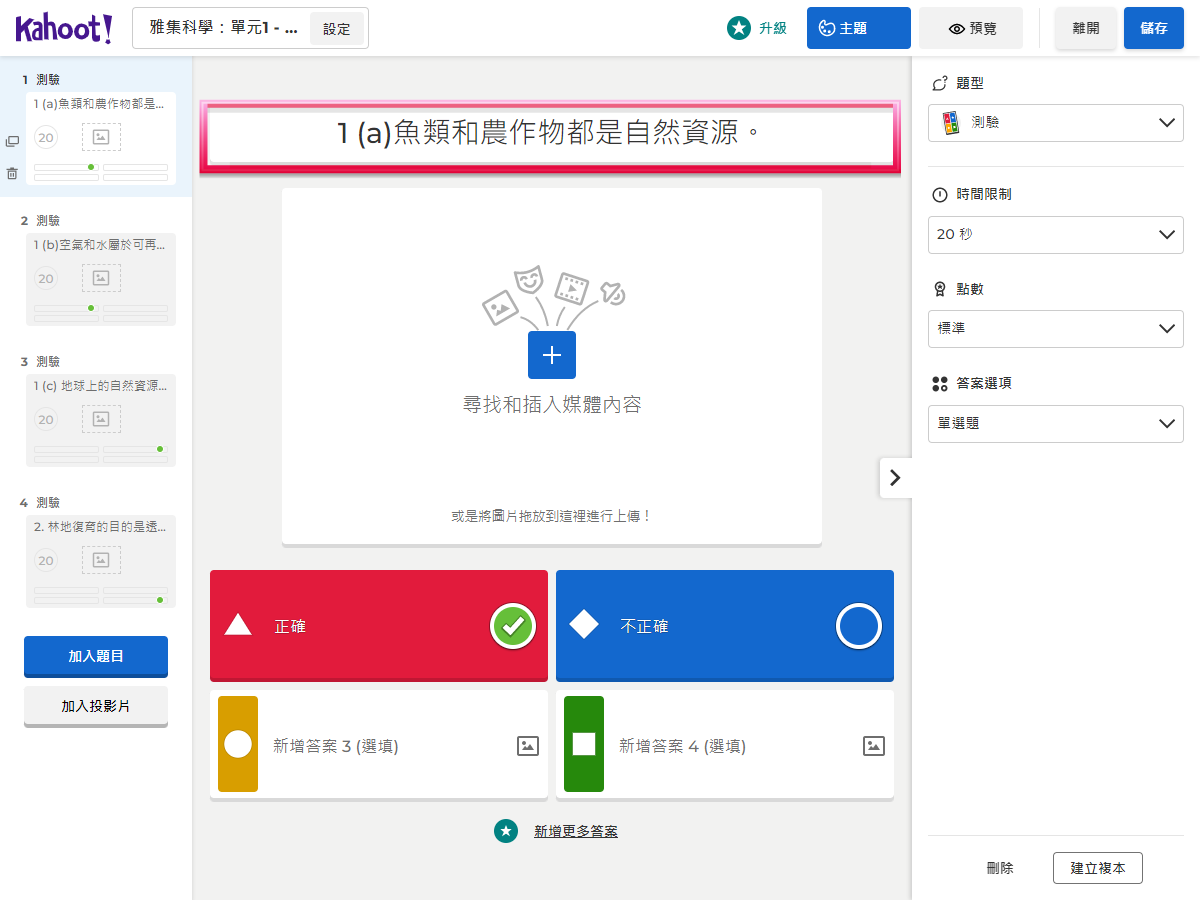
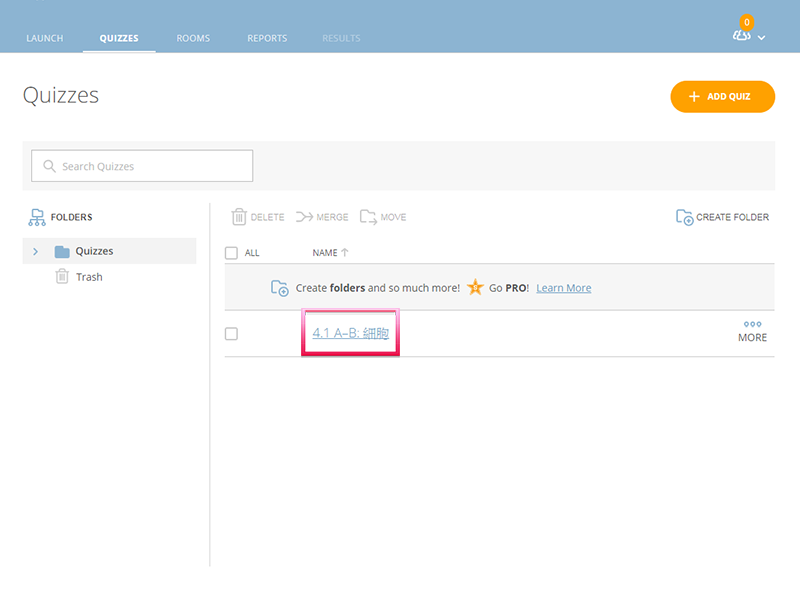
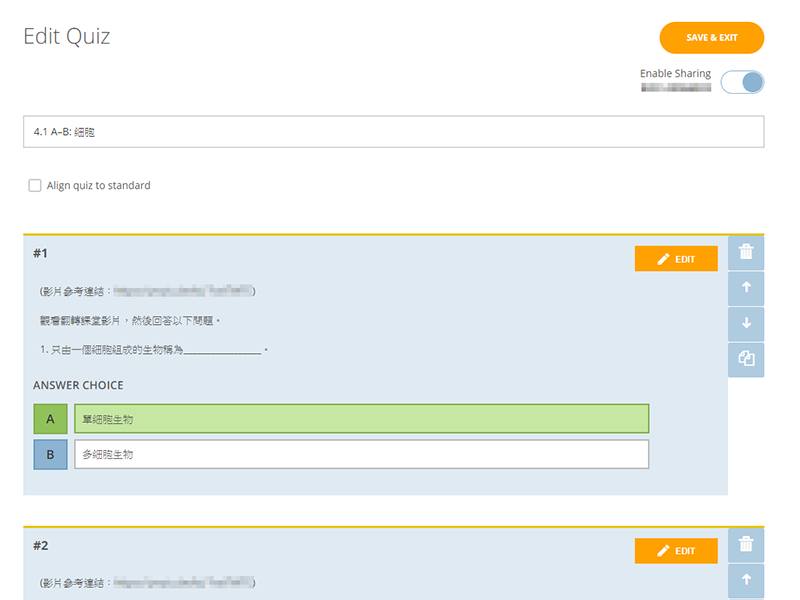
有關修改題目的詳細步驟,請按此。 Click here to know how to edit questions.


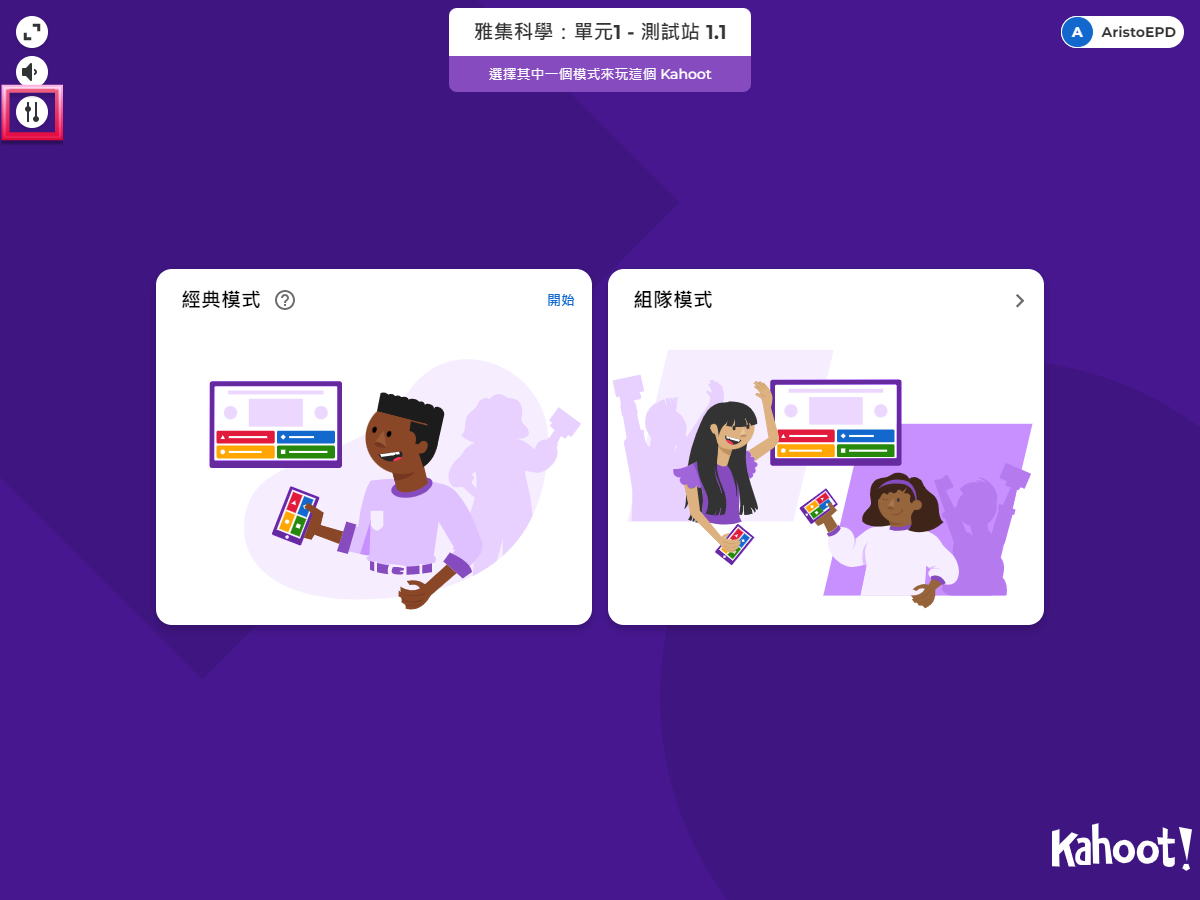
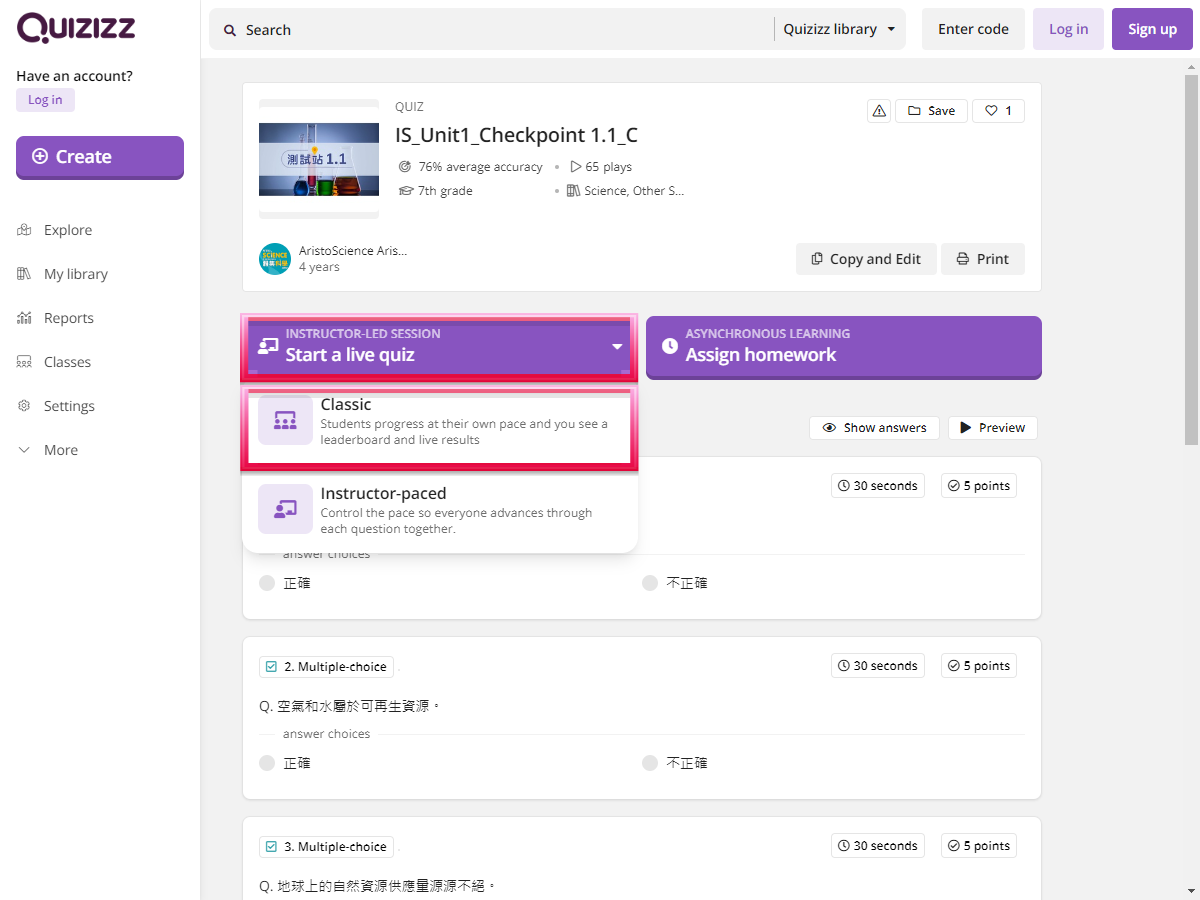
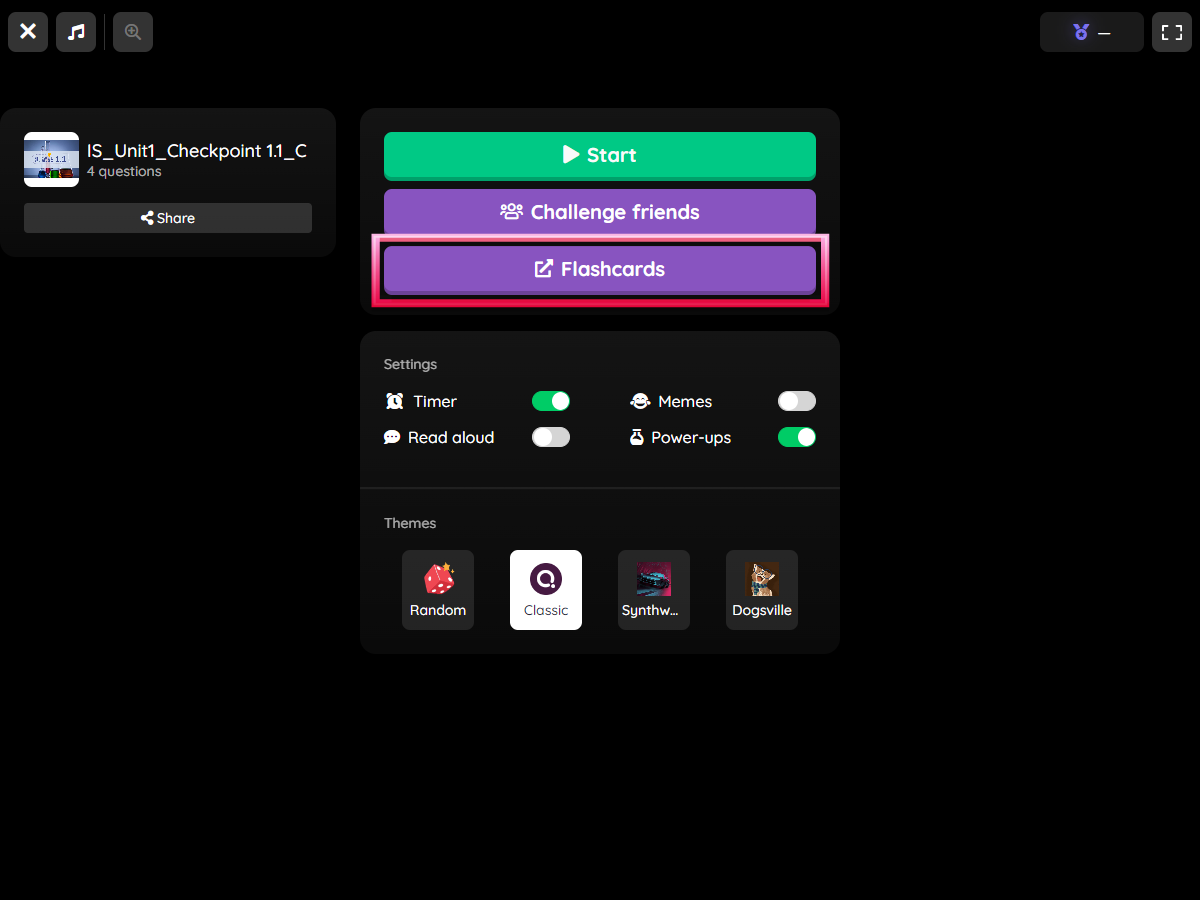
Kahoot! 提供兩種不同的遊戲模式︰如學生使用「一人一機」可選擇經典模式 (Classic mode),如學生多人一機可選擇組隊模式 (Team mode)(此指南中使用經典模式)。 Teachers can change the game options before starting the quiz game. There are two game modes provided in Kahoot!:
Classic - if every student has an own device;
Team - if students are sharing a device.
(‘Classic’ mode is used in this user guide for demonstration.)


學校需要準備甚麼設備以進行 Kahoot! 練習?
What devices are needed to start and play a Kahoot! quiz game?
| 教師Teacher | 學生Student | |
|---|---|---|
| 設備 Device | 桌上電腦、平板電腦或智能電話 Desktop computer, tablet or smartphone | |
| 帳戶 Account | 不須申請 Kahoot! 帳戶 (No need to register a Kahoot! account) | |
- 如教師需要下載成績報告、使用「指派模式」、複製或修改本社的 Kahoot! 練習,必須先以 Kahoot! 帳戶登入,可按此申請並選擇連結至 Google 或 Microsoft 現有帳戶。
- 須連結至互聯網。
- 教師及學生可直接透過 Kahoot! 網站使用,不需安裝 Kahoot! 的流動程式。
- Logging in with a Kahoot! account is needed for teachers to download reports, use ‘Assign’ mode, copy or modify our Kahoot! quizzes. Click here to register (Sign-up with a Google or Microsoft account is available).
- Internet connection is required.
- Teachers and students can open Kahoot! from the website directly. Installing the mobile app is optional.
我可更改雅集的 Kahoot! 練習嗎?
Can I edit the Kahoot! quiz made by Aristo?
除了即時發放 Kahoot! 練習外,我可以用「功課」形式發放給學生在家完成練習嗎?
In addition to starting an instant Kahoot! quiz, can I send the quiz as a ‘homework’ to let students complete at home?
如要使用 Kahoot!,有甚麼網絡設備及頻寬上的要求?
What are the requirements of bandwidth and network settings if I want to use Kahoot!?
在一些情況,為何我不能修改雅集製作的練習?
In some cases, why I cannot edit the quiz made by Aristo?


(暫只提供中文版本)
(Only the Chinese version is provided now.)


- 教師不用啟動練習
- 學生可不用登入 Quizizz 自行開始
- Teachers do not need to start the quiz
- Students can start by themselves without logging in to Quizizz
-
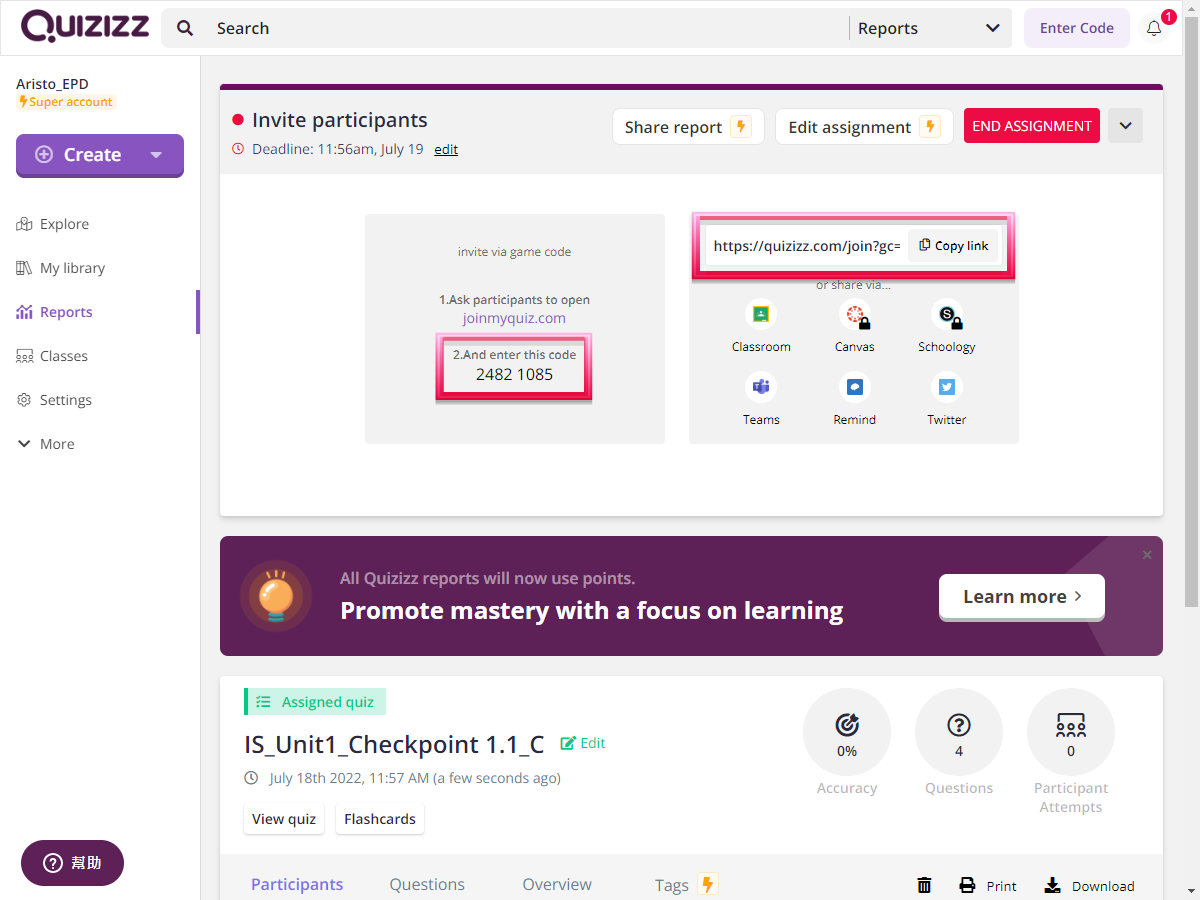
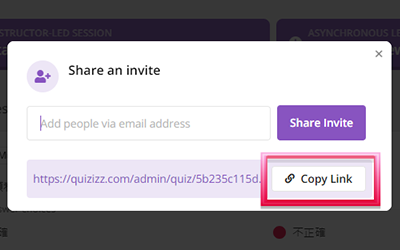
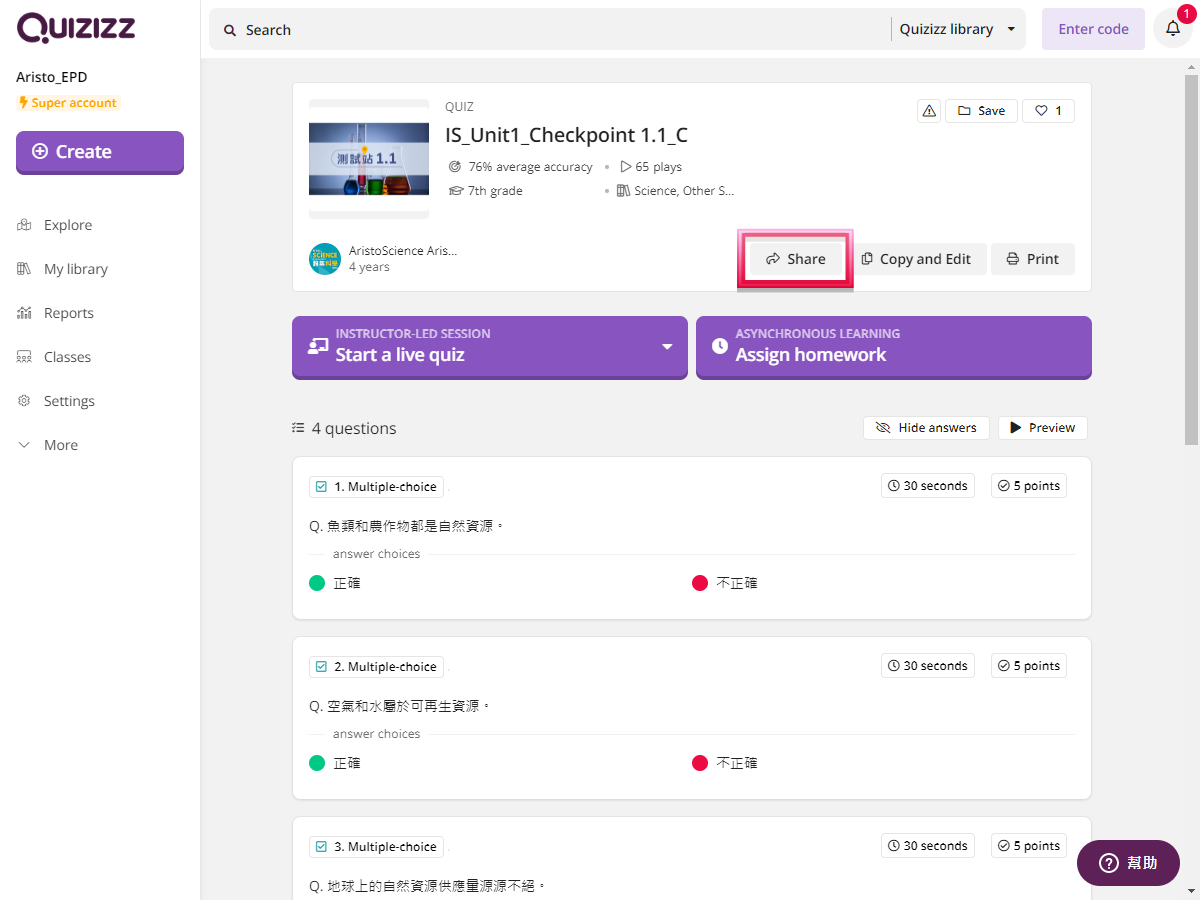
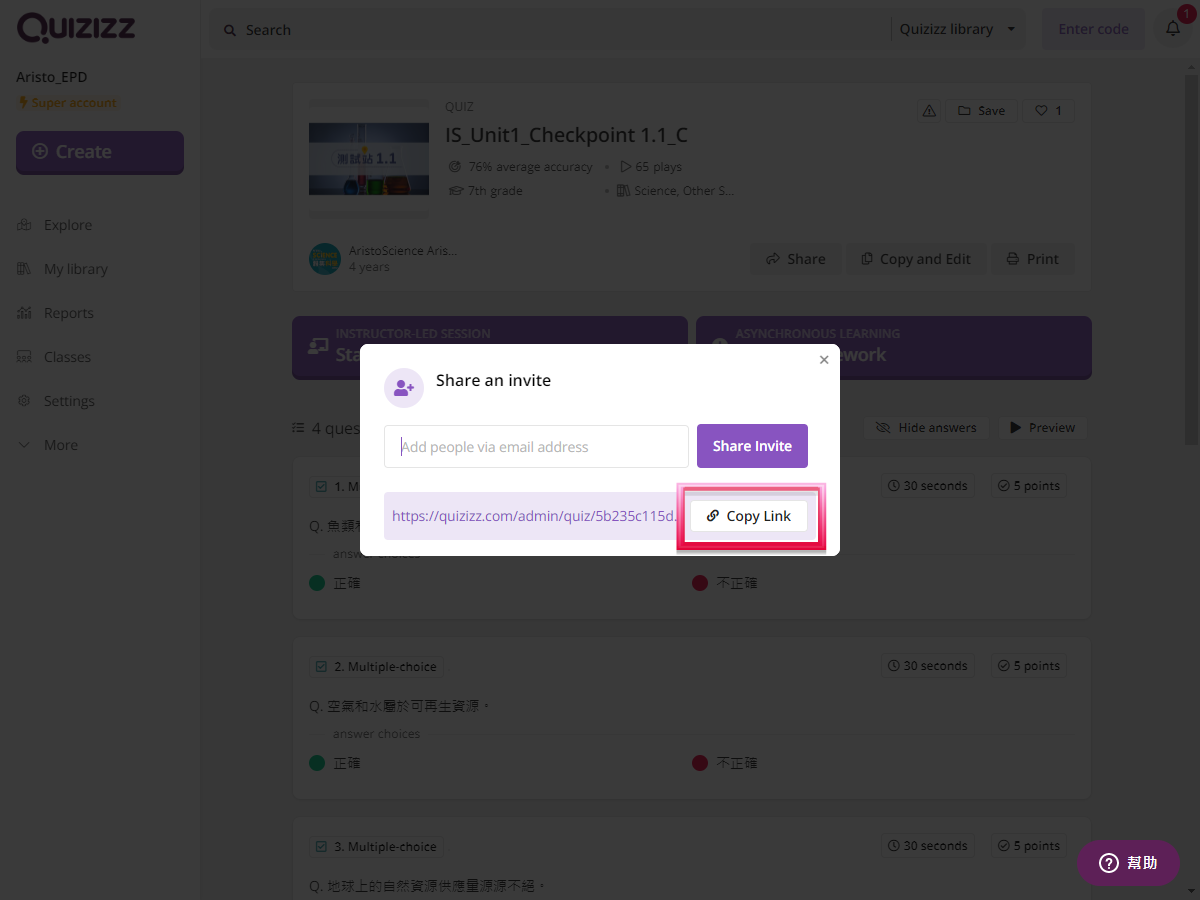
教師可直接複製網頁連結,或於登入後點撃「Share」按鈕,再點擊「Copy link」以複製這練習的網頁連結,並發放給學生作溫習題目之用(沒有完成期限及學生成績報告)。 Teachers (after logged in) can click the ‘Share’ button, then select ‘Copy URL’ to copy the URL to this quiz. Teachers can share this link with the students for their self-study (no deadline and student’s performance reports).


-
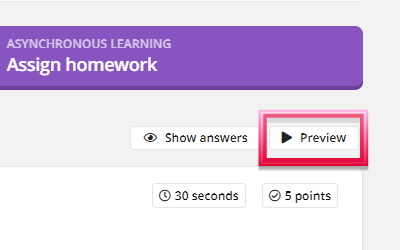
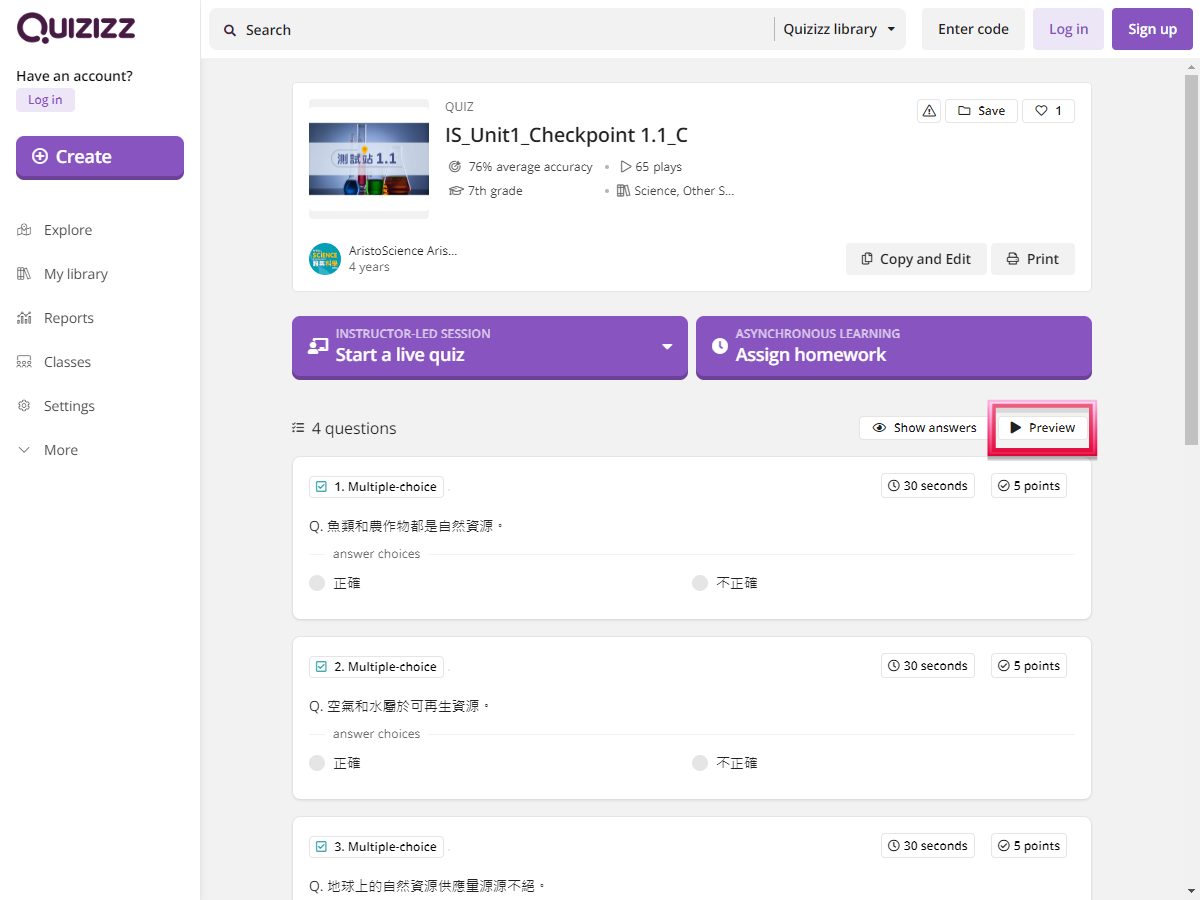
學生(不用登入)開啟練習頁面後可點撃「Preview」按鈕來自行溫習題目。 Students (login is not required) can click ‘Preview’ to study the questions at their own pace.


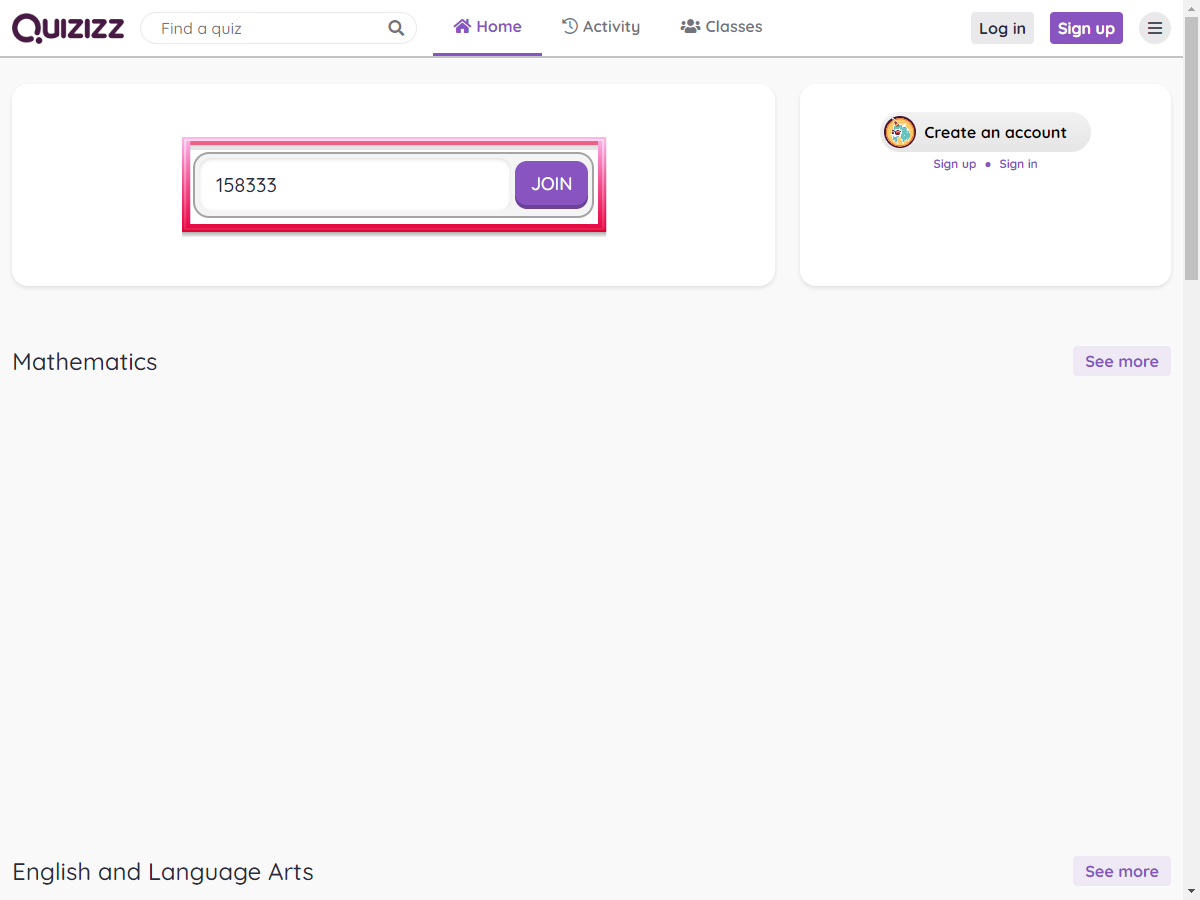
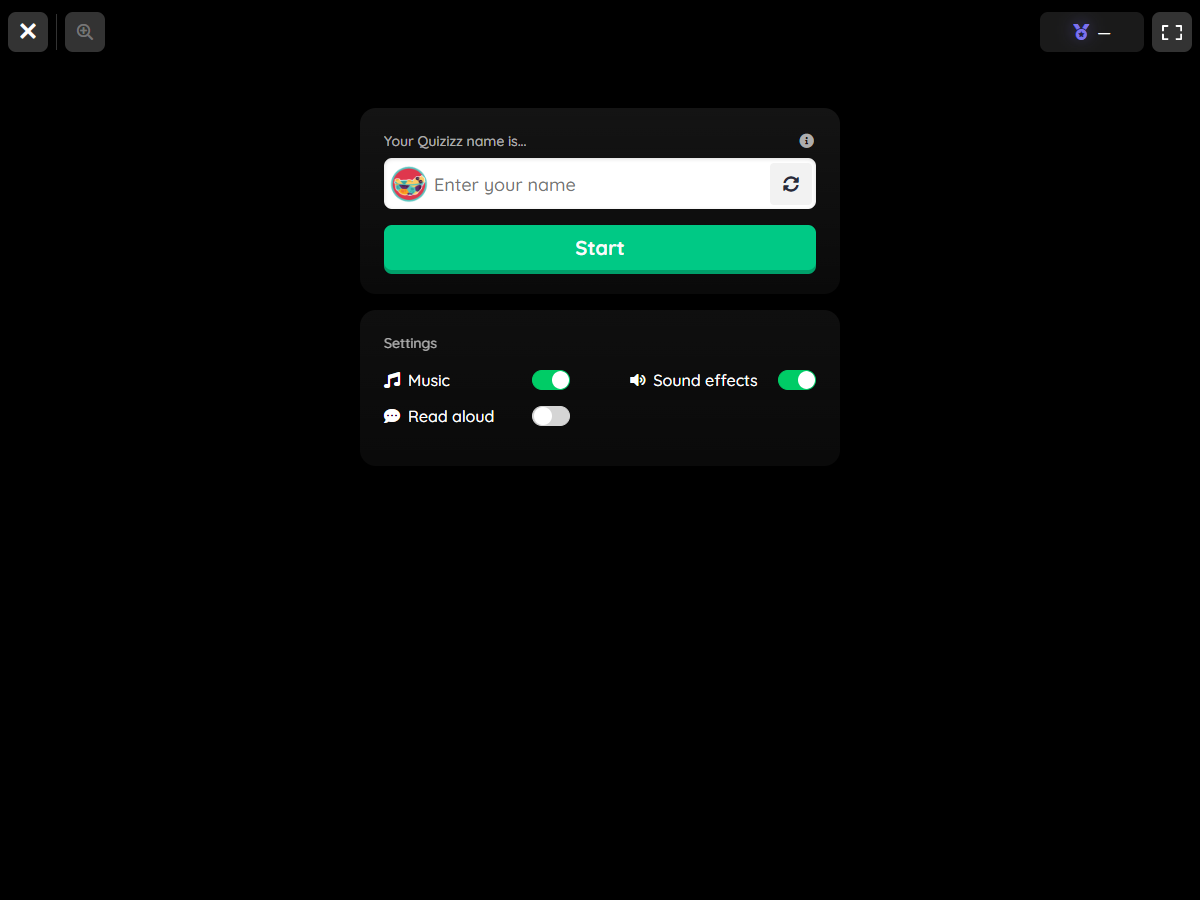
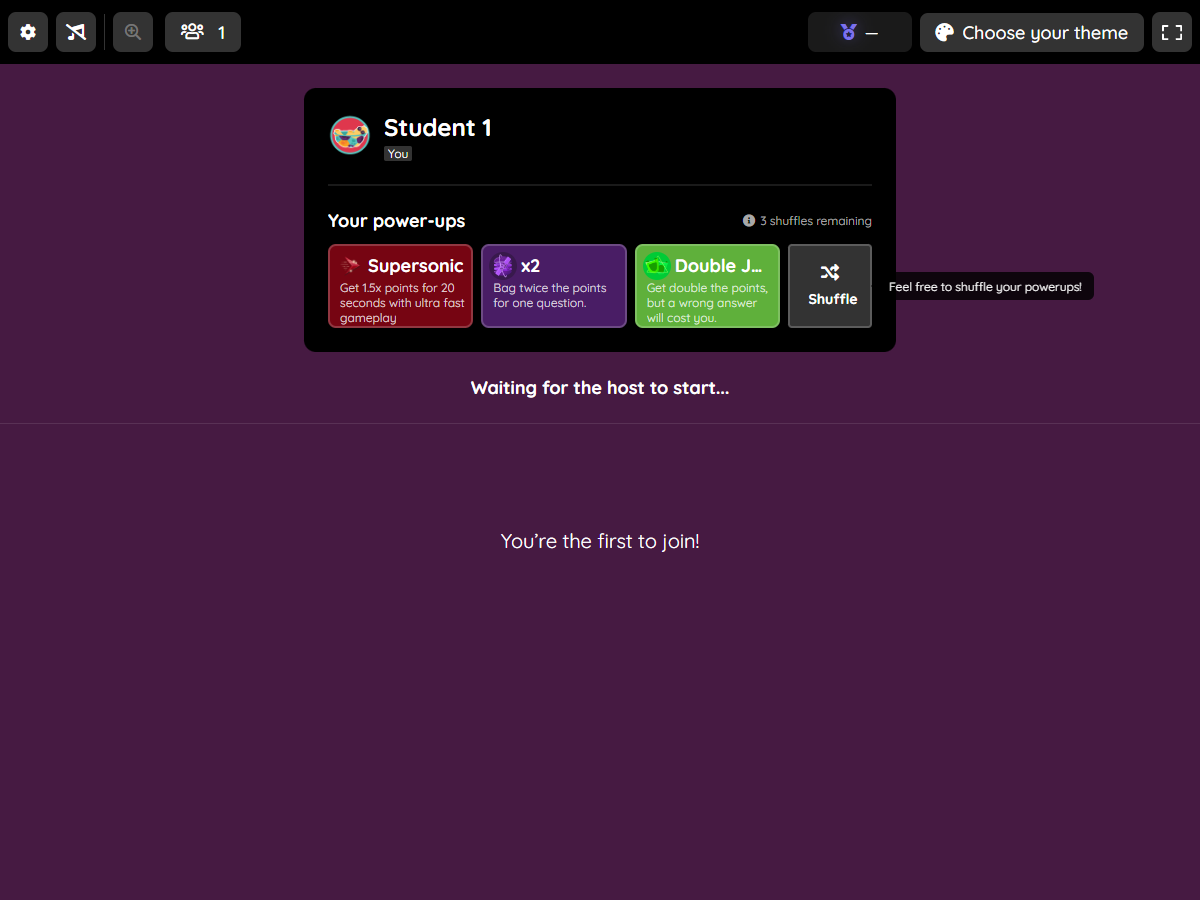
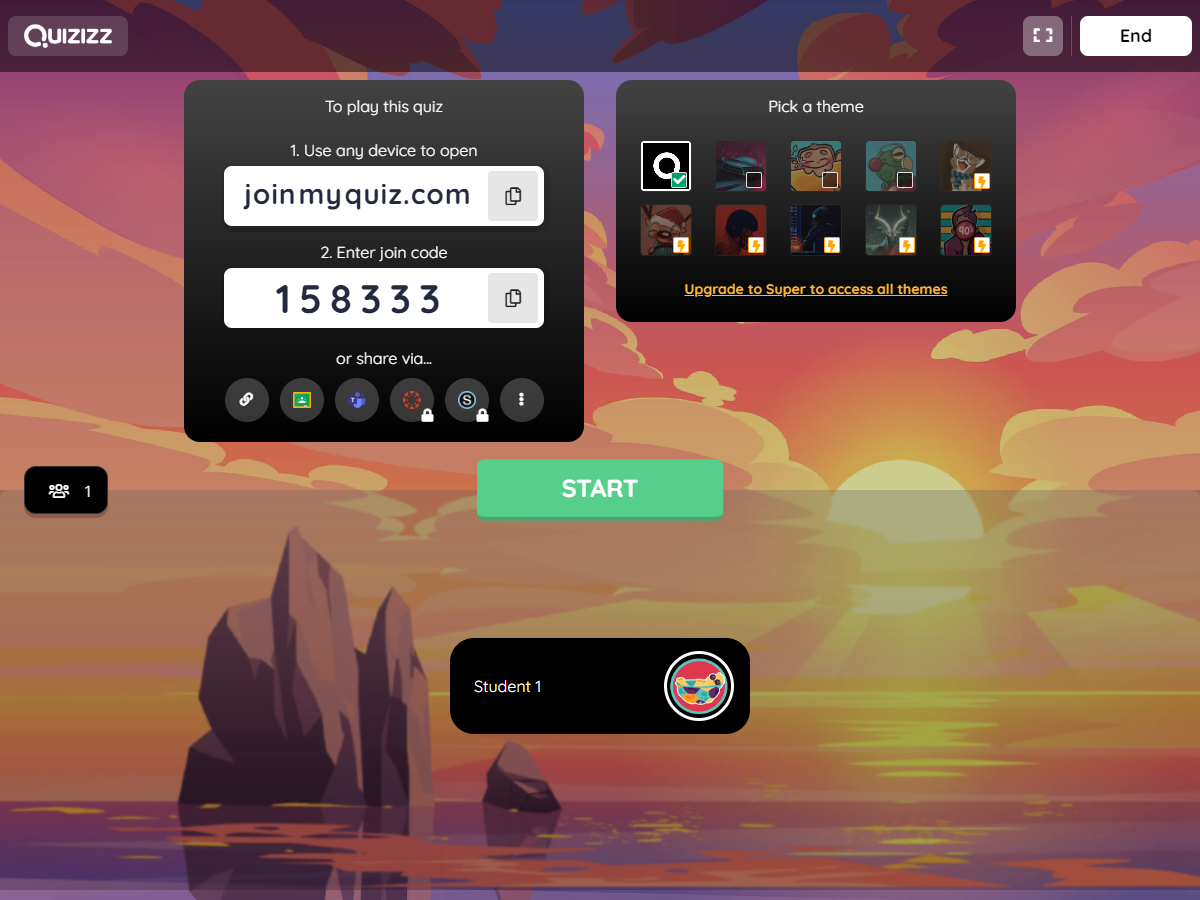
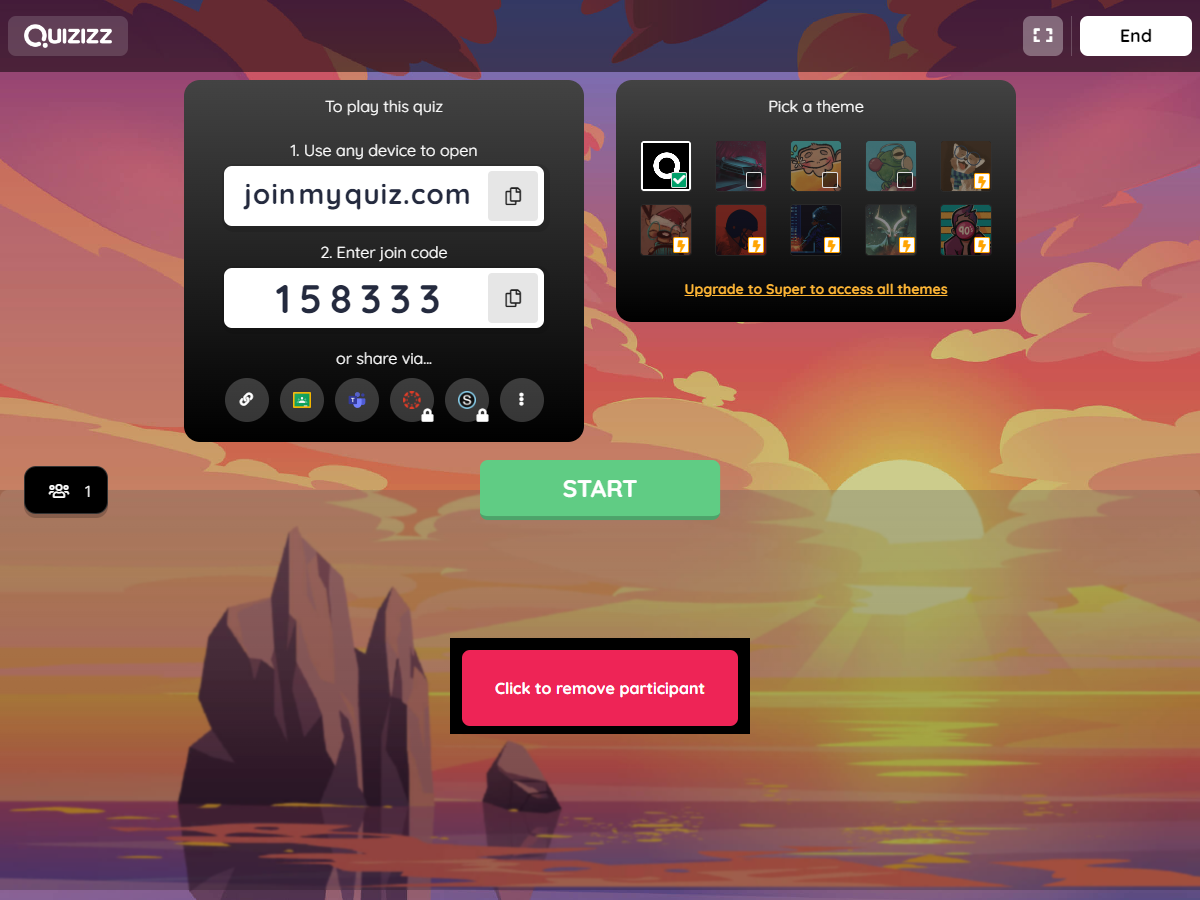
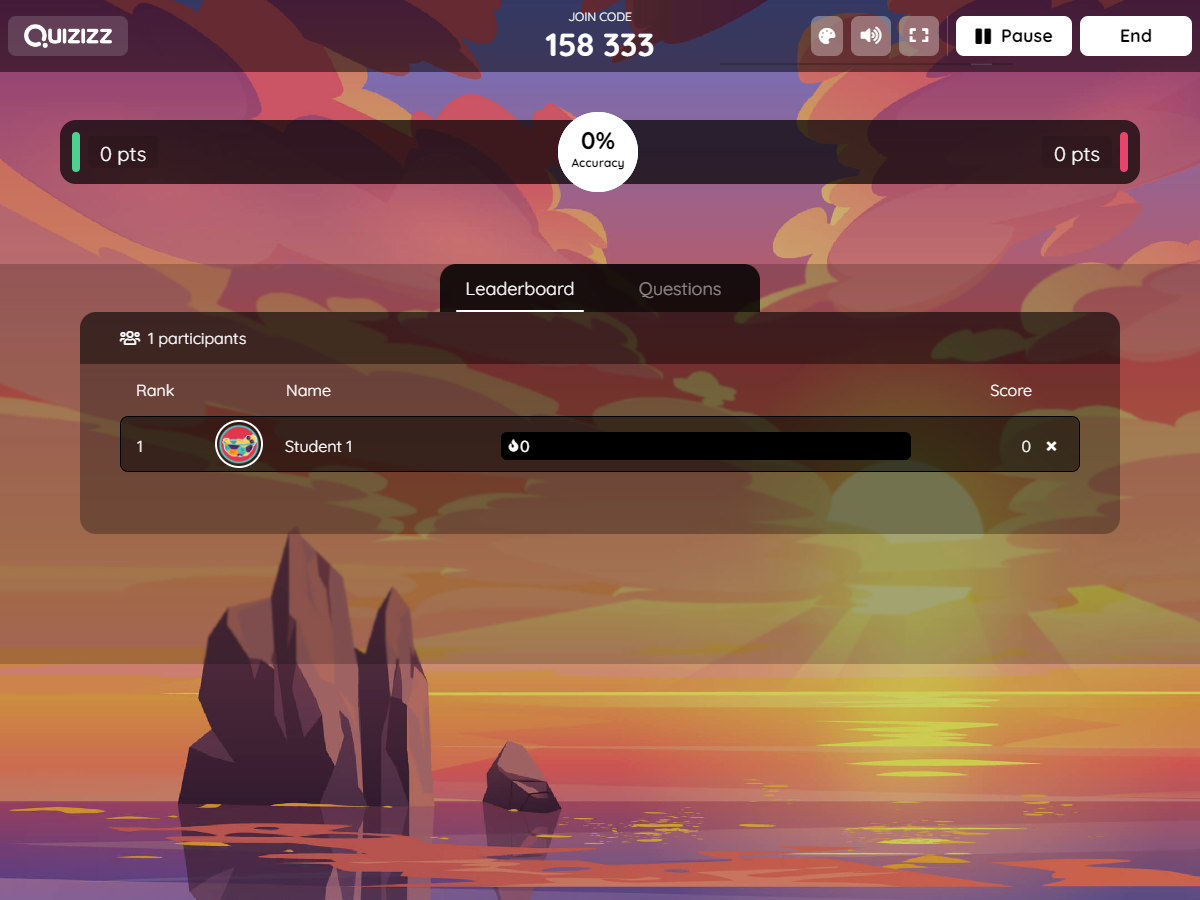
學校需要準備甚麼設備以進行 Quizizz 練習?
What devices are needed to start and play a quiz on Quizizz?
| 教師Teacher | 學生Student | |
|---|---|---|
| 設備 Device | 桌上電腦、平板電腦或智能電話 Desktop computer, tablet or smartphone | |
| 帳戶 Account | 不須申請 Quizizz 帳戶 (No need to register a Quizizz account) | |
- 如教師需要下載成績報告、使用 Homework 模式、複製或修改本社的 Quizizz 練習,必須先以 Quizizz 帳戶登入,可按此申請並選擇連結至 Google 或 Microsoft 現有帳戶。
- 須連結至互聯網。
- 教師及學生可直接透過 Quizizz 網站使用,不需安裝 Quizizz 的流動程式。
- Logging in with a Quizizz account is needed for teachers to download reports, use ‘Homework’ mode, copy or modify our Quizizz exercises. Click here to register (Sign-up with a Google or Microsoft account is available).
- Internet connection required.
- Teachers and students can open Quizizz from the website directly. Installing the mobile app is optional.
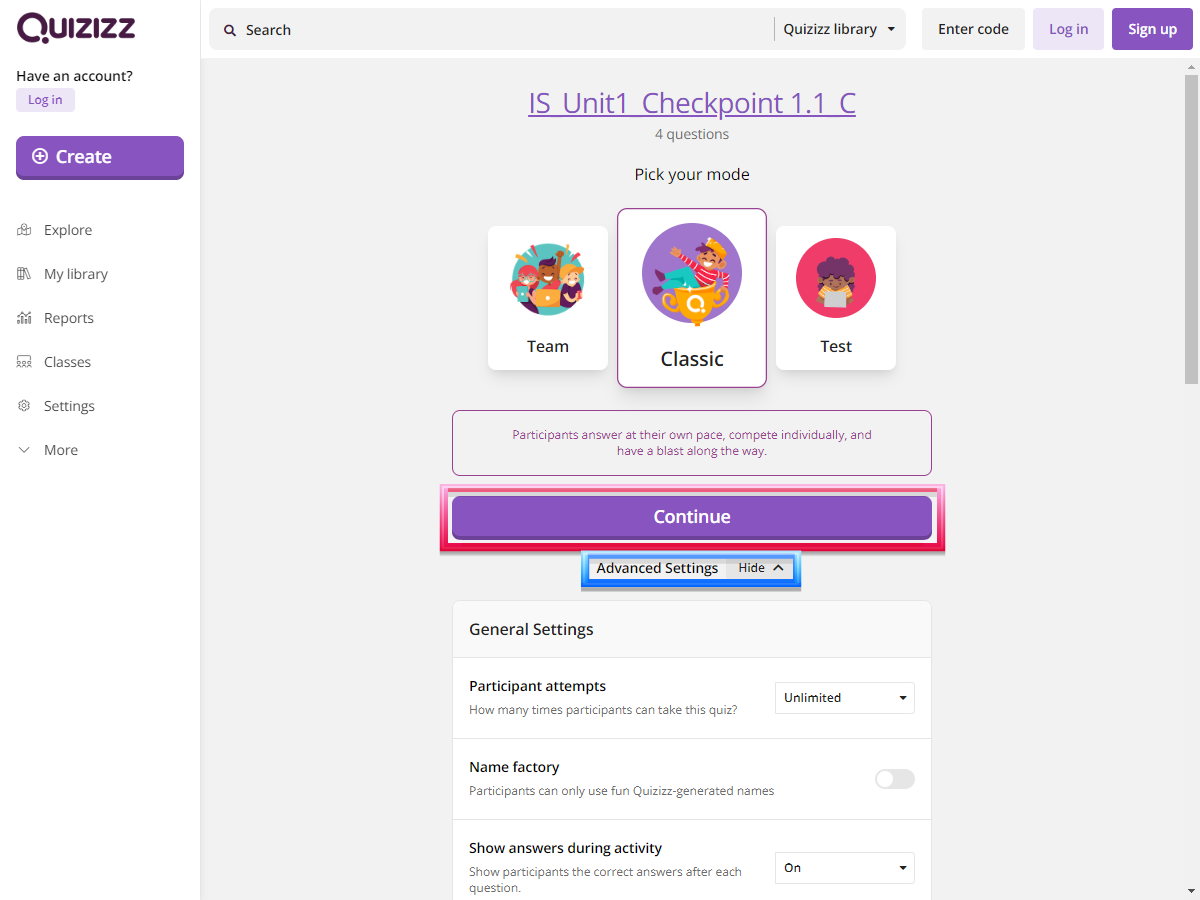
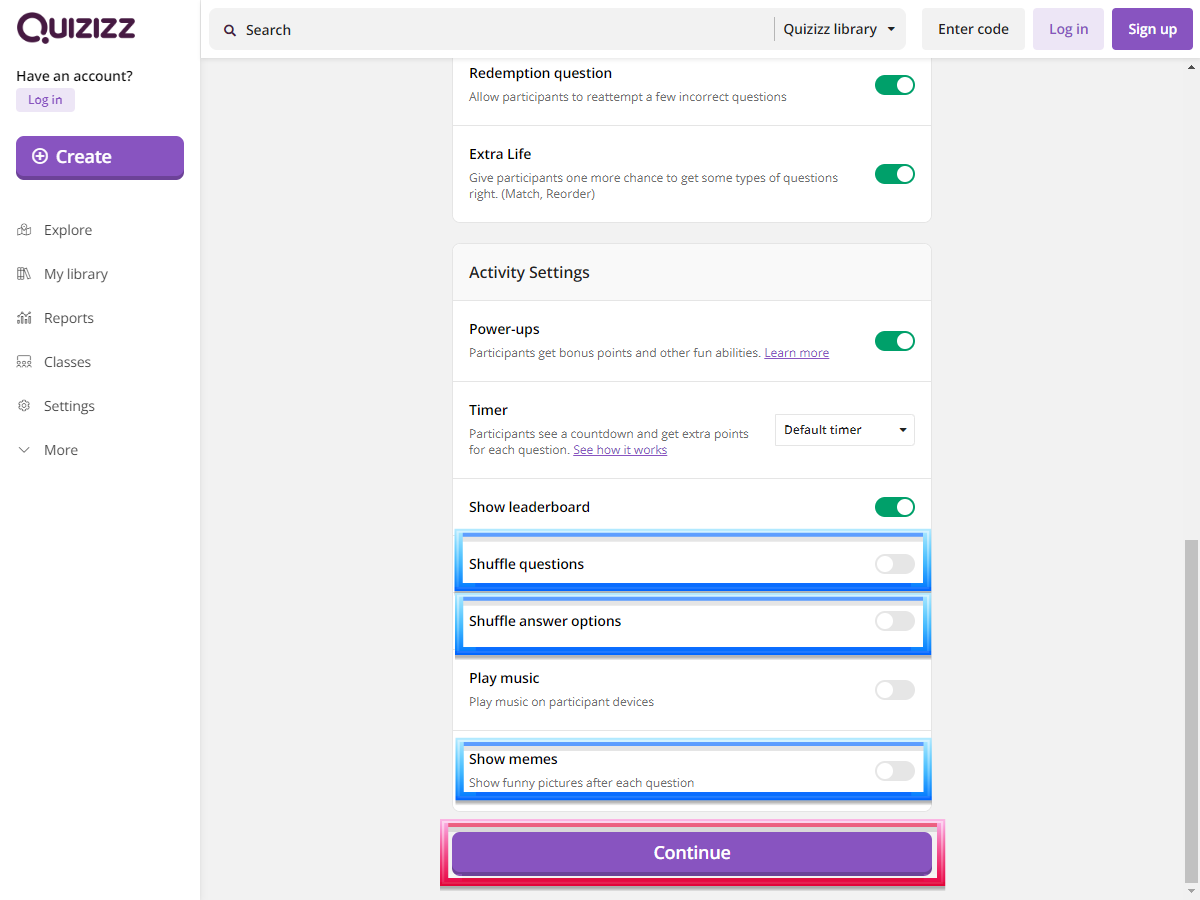
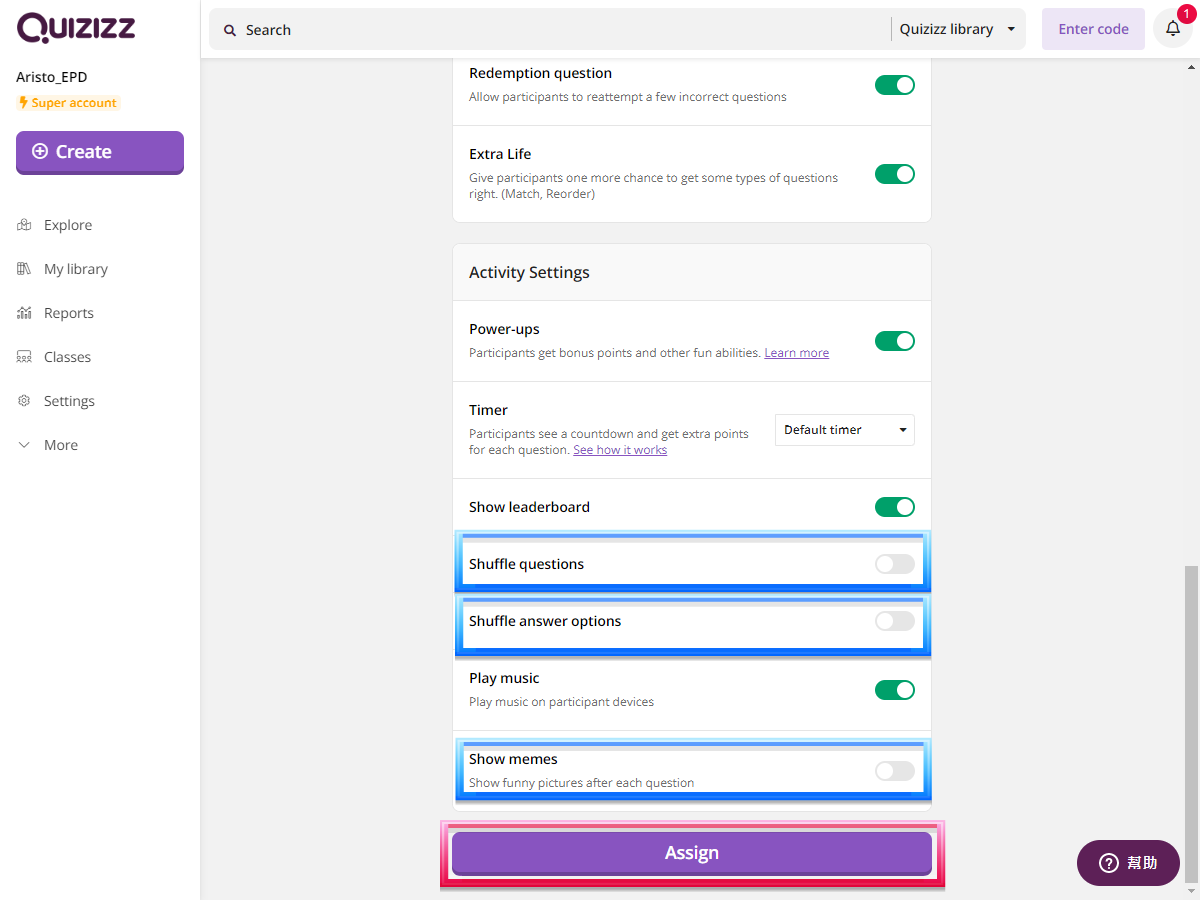
開啟 Quizizz 練習時,我可作甚麼設定?
What settings can I make before starting a quiz on Quizizz?
- Shuffle questions
- Shuffle answer options
- Show memes
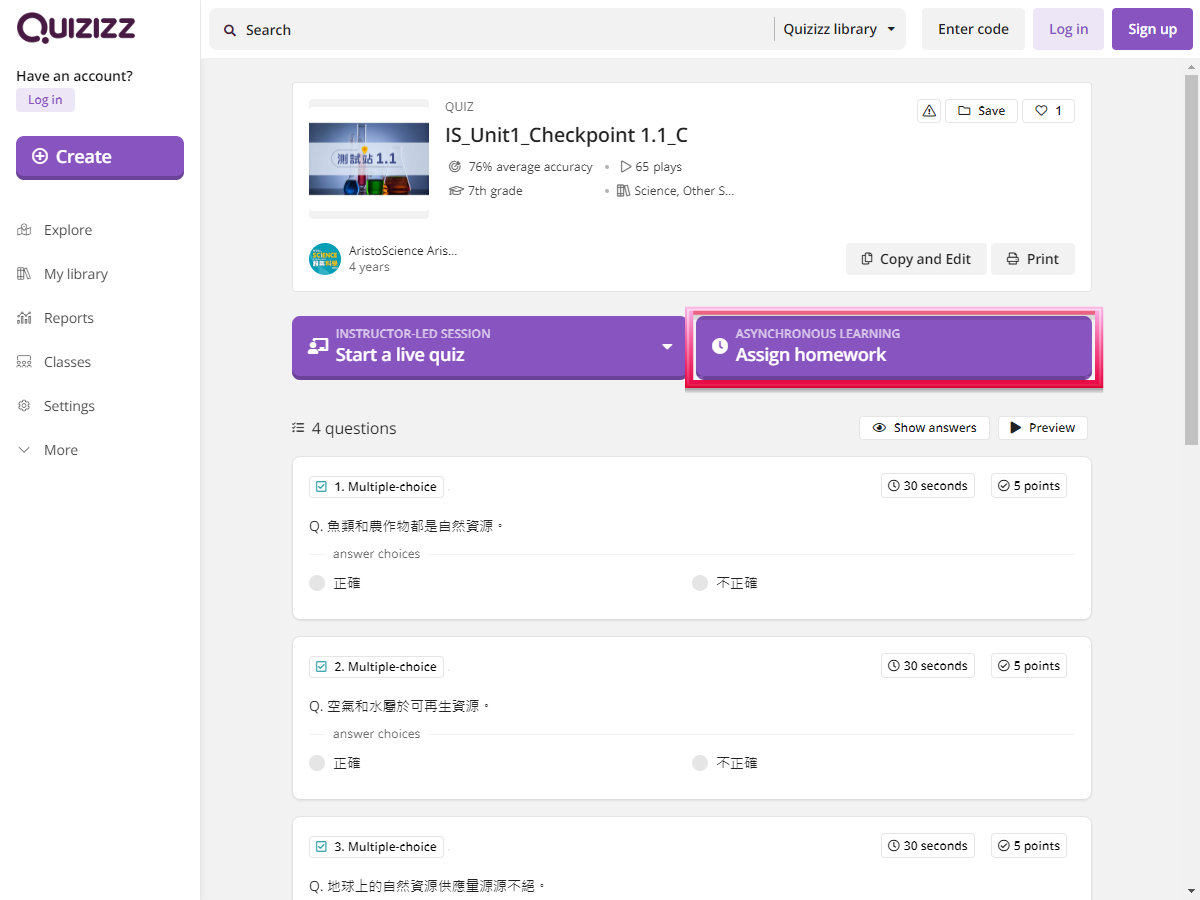
我可更改雅集的 Quizizz 練習嗎?
Can I edit the Quizizz exercises made by Aristo?
除了即時發放 Quizizz 練習外,我可以用「功課」形式發放給學生在家完成練習嗎?
In addition to starting an instant quiz, can I send the quiz as a ‘homework’ to let students complete at home?
如要使用 Quizizz,有甚麼網絡設備及頻寬上的要求?
What are the requirements of bandwidth and network settings if I want to use Quizizz?
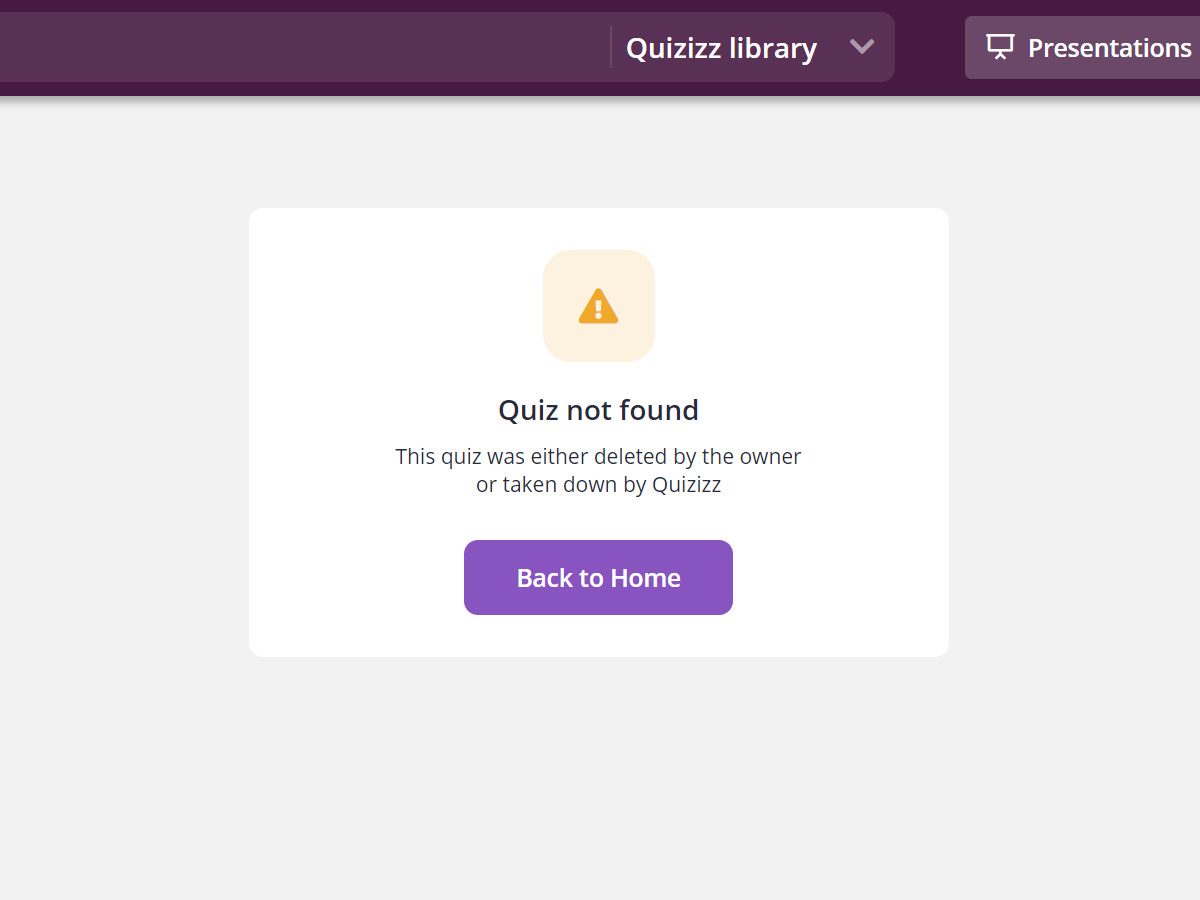
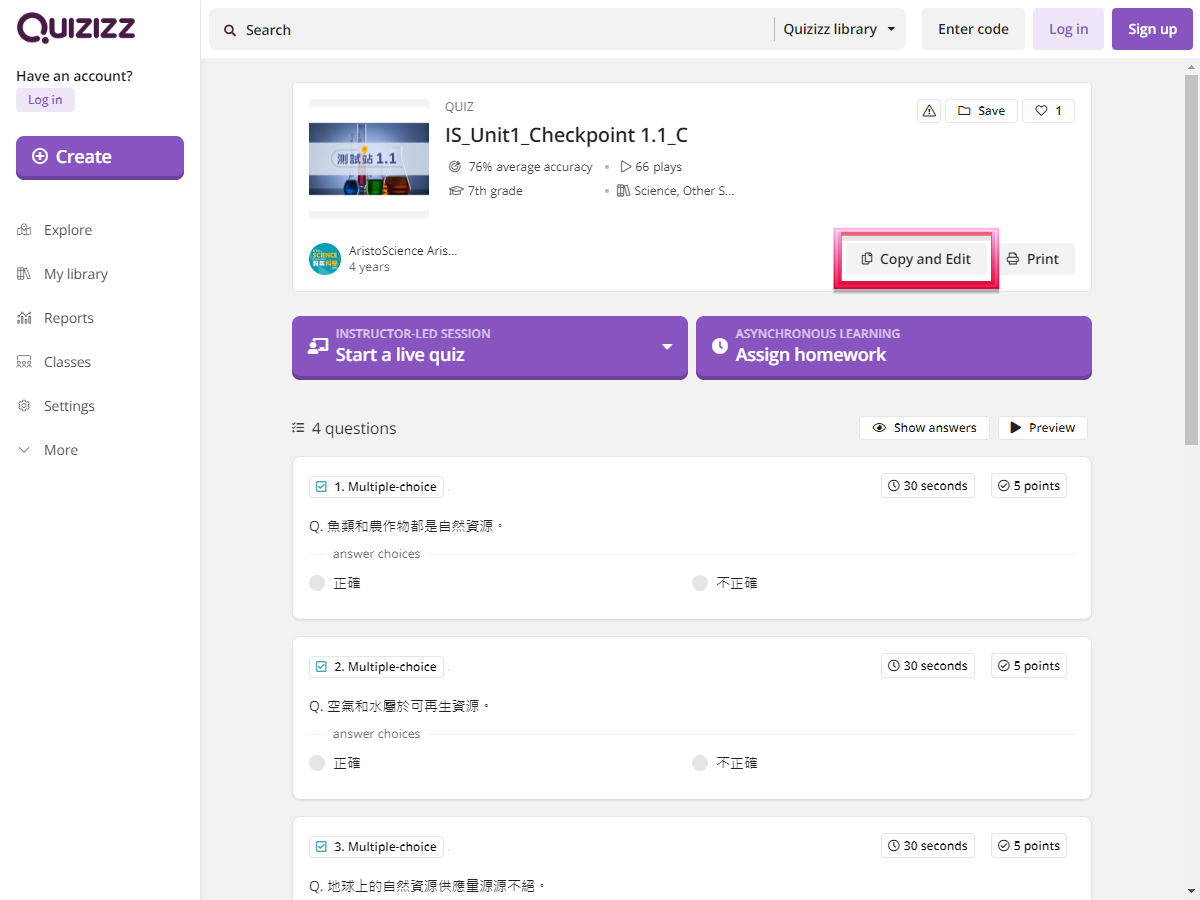
為何我在雅集網頁點選練習並登入 Quizizz 後,頁面會顯示「Quiz not found」?
Why does the page show ‘Quiz not found’ after I have clicked the quiz on the Aristo web page and logged in to Quizizz?


在一些情況,為何我不能修改雅集製作的練習?
In some cases, why I cannot edit the quiz made by Aristo?


(暫只提供中文版本)
(Only the Chinese version is provided now.)
使用 Quizizz AI 生成測驗:
Using Quizizz AI to generate quizzes:
- 註冊或登錄你的 Quizizz 帳戶。
- 選擇「創建 (Create)」,然後選擇「試題 (Quiz)」來開始製作新測驗。你可以使用不同資料來創建測驗,例如文字提示、網頁連結、YouTube 影片或上傳你的文件檔(DOC、PDF、PPT)。
- 有關詳細資訊,請按此。
- Sign up for or log into your Quizizz account.
- Choose ‘Create’, followed by ‘Quiz’ to start a new activity. You can use various resources such as text prompts, web links, YouTube videos or upload your documents (DOC, PDF, PPT) to generate quizzes.
- For more information, please click here.
示範影片:
Demonstration videos:
|
|
| 使用雅集的YouTube影片來生成測驗。 Generate quizzes from our YouTube videos. |
|---|
|
|
| 使用雅集的文件檔來生成測驗。 Generate quizzes from our documents. |
|---|
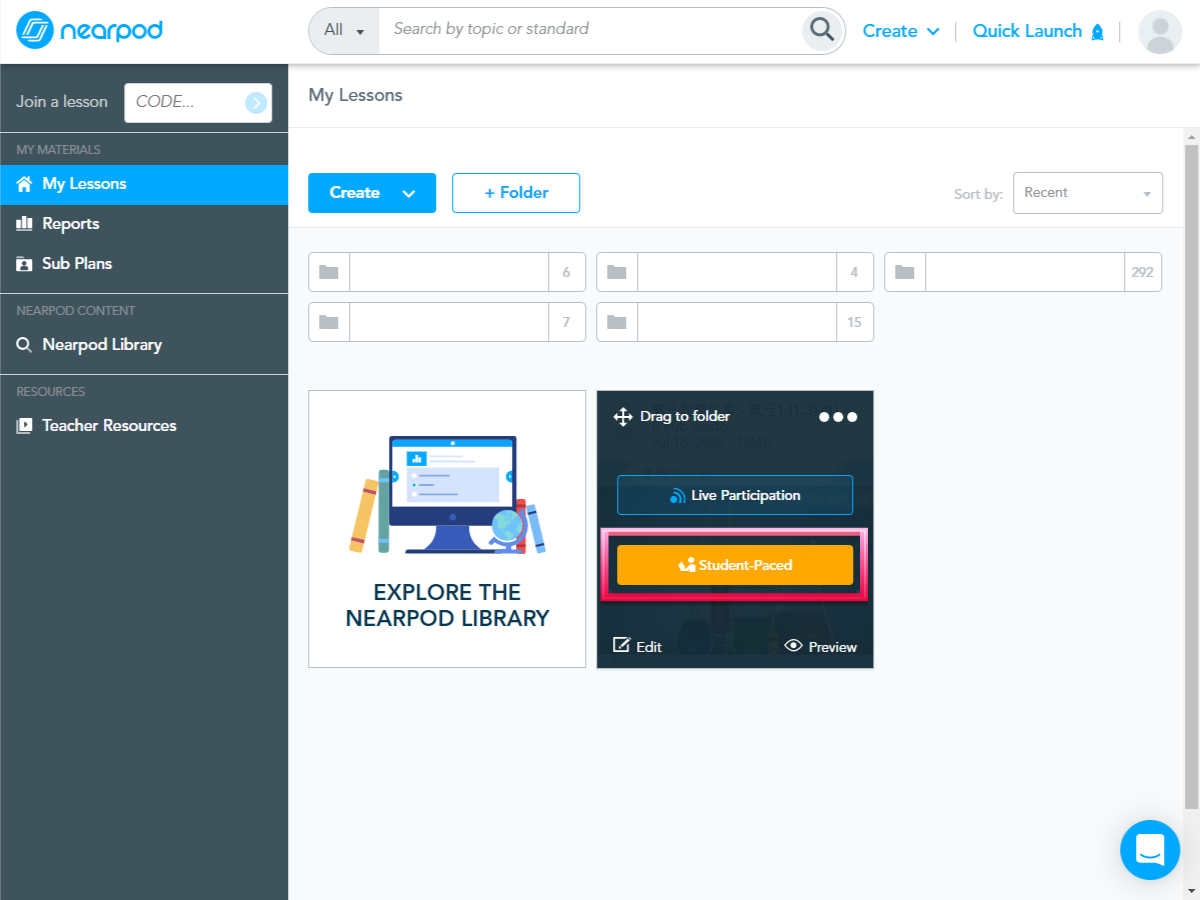
- 教師必須擁有 Nearpod 帳戶。教師先把本社提供的 Nearpod 課堂添加至個人 Nearpod 帳戶,然後可依畫面指示發放給學生。這模式下教師可使用 Nearpod 提供的互動功能(如︰檢視投票報告)。
- 教師必須使用個人電腦或平板電腦。
- A Nearpod account is needed. Teachers can add the Nearpod lesson made by Aristo to their own Nearpod accounts. After that, teachers can start the lesson and share it with the students by following the steps as shown on the Nearpod website. Teachers will be able to use the interactive functions as provided in Nearpod, such as checking the voting results.
- Teachers need to use a desktop computer or tablet.


學校需要準備甚麼設備以進行 Nearpod 課堂?
What devices are needed to start a Nearpod lesson?
| 教師Teacher | 學生Student | |
|---|---|---|
| 設備 Device | 桌上電腦或平板電腦 Desktop computer or tablet | 桌上電腦、平板電腦或智能電話 Desktop computer, tablet or smartphone |
| 帳戶 Account | Nearpod 教師帳戶,一般免費帳戶便可 Nearpod account (can use with a free account) | 不須申請 Nearpod 帳戶 No need to register a Nearpod account |
- 如教師未有帳戶,可按此申請並選擇連結至 Google 或 Office 365 現有帳戶。
- 須連結至互聯網。
- 教師及學生可直接透過 Nearpod 網站使用,不需安裝 Nearpod 的流動程式。
- Click here to register a Nearpod account. (Sign-up with a Google or Microsoft account is available)
- Internet connection required.
- Teachers and students can open Nearpod from the website directly. Installing the mobile app is optional.
「預覽」及「加進我的 Nearpod 」有甚麼分別?
What is the difference between ‘Preview’ and ‘Add to My Nearpod’?
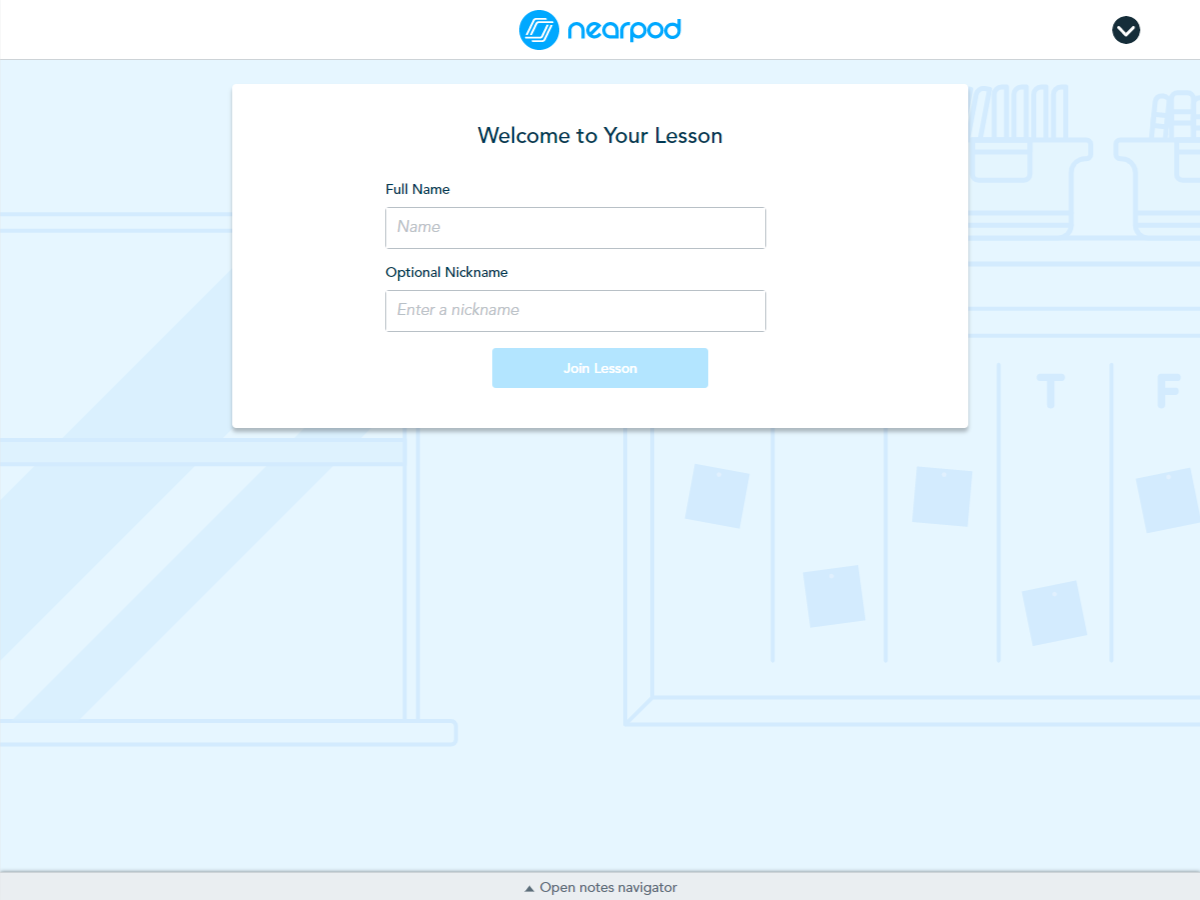
| 預覽 | 供教師預覽 Nearpod 課堂內容,不用登入 Nearpod,並且可使用智能電話、平板電腦或桌上電腦開啟。 |
|---|---|
| 加進我的 Nearpod | 讓教師複製本社的 Nearpod 課堂至自己的帳戶,必須登入 Nearpod,並只可用平板電腦或桌上電腦複製。 |
| Preview | For teachers to preview the content of Nearpod lesson without logging in. Teachers can use a smartphone, tablet or desktop computer to preview. |
|---|---|
| Add to my Nearpod | It allows teachers to copy our Nearpod lesson to their own accounts. Teachers need to log in with their Nearpod accounts and use a tablet or desktop computer to copy. |
除了即時發放 Nearpod 課堂外,我可以用「功課」形式發放給學生在家完成練習嗎?
In addition to starting a Live Participation, can I send the lesson as a ‘homework’ to let students complete at home?
如何配合Zoom使用Nearpod?
How to use Nearpod with Zoom?
(暫只提供中文版本)
(Only the Chinese version is provided now.)
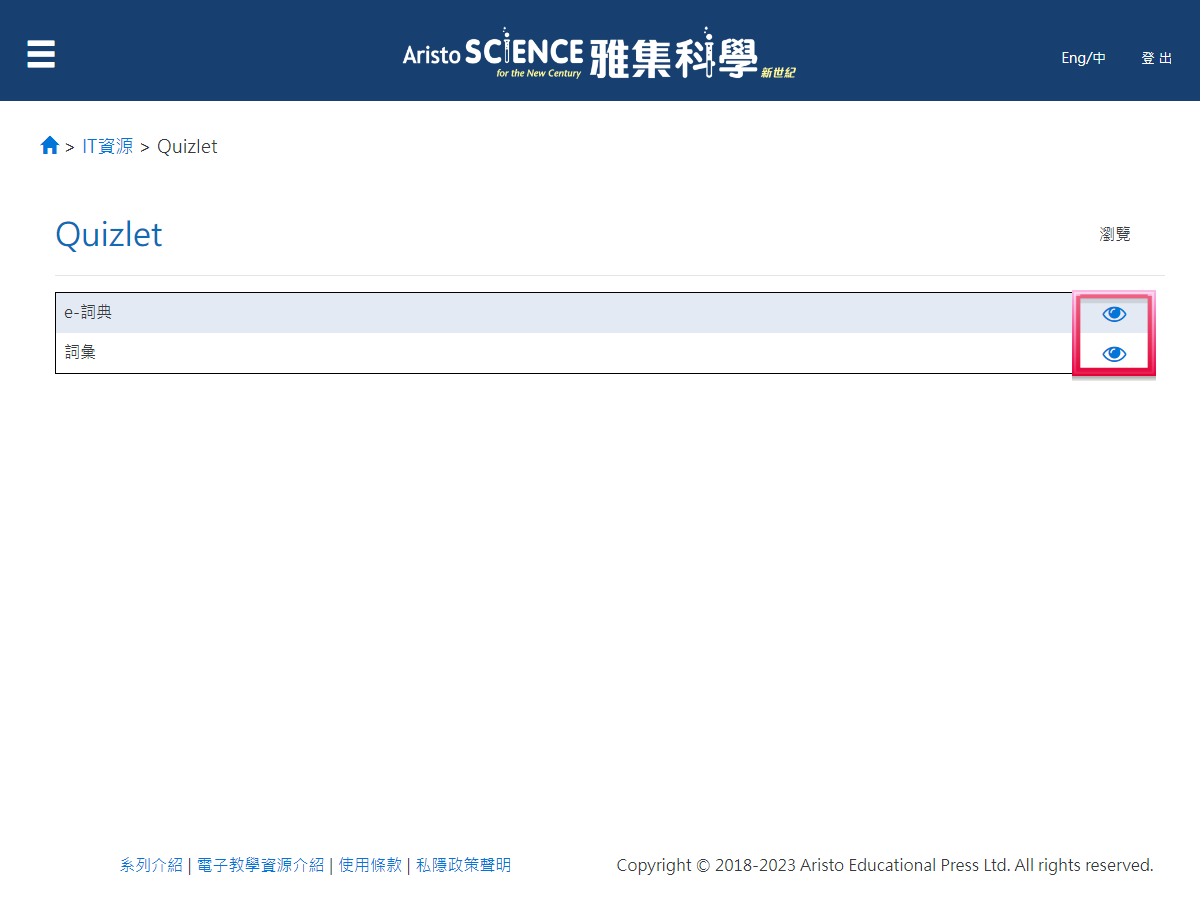
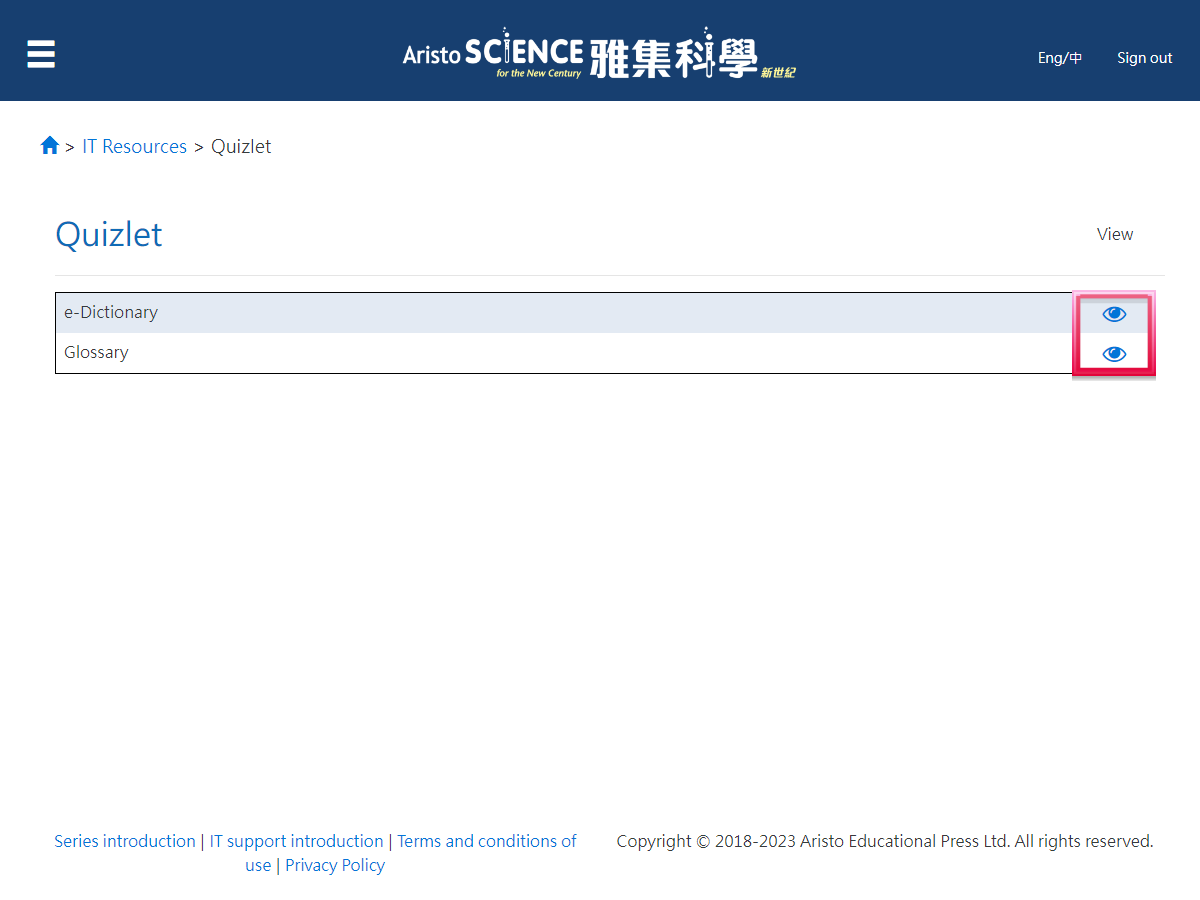

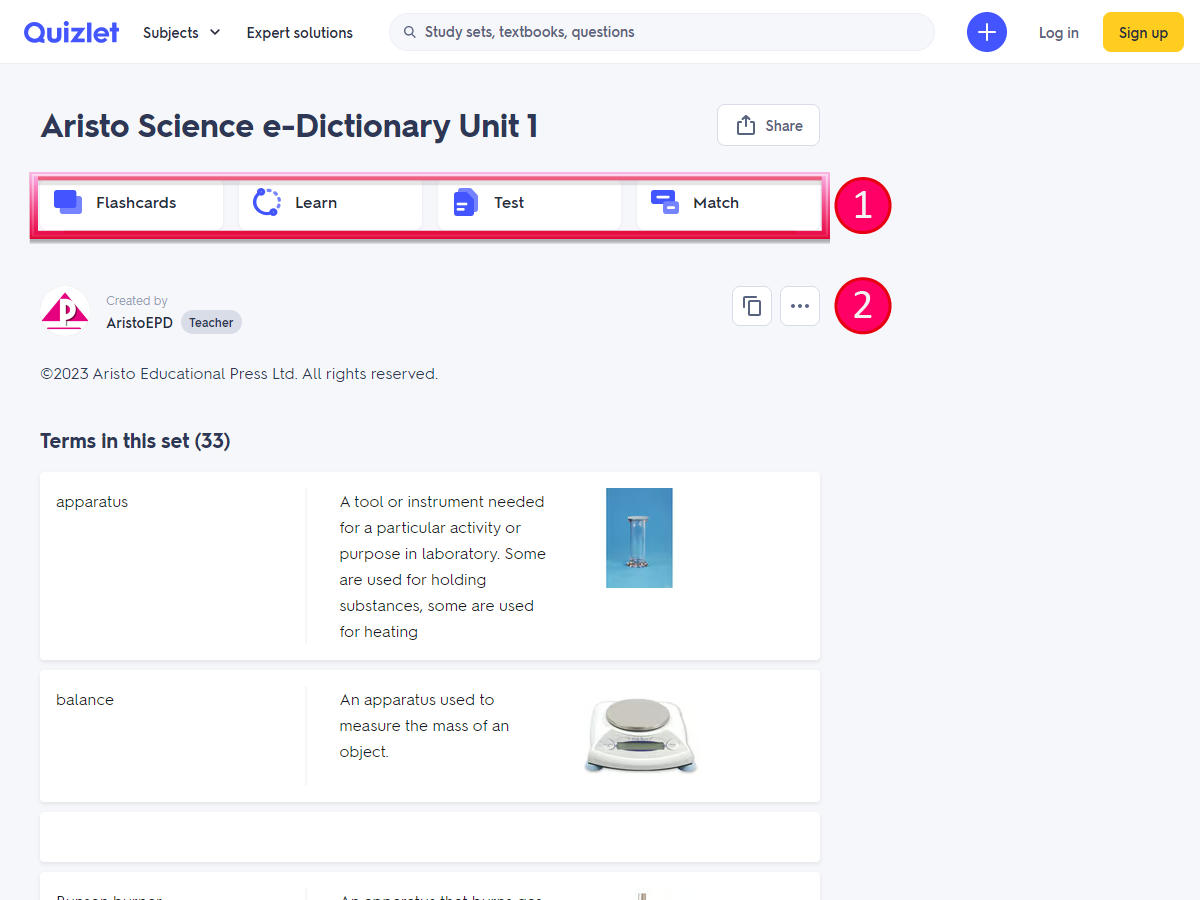
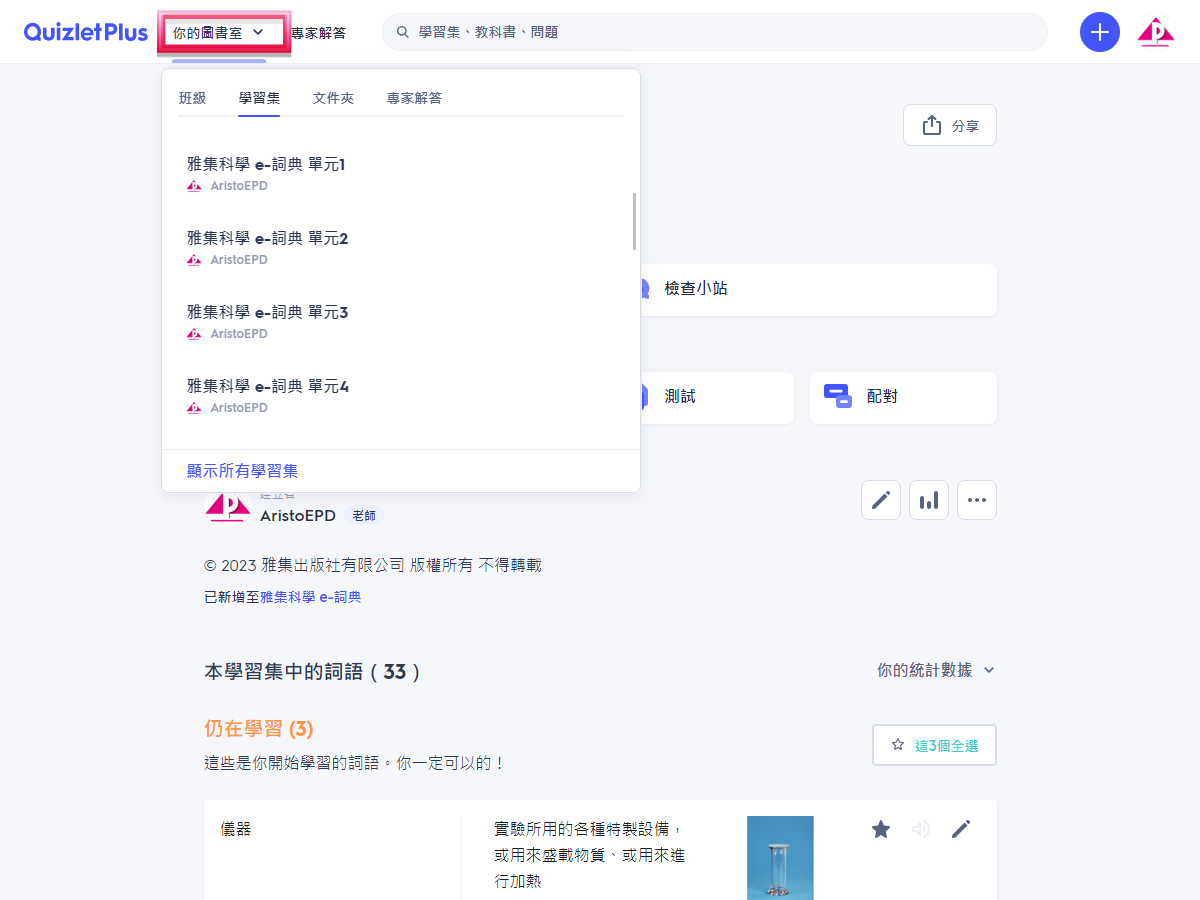
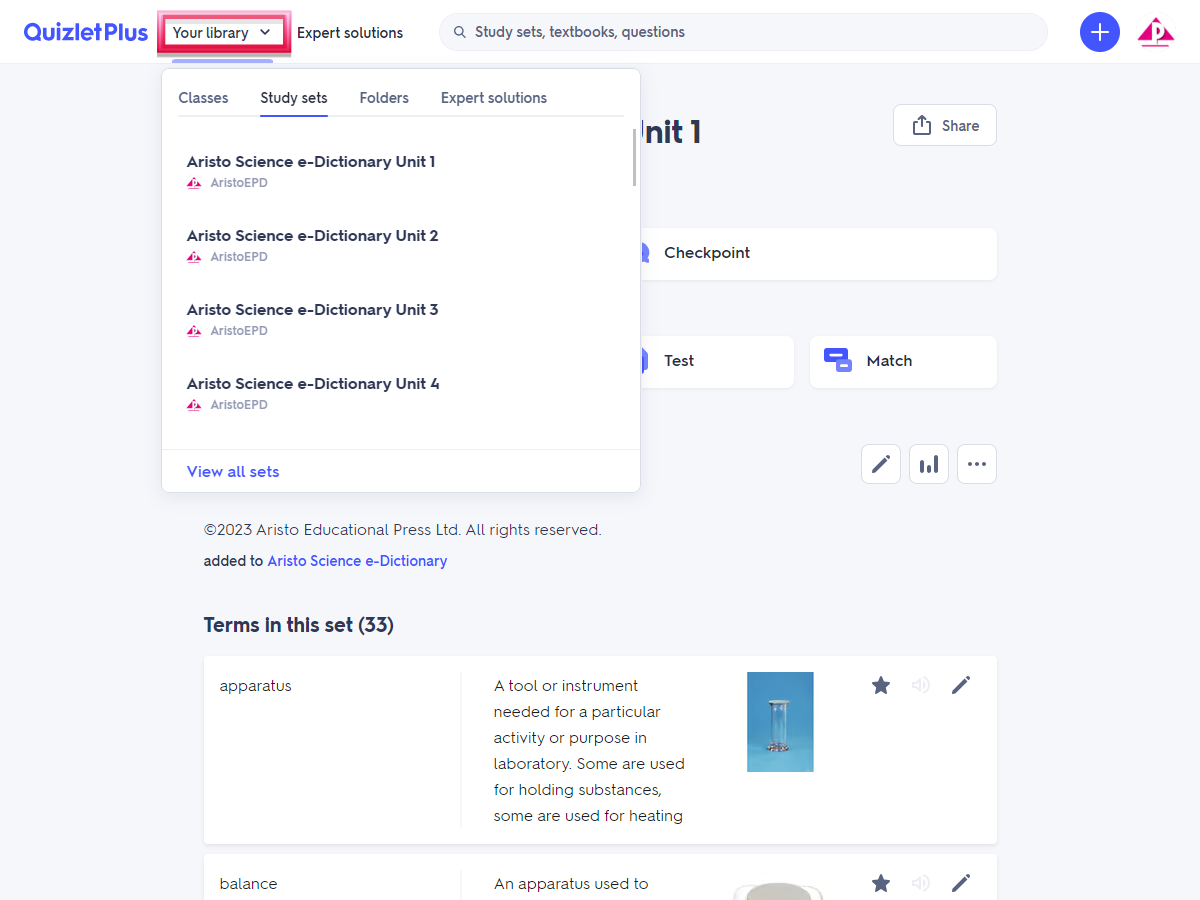
| 1 | 選擇學習或遊戲模式; Select a ‘study’ or ‘play’ mode; |
| 2 | 儲存和編輯這學習集(需先登入 Quizlet 帳戶)。 Save and edit this study set (you need to log in your Quizlet account). |

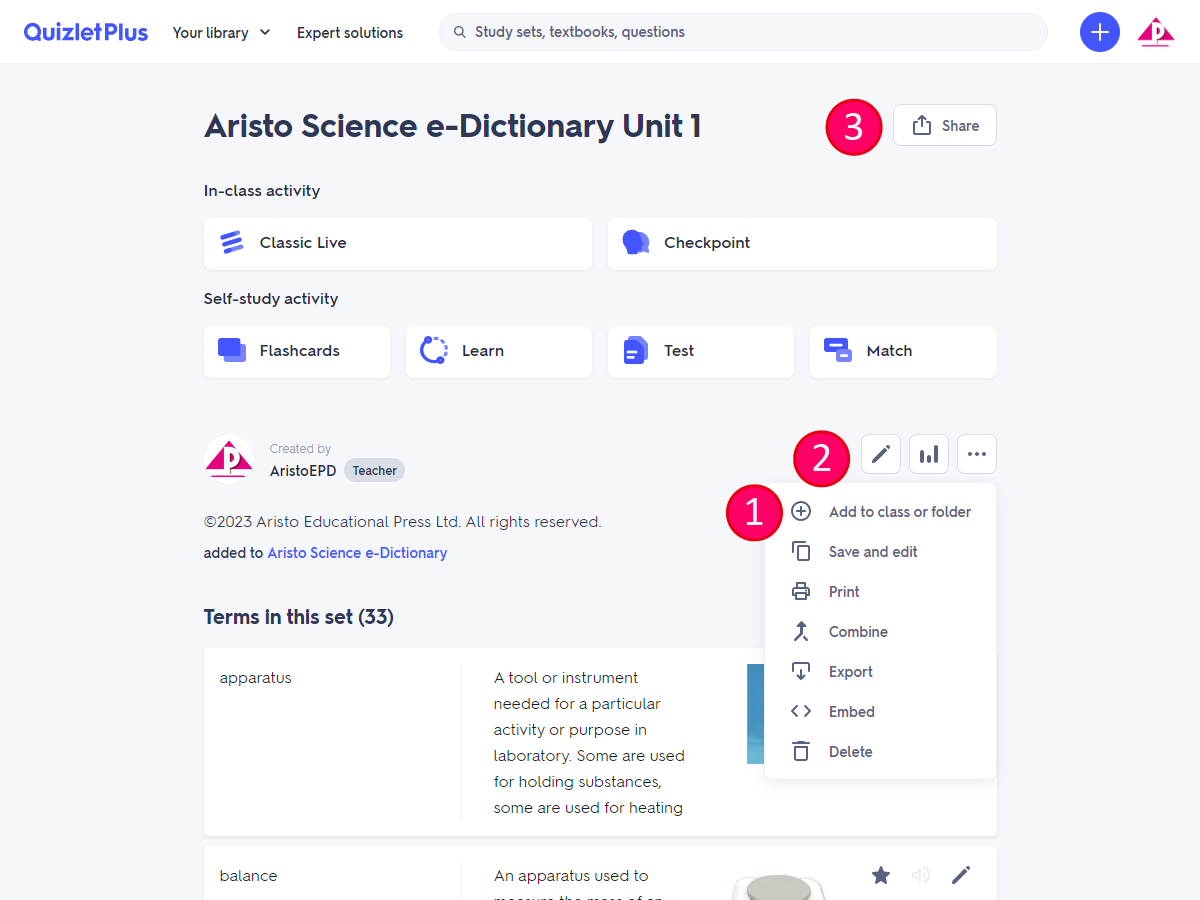
| 1 | 將這學習集加到帳戶內的班級或文件夾,供日後開啟; Add this study set to a class or folder under your account, so that you can open it later; |
| 2 | 直接儲存及編輯這學習集,如學習集內置了 Quizlet Plus 的進階功能,則需有 Quizlet Plus 的帳戶才可儲存和編輯; Save and edit the study set directly. If the study set is added with any advanced functions in Quizlet Plus, you will need a Quizlet Plus account to save and edit. |
| 3 | 按此獲取連結,將這學習集分享給學生。 Click here to get the link to share this study set with your students. |
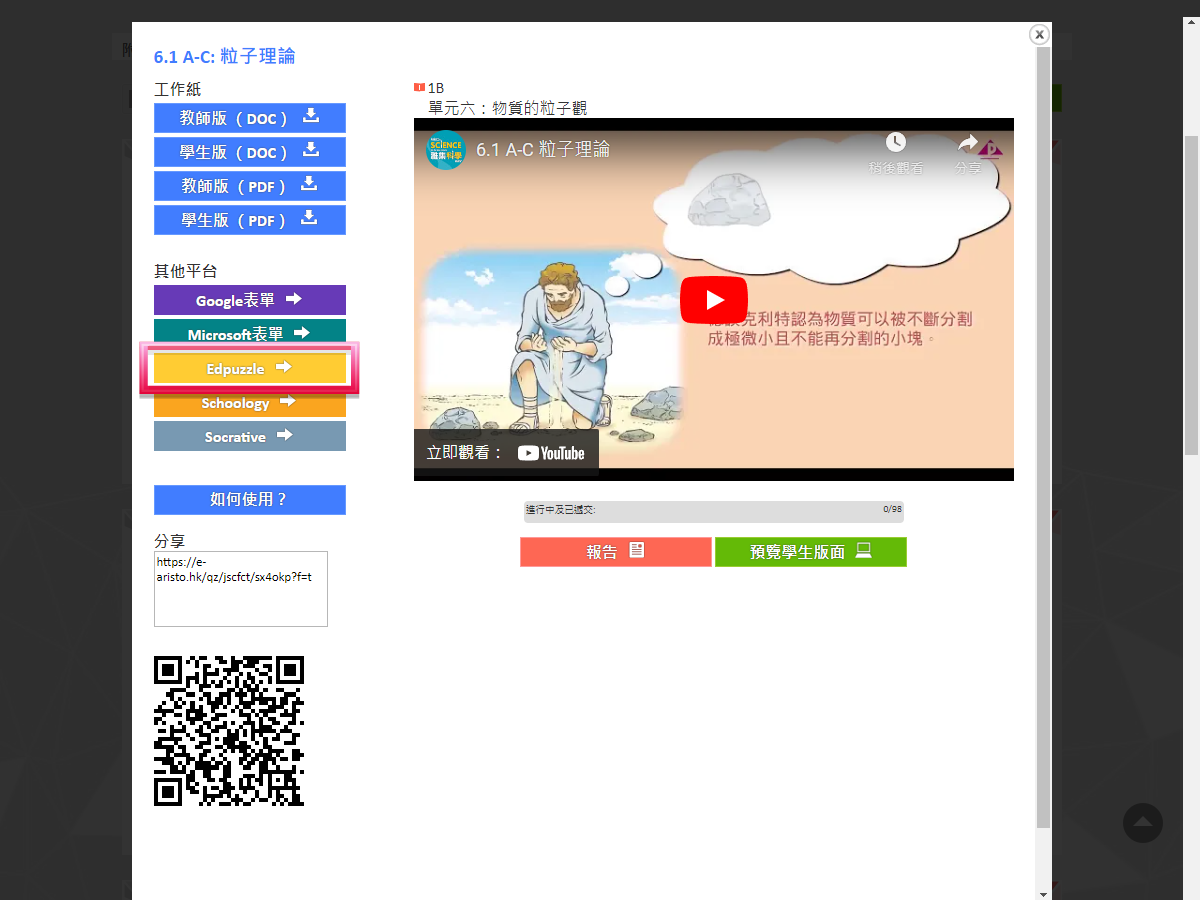
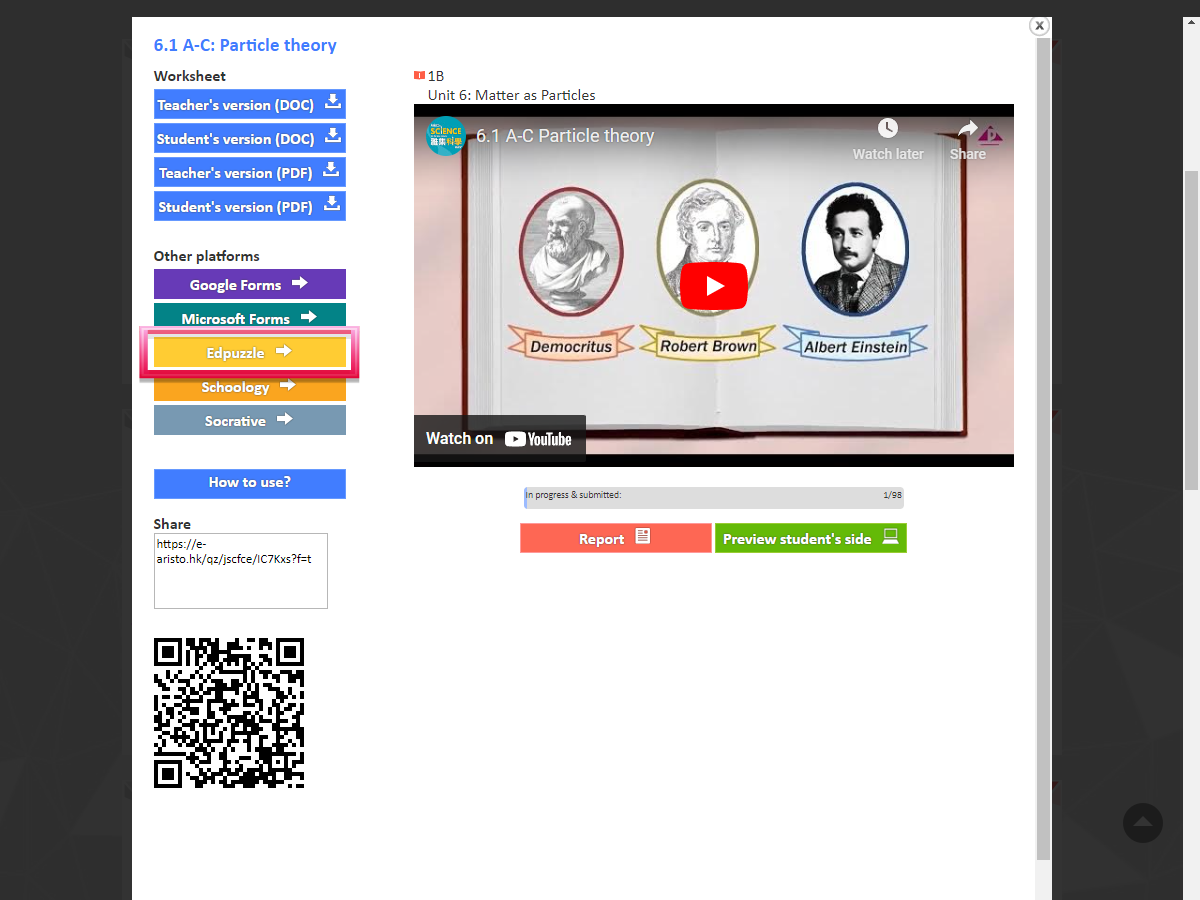

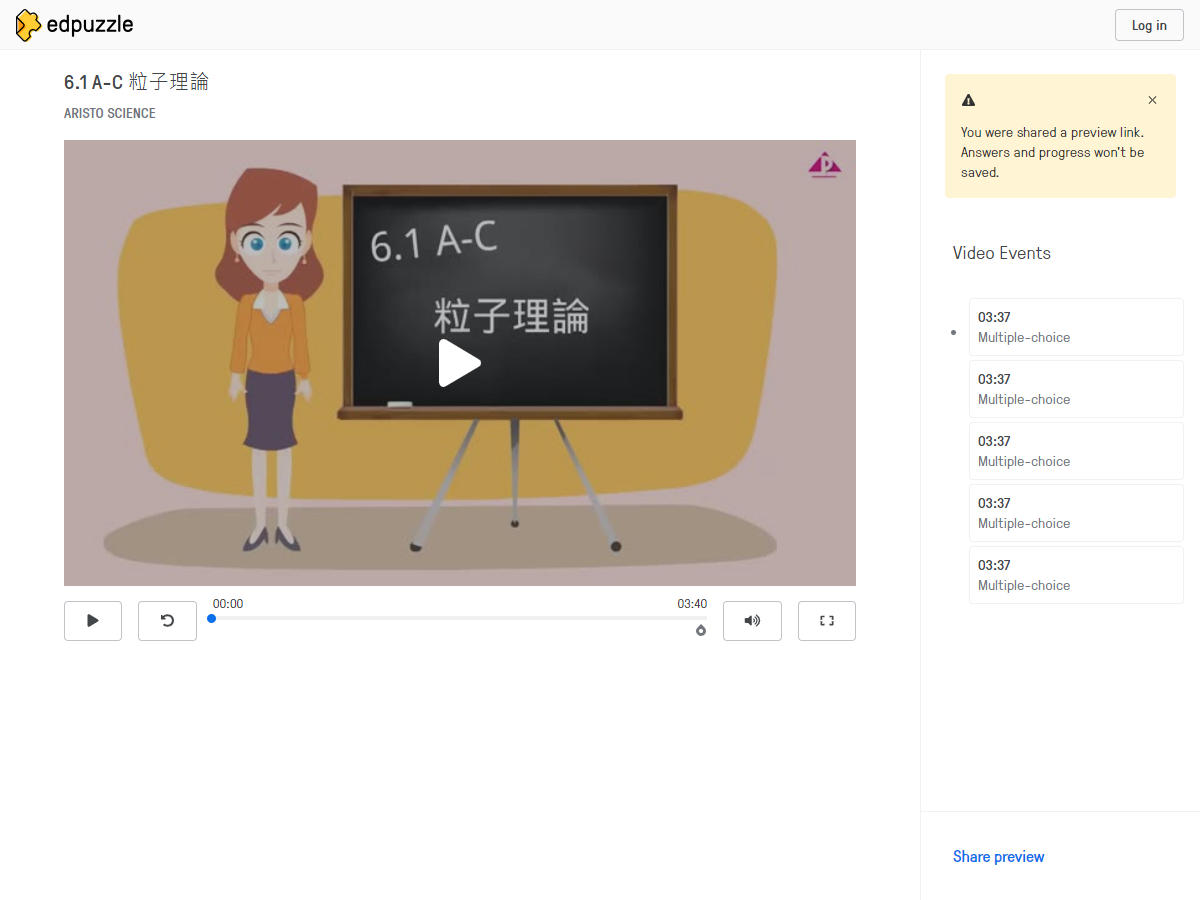

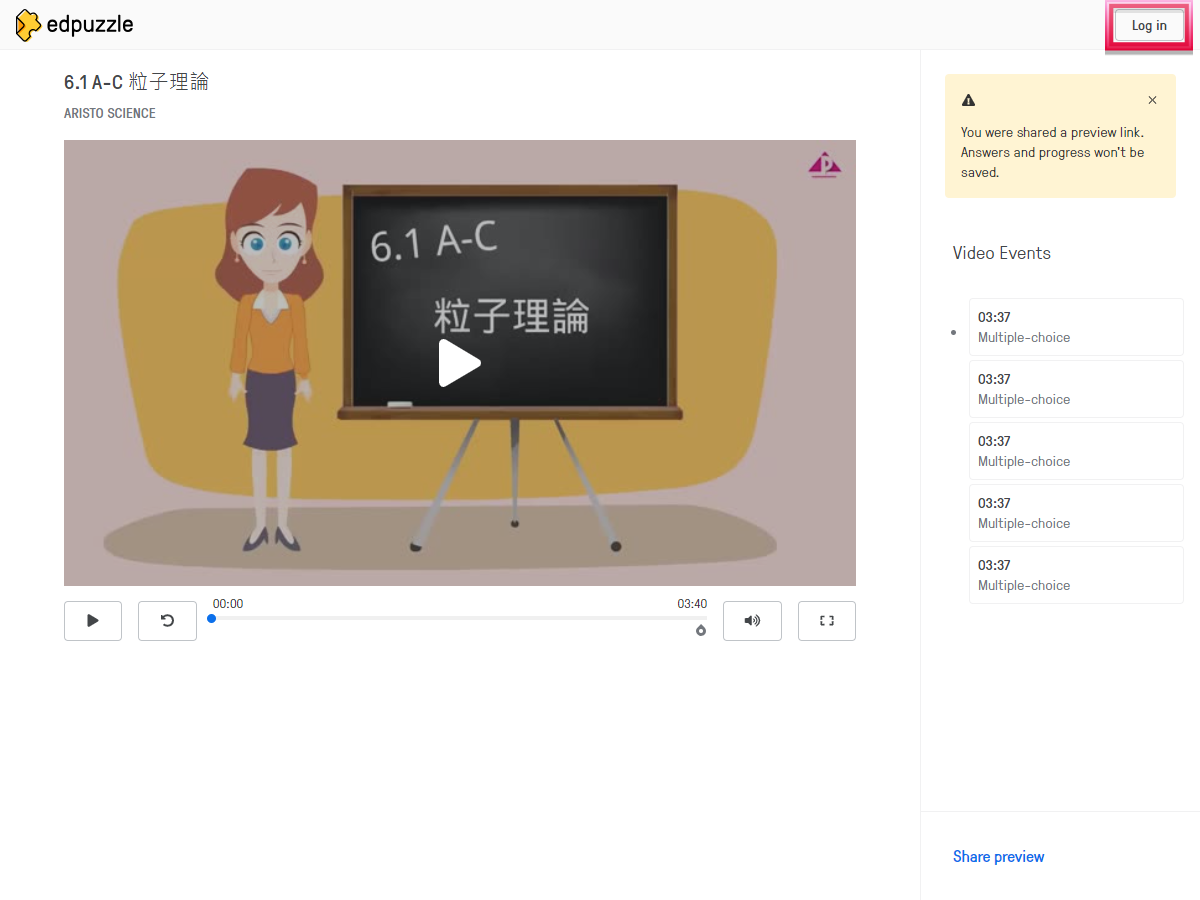
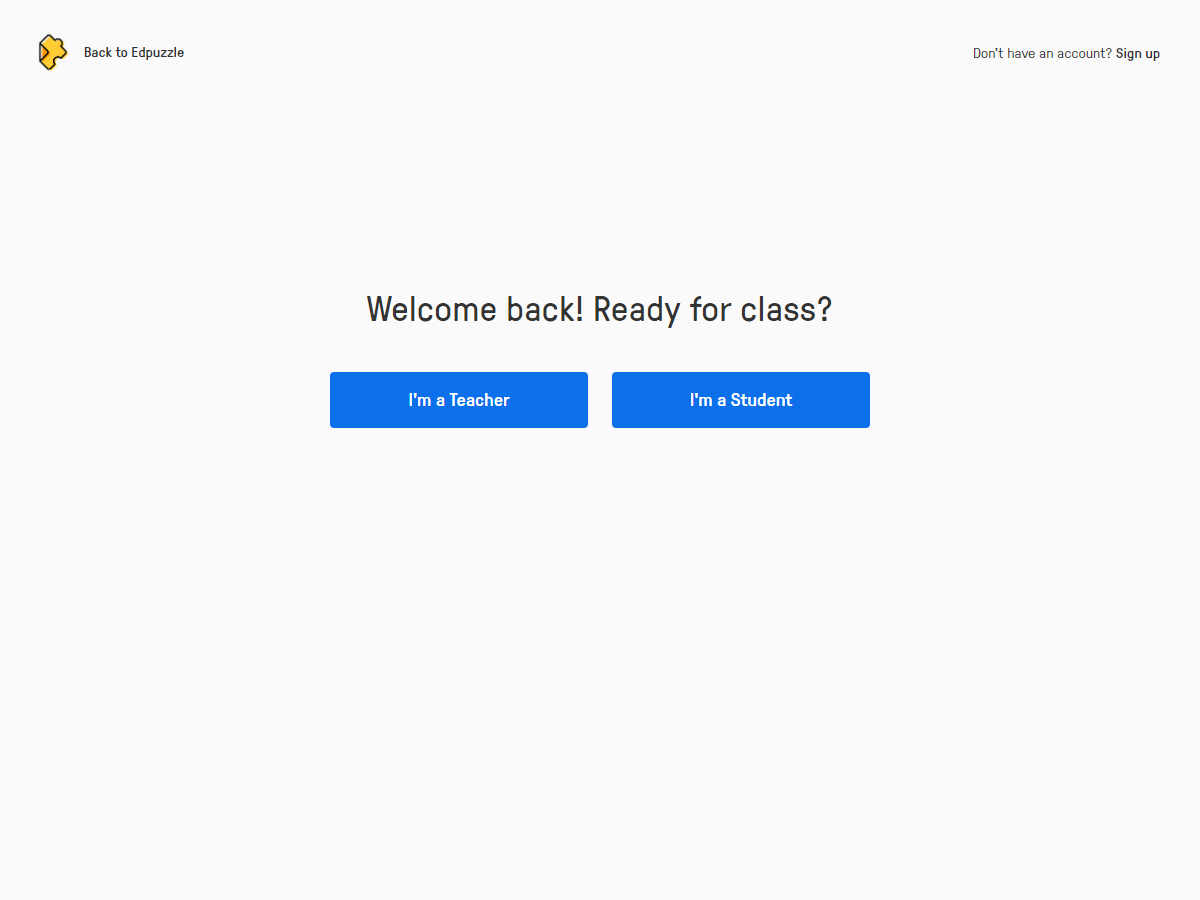
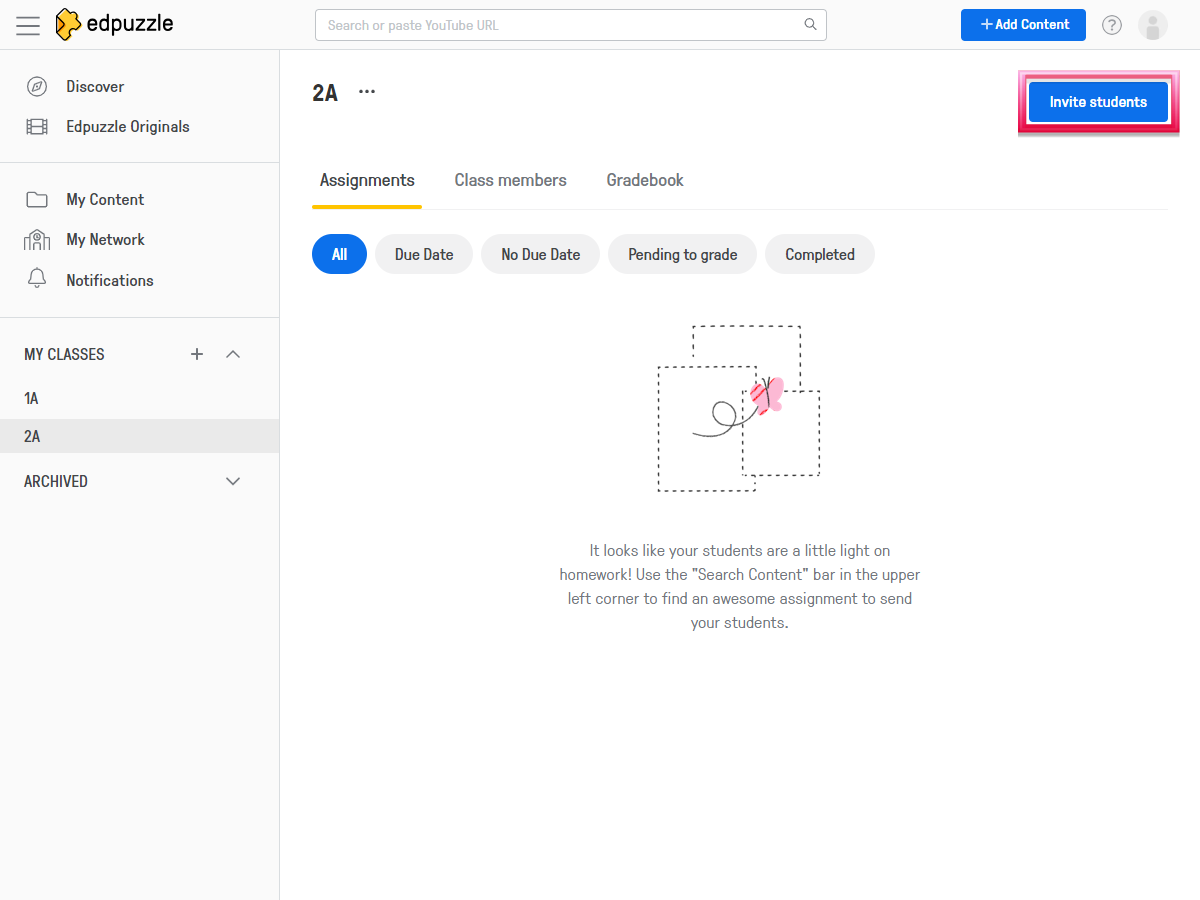
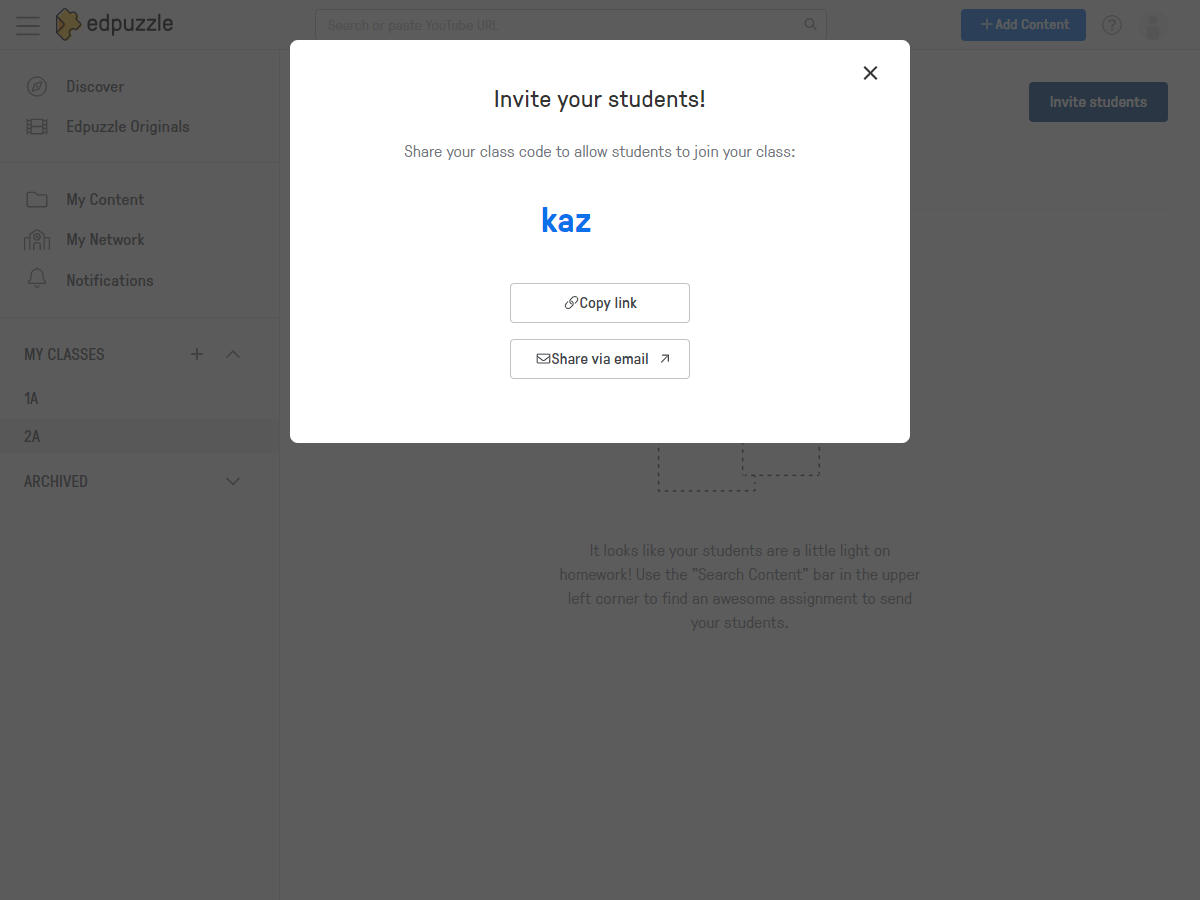
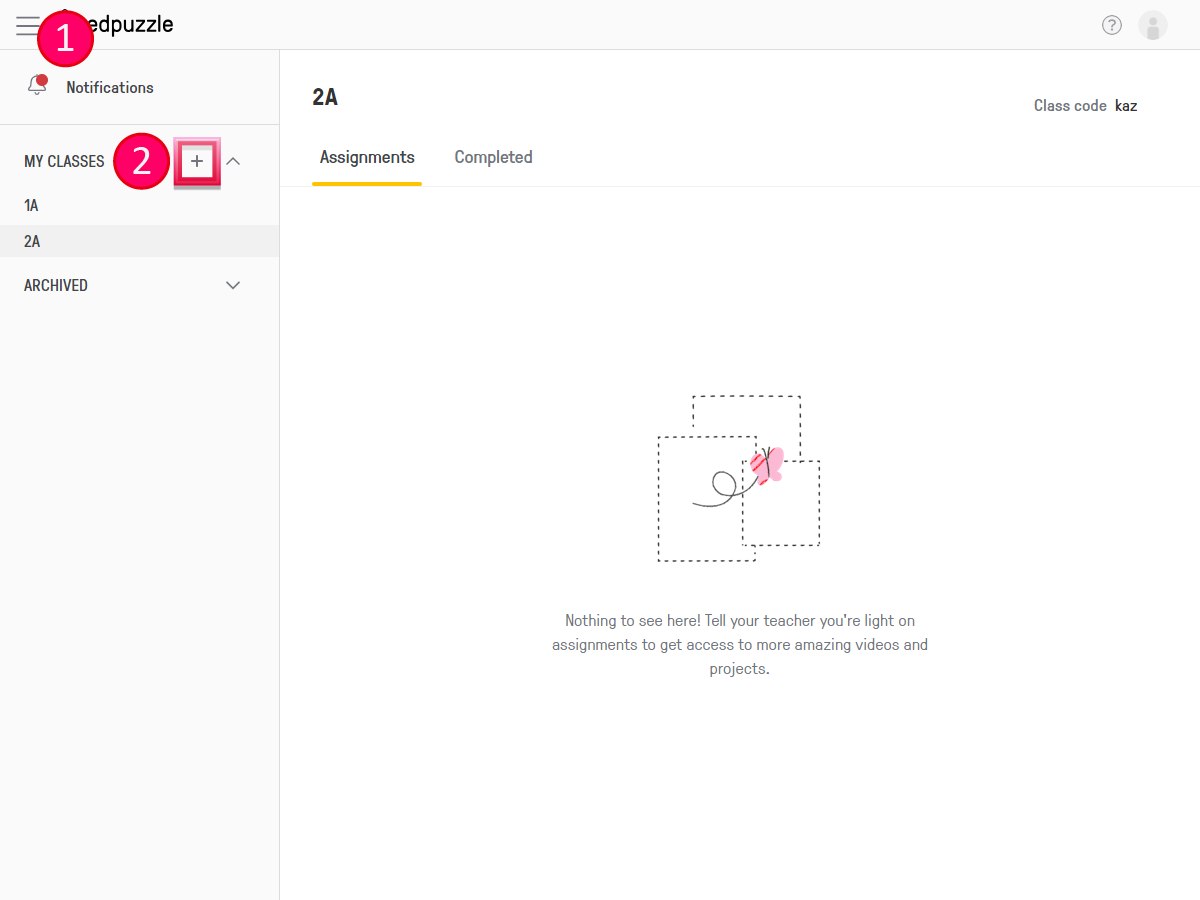
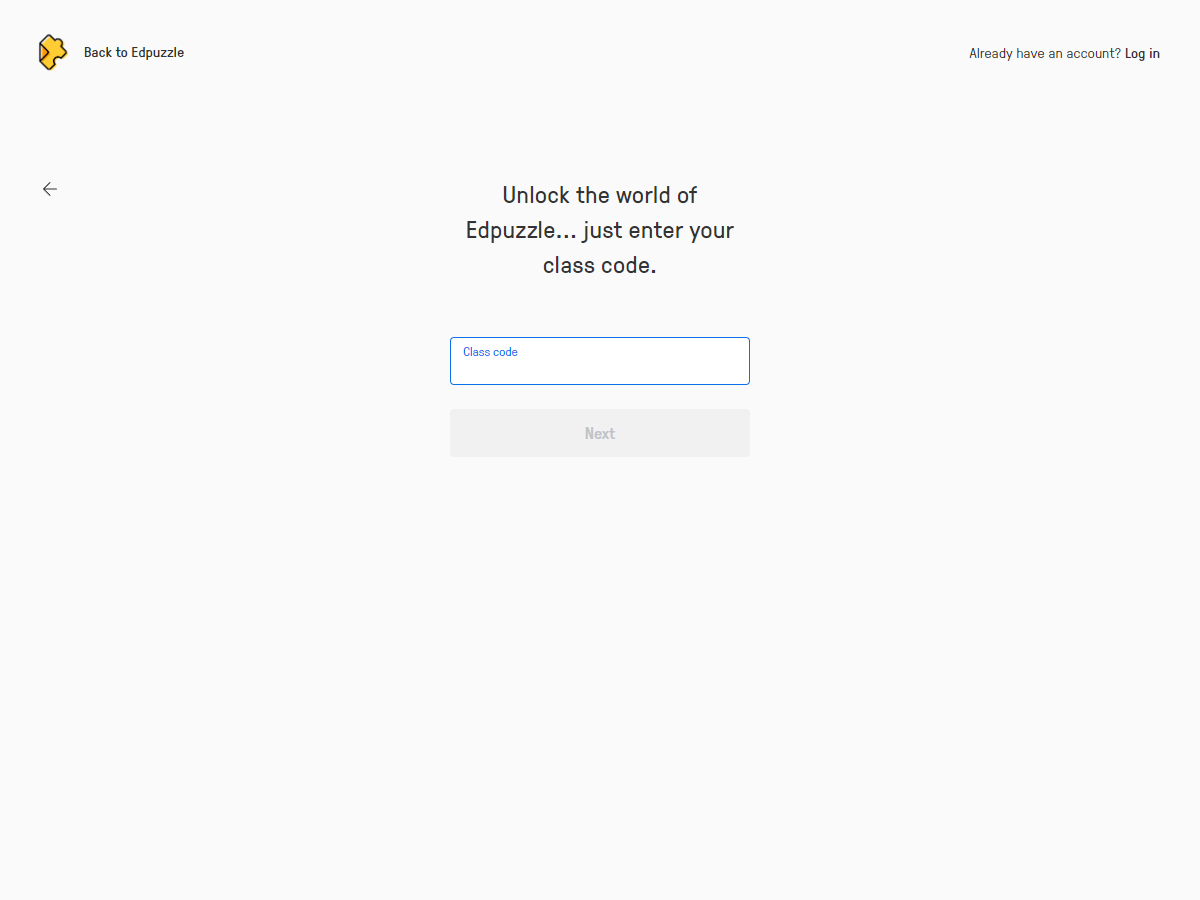
如已有 Edpuzzle 帳戶,點按 Log in 後,再按 I'm a Teacher 或 I'm a Student 來登入;
如未有Edpuzzle帳戶,點按 Log in 後,點按右上方的 Sign up ,再選擇 I'm a Teacher 或 I'm a Student 來登記。你也可使用 Google 帳戶或 Microsoft 帳戶登記及登入。
(註:使用教師帳戶登入才可複製、編輯及發放練習。)
If you already have an Edpuzzle account, click on the ‘Log in’ button, then select ‘I’m a Teacher’ or ‘I’m a Student’ to log in;
If you haven’t got an Edpuzzle account yet, click on the 'Log in’ button, then click on ‘Sign up’ from the top right corner. After that, you can select ‘I’m a Teacher’ or ‘I'm a Student’ to register. You can also sign up or log in with your Google or Microsoft account.
(Note: A teacher account is required to copy, edit and release the exercise.)

如已使用教師帳戶登入,可按影片上方的按鈕作以下操作:
If you have logged in your teacher account, you can click on the buttons above the video to perform the following actions:
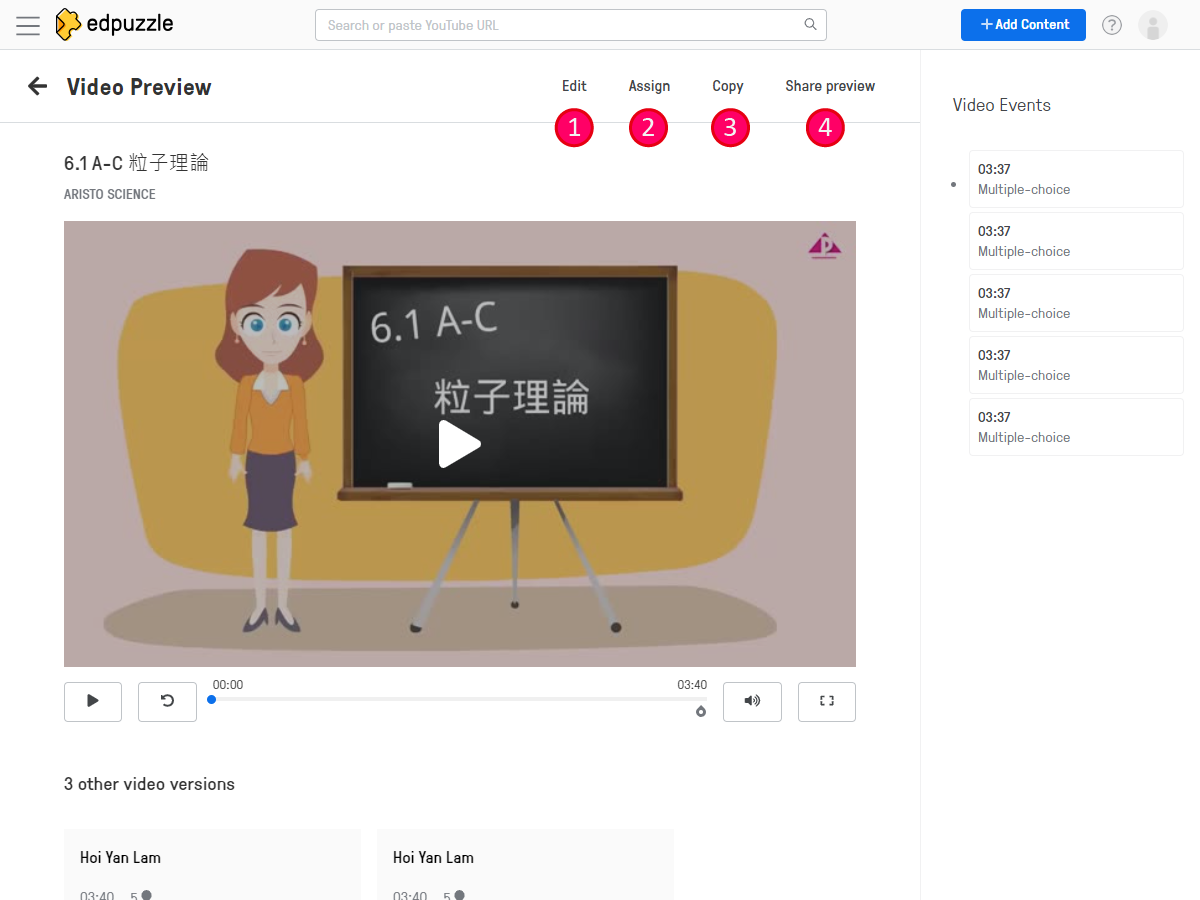

| 1 | Edit: 修改練習內容,修改後有關練習會儲存在教師的 Edpuzzle 帳戶內 Edit: Edit the exercise and the modified version will be saved in the teacher’s account |
| 2 | Assign: 經「班別 (Class)」將練習發放給學生 Assign: Release the exercise to students via a ‘class’ |
| 3 | Copy: 將練習複製到教師帳戶,可另行再修改及發放 Copy: Copy the exercise to the teacher’s account, so that it can be edited and released later |
| 4 | Share preview: 將練習的預覽連結發放給其他教師 Share preview: Share the preview link of this exercise with other teachers |
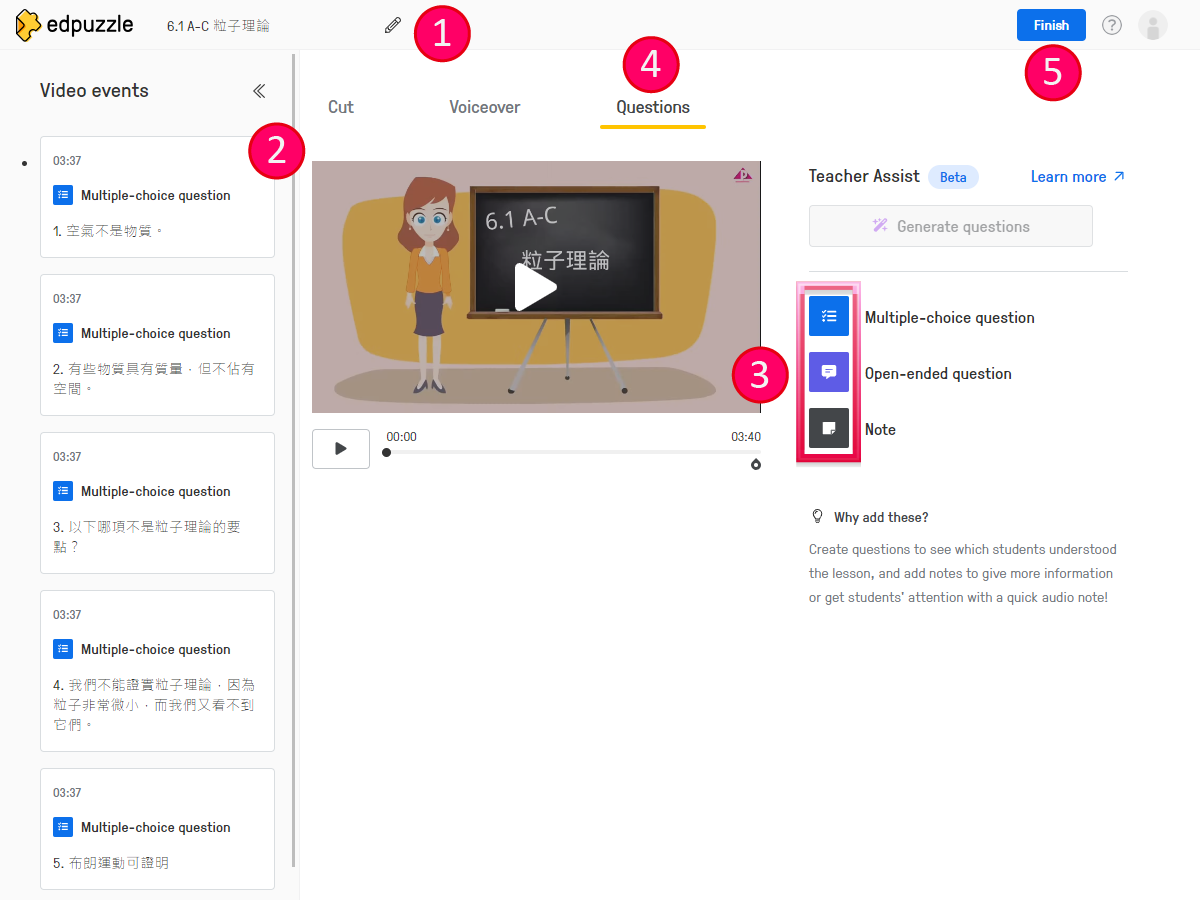

| 1 | 修改標題 Change the title |
| 2 | 點選題目來修改或刪除 Click to select a question to edit or delete |
| 3 | 點按來修改或刪除題目 Click to edit or delete the question |
| 4 | 加入「多項選擇題」、「開放式題目」或「筆記」 Add a ‘multiple-choice question’, ‘open-ended question’ or ‘note’ |
| 5 | 切換編輯模式,包括剪輯、加入旁白及修改問題 Switch to another editing mode, such as cutting the video, adding voiceover or editing questions. |
| 6 | 修改完成後,按 Finish 來完成 Click on the ‘Finish’ button if you have completed all the amendments. |

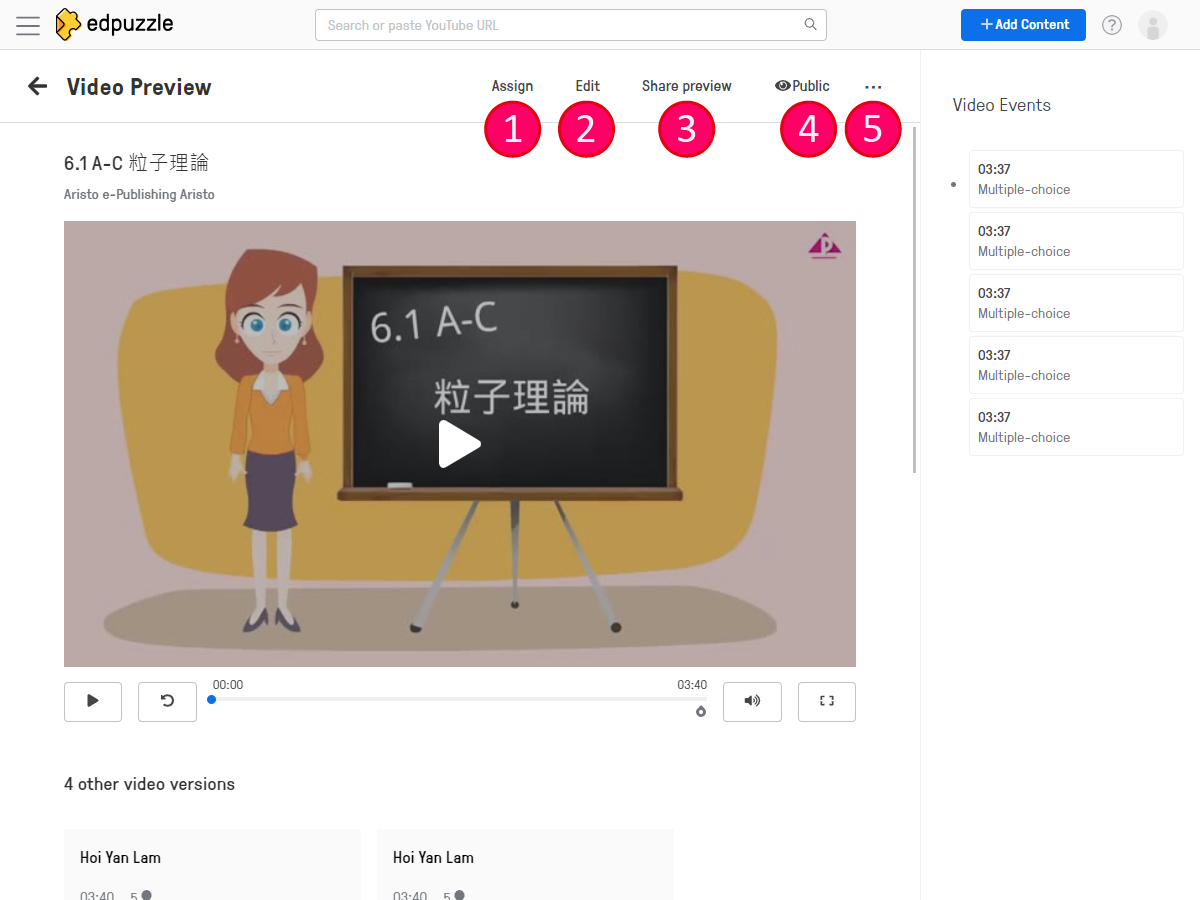
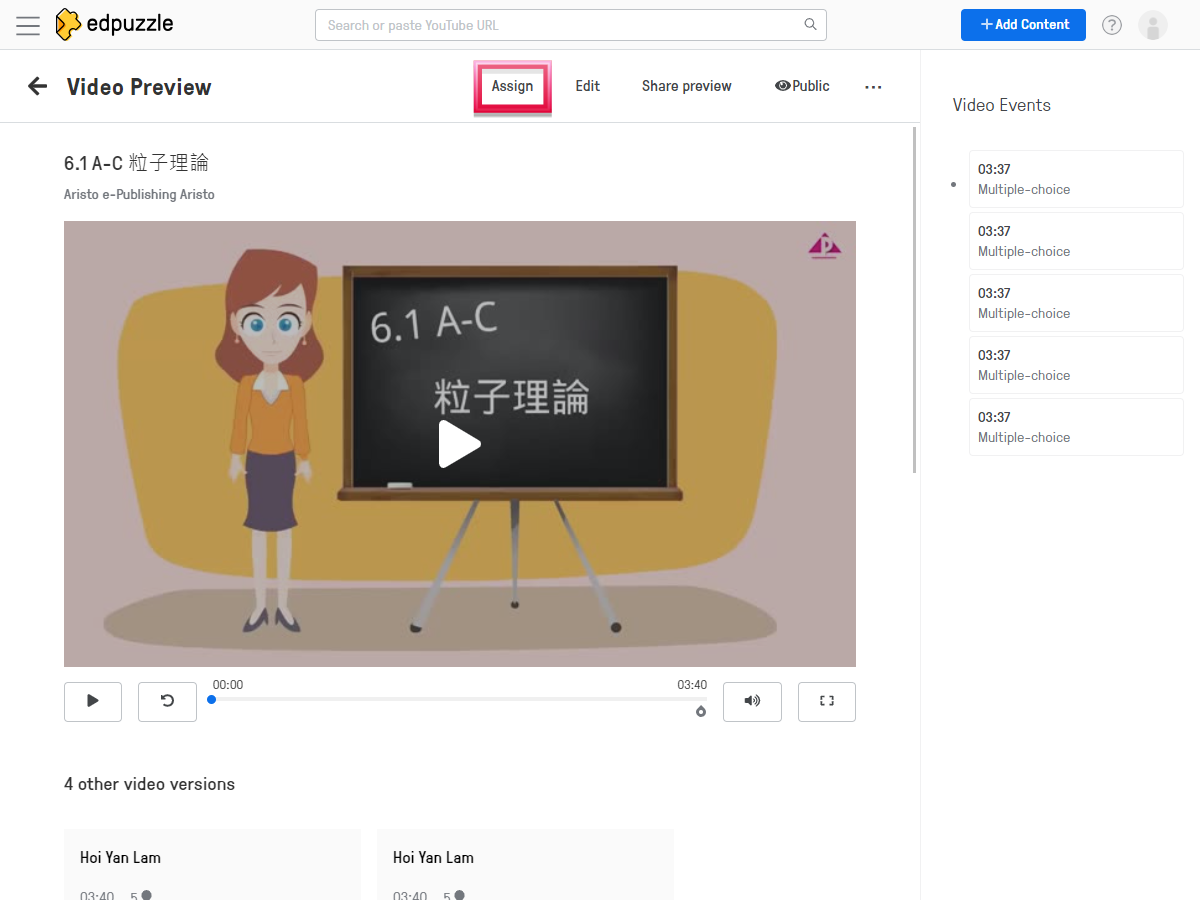
| 1 | Assign: 經「班別 (Class)」將練習發放給學生 Assign: Release the exercise to students via a ‘class’ |
| 2 | Edit: 修改練習內容 Edit: edit the content of this exercise |
| 3 | Share preview: 將練習的預覽連結發放給其他教師 Share preview: Share the preview link of this exercise with other teachers |
| 4 | 將練習設定為 Public (可公開在 Edpuzzle 讓其他用戶搜尋)或 Private(只讓教師及自己的學生觀看) Set the visibility of this exercise to ‘Public’ (that allows other users to find your exercise on Edpuzzle) or ‘Private’ (only the teacher and students can view) |
| 5 | 其他操作,例如複製練習 (Duplicate)、移動練習 (Move to folder)或刪除 (Delete) Other actions, such as ‘Duplicate’, 'Move to folder’ and ‘Delete’ |


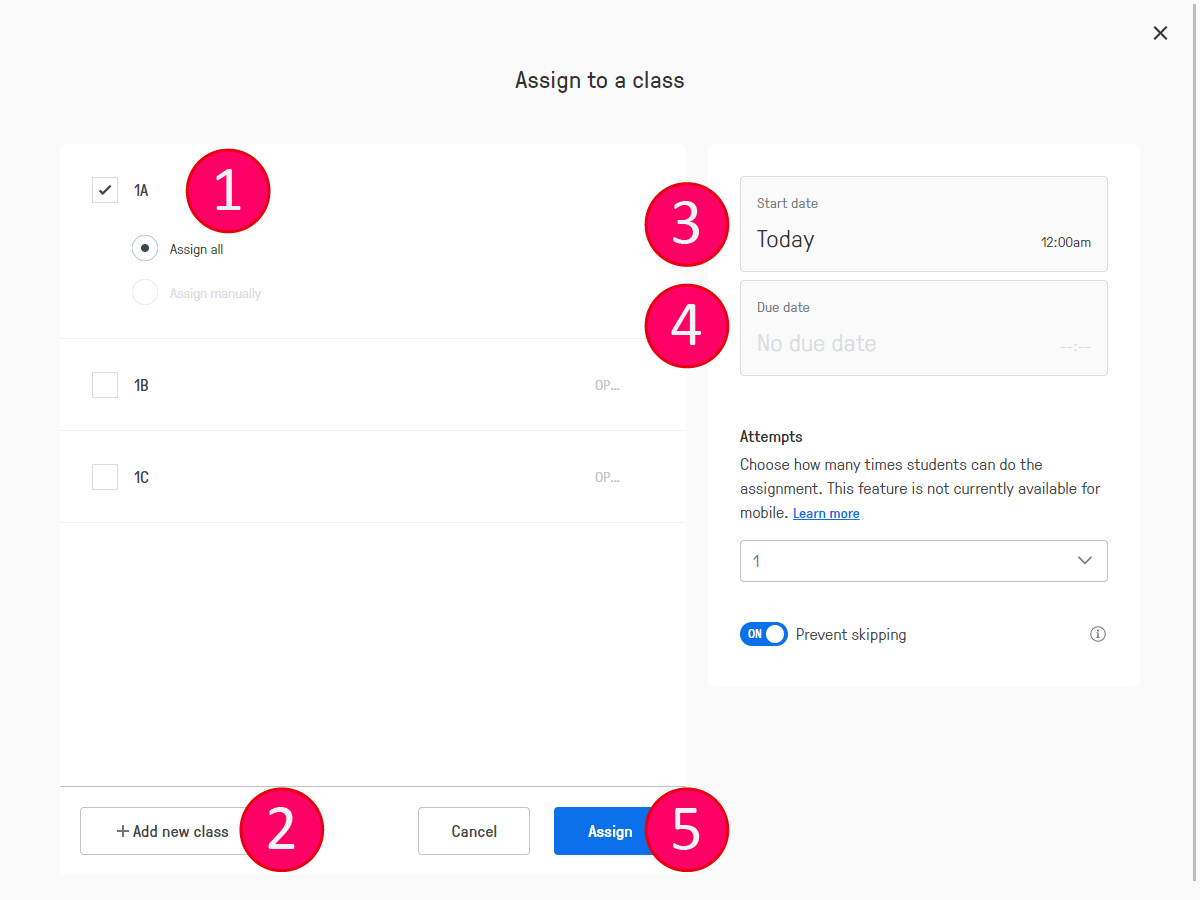
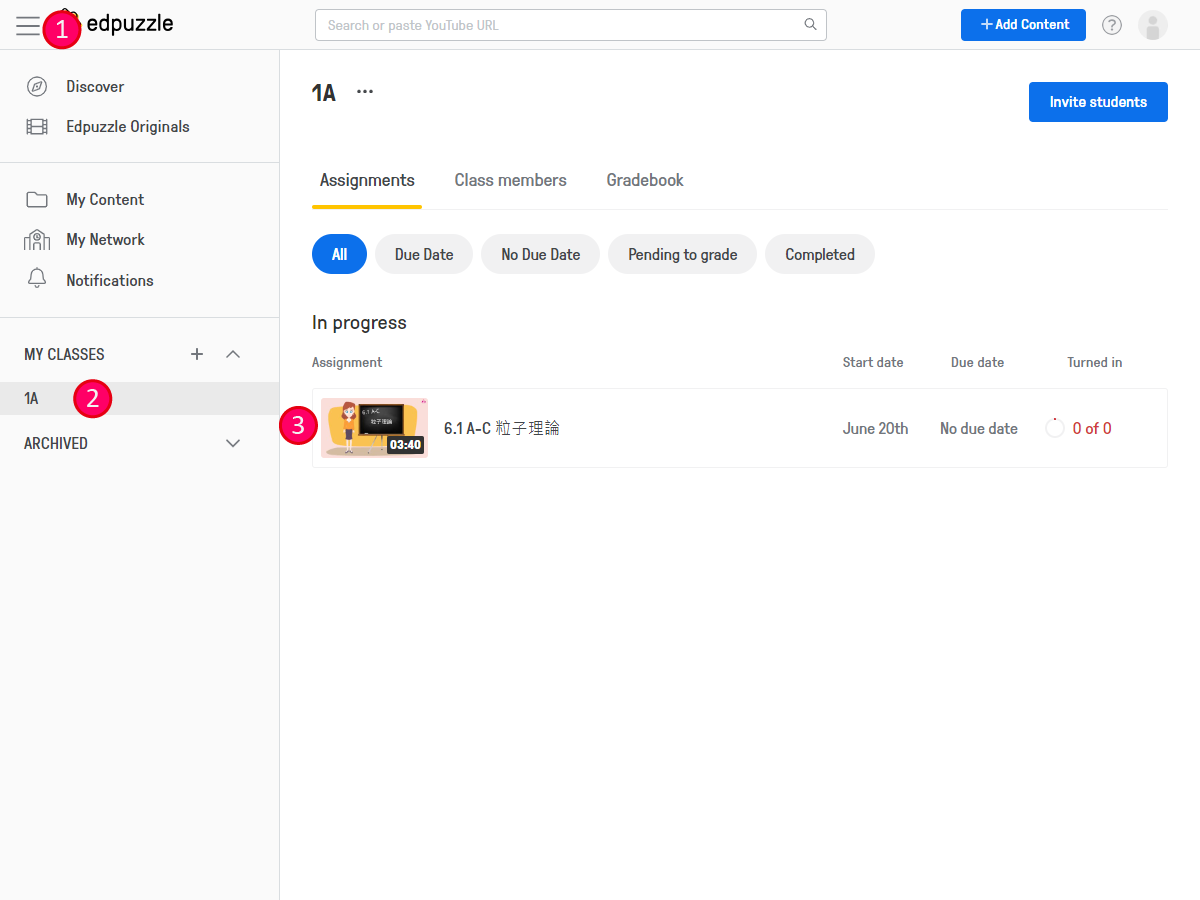
| 1 | 選擇班別 Select the class(es) |
| 2 | 新增班別 Add new class |
| 3 | 設定練習的開始及結束日期 Set the start date and due date of the exercise |
| 4 | 可在此設定學生能否在觀看影片時跳過問題 You can set here whether or not to allow students to skip the questions while watching the video |
| 5 | 完成設定後可點按 Assign Click on the ‘Assign’ button if you have finished the setting |
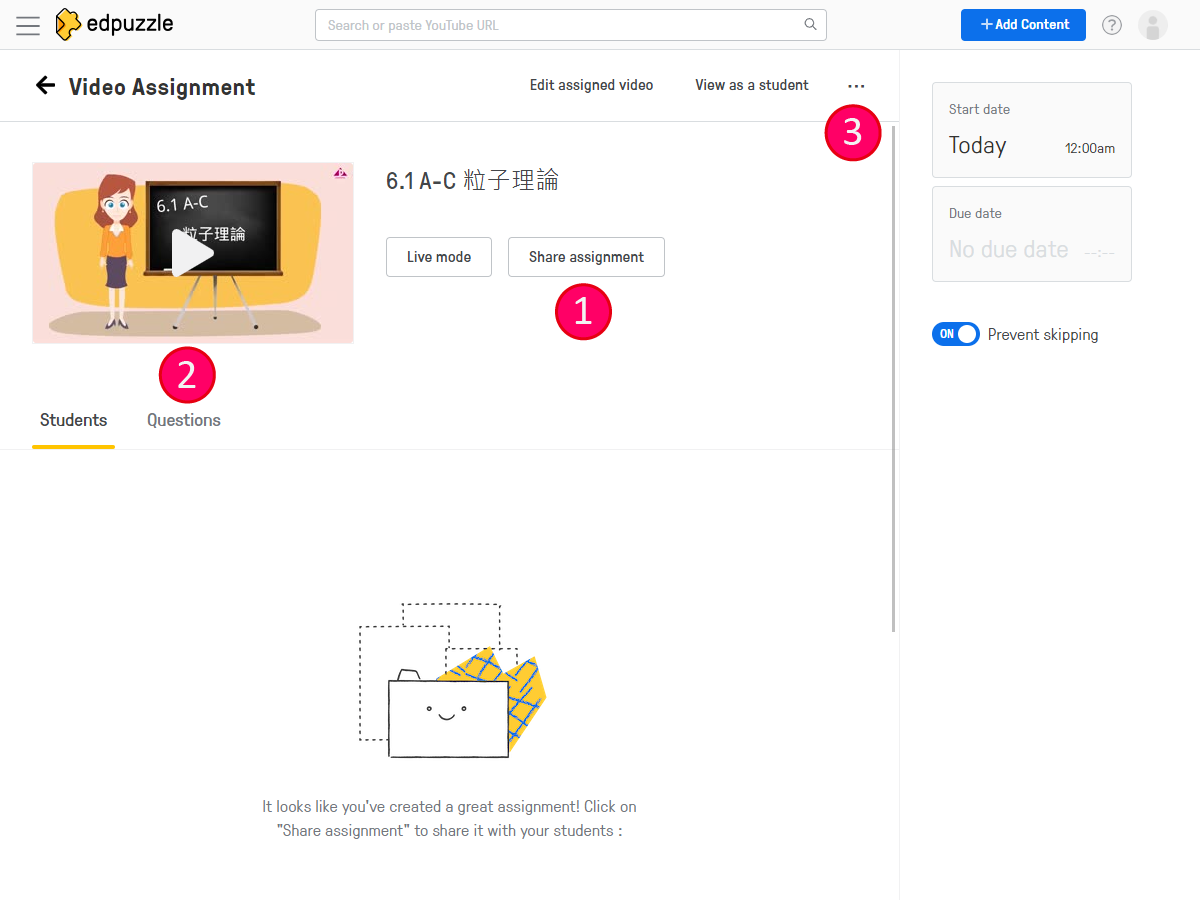

| 1 | 選擇練習發放模式:Live mode 或 Share assignment Select a mode to share: ‘Live mode’ or ‘Share assignment’ |
| 2 | 查閱成績報告 Check the performance report |
| 3 | 點按可重設學生進度或下載成績報告 Click here can reset the student progress or download the grades |


使用問題生成器 (Question Generator):
Using the Question Generator:
- 開啟雅集網站上的 Edpuzzle 練習,或在 Edpuzzle 網頁貼上我們的 YouTube 影片連結來使用所需影片。
- 選擇 「編輯 (Edit)」來啟動影片編輯器。
- 點按影片上方的「問題 (Questions)」。
- 點按「生成題目 (Generate Questions)」。
- 選擇要加入的問題類型,系統將自動生成問題並加入影片內。
- Open the Edpuzzle exercises from Aristo’s website or find our YouTube videos on Edpuzzle by pasting the YouTube link.
- Select ‘Edit’ to launch the video editor.
- Navigate to the ‘Questions’ tab located above the video.
- Press the ‘Generate Questions’ button.
- Choose the type of questions you wish to add. Questions will then be automatically created and inserted into the video.
備註:
Notes:
示範影片:
Demonstration videos:
|
|
| 在雅集預製的 Edpuzzle 練習上使用問題生成器 (Question Generator)。 Using the Question Generator with our pre-made Edpuzzle exercises. |
|---|
|
|
| 在雅集的 YouTube 影片上使用問題生成器 (Question Generator)。 Using the Question Generator with our YouTube videos. |
|---|
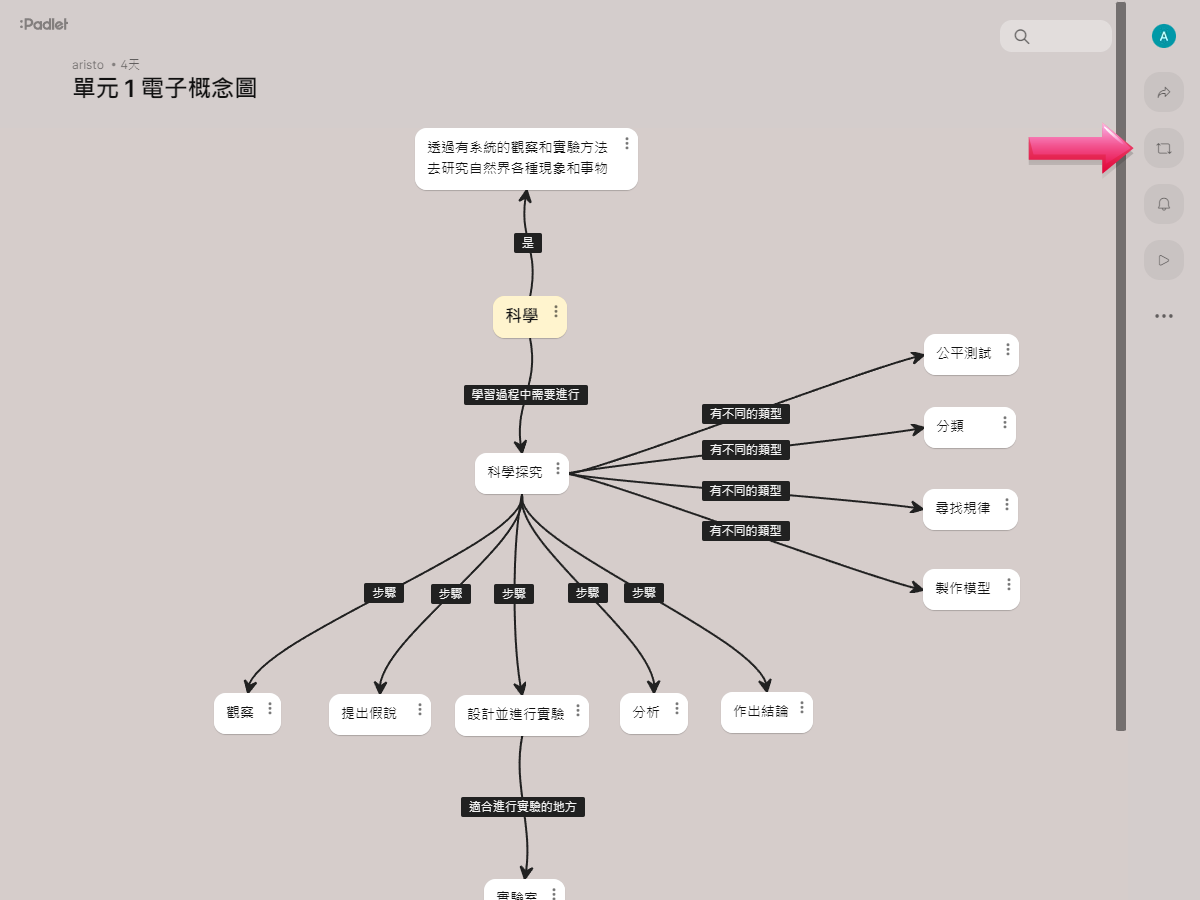
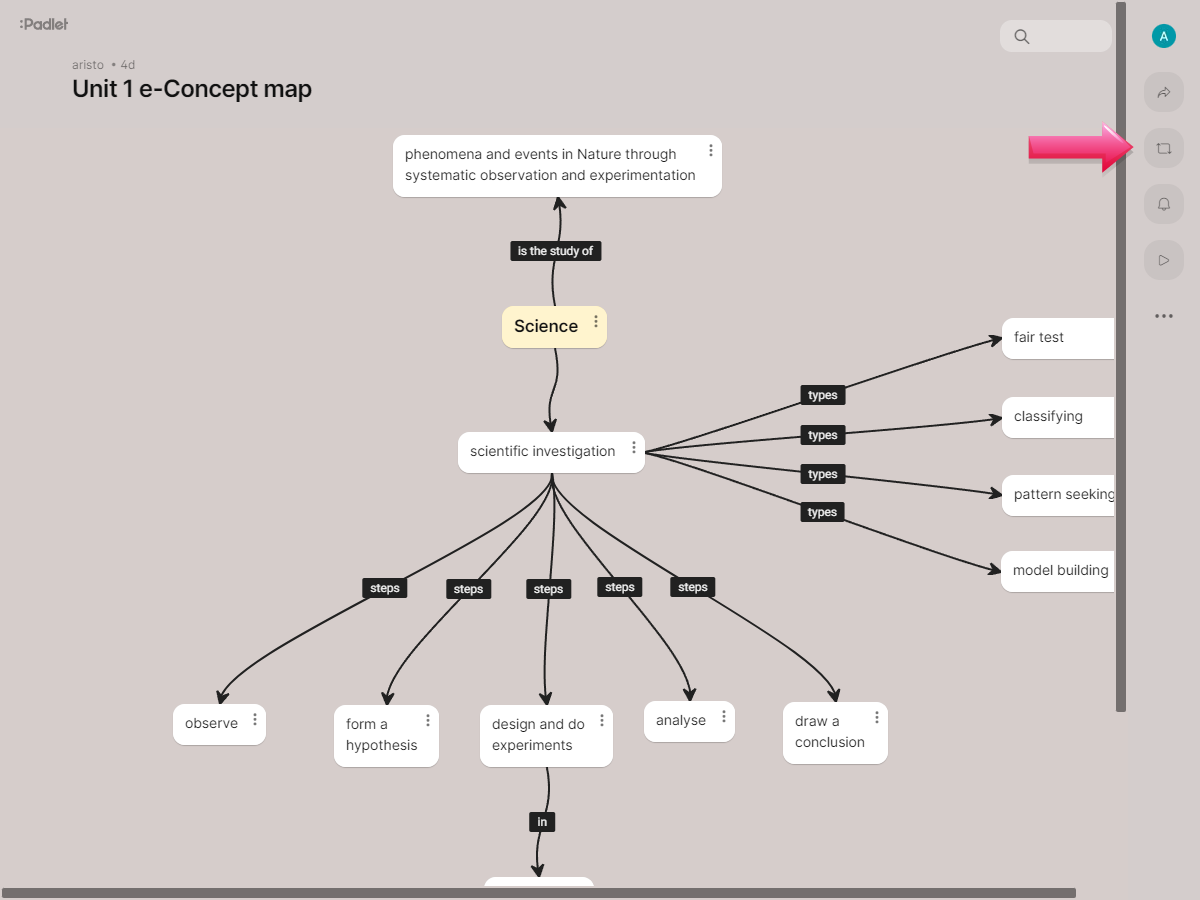
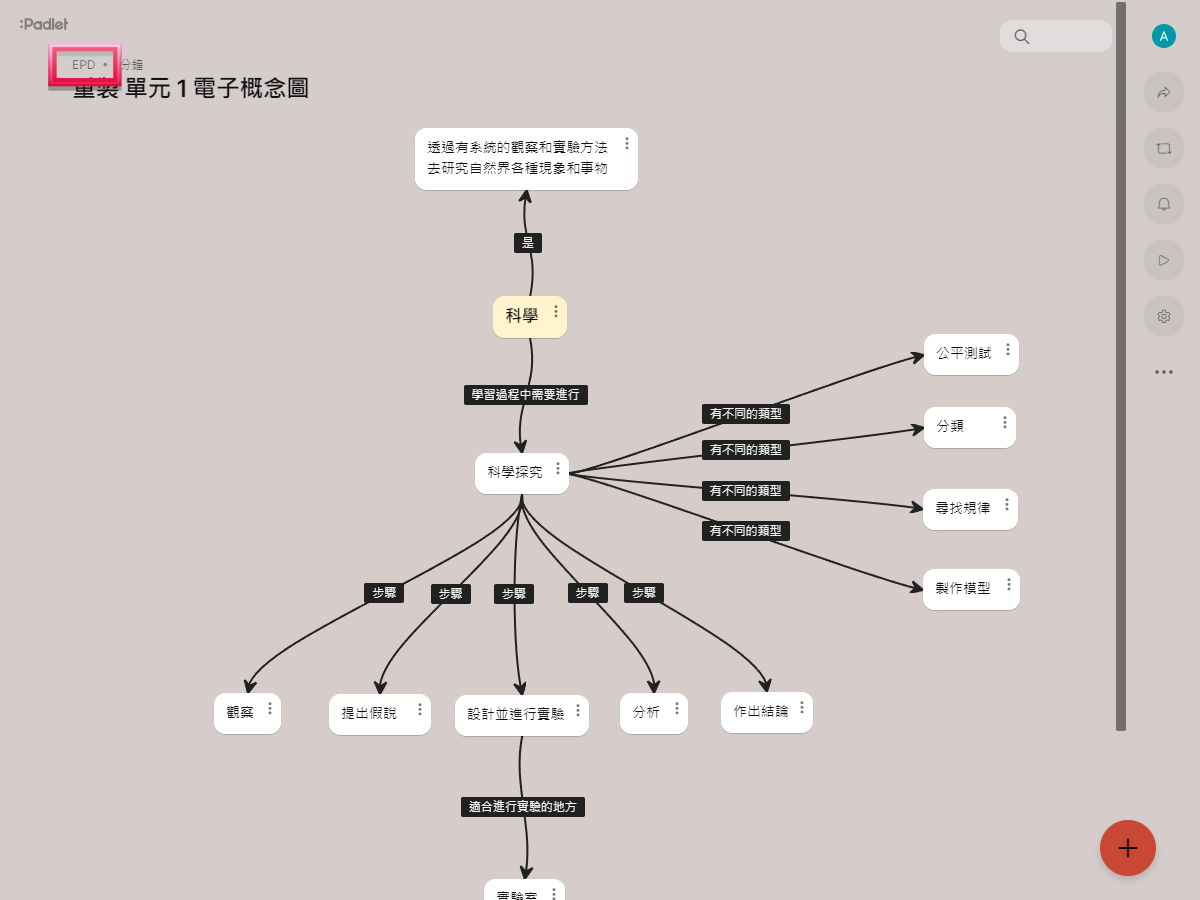
開啟雅集製作的 Padlet 腦圖,不用登入 Padlet 也可即時瀏覽。
Open the Padlet mind map created by Aristo. It is not required to log in to view the mind map on Padlet.
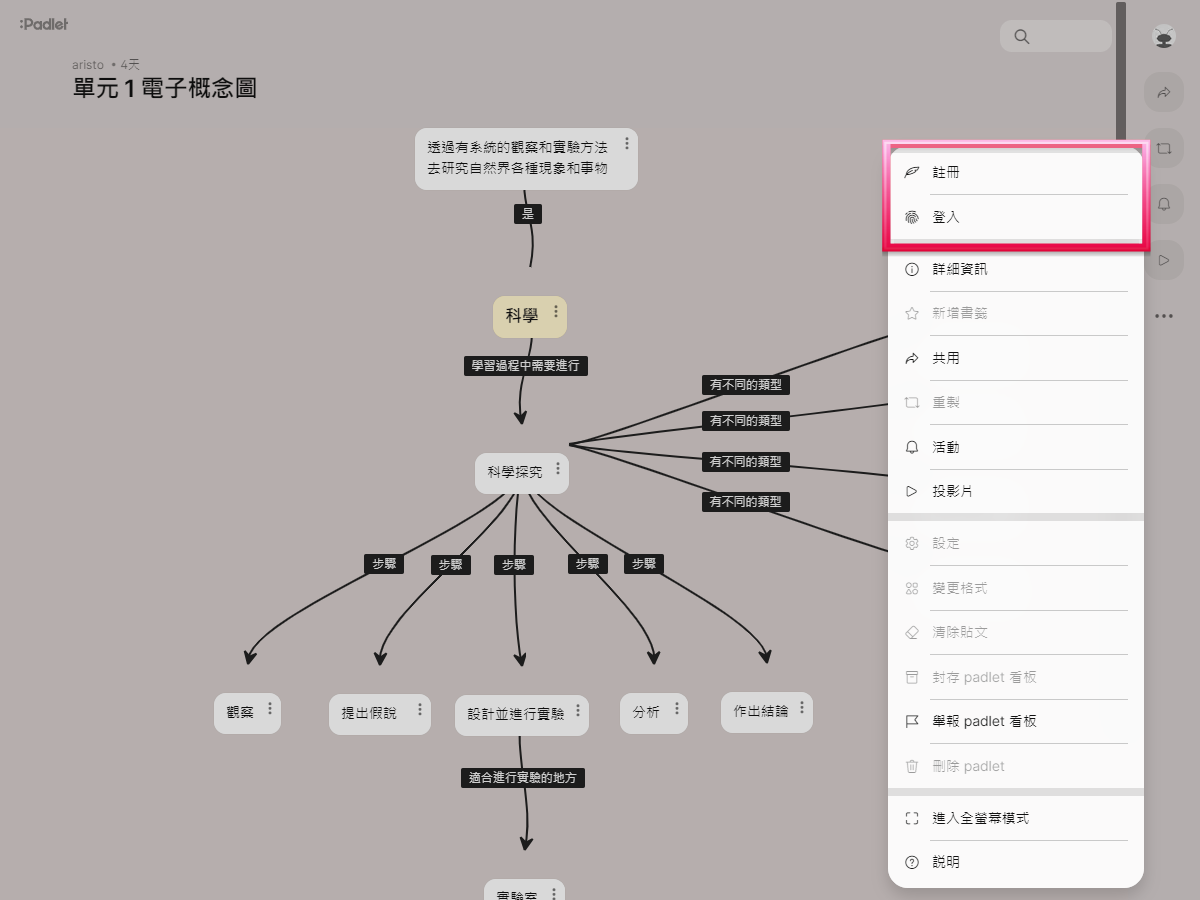
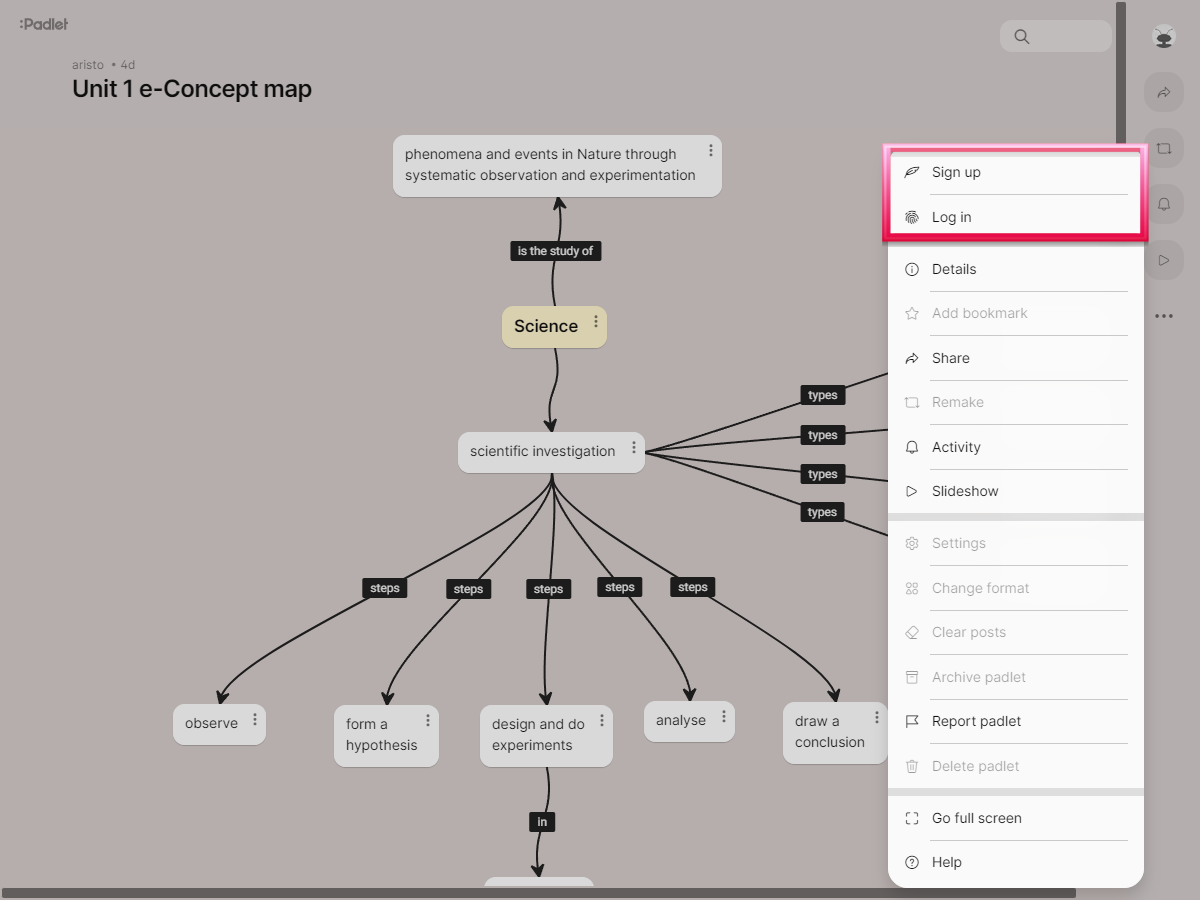
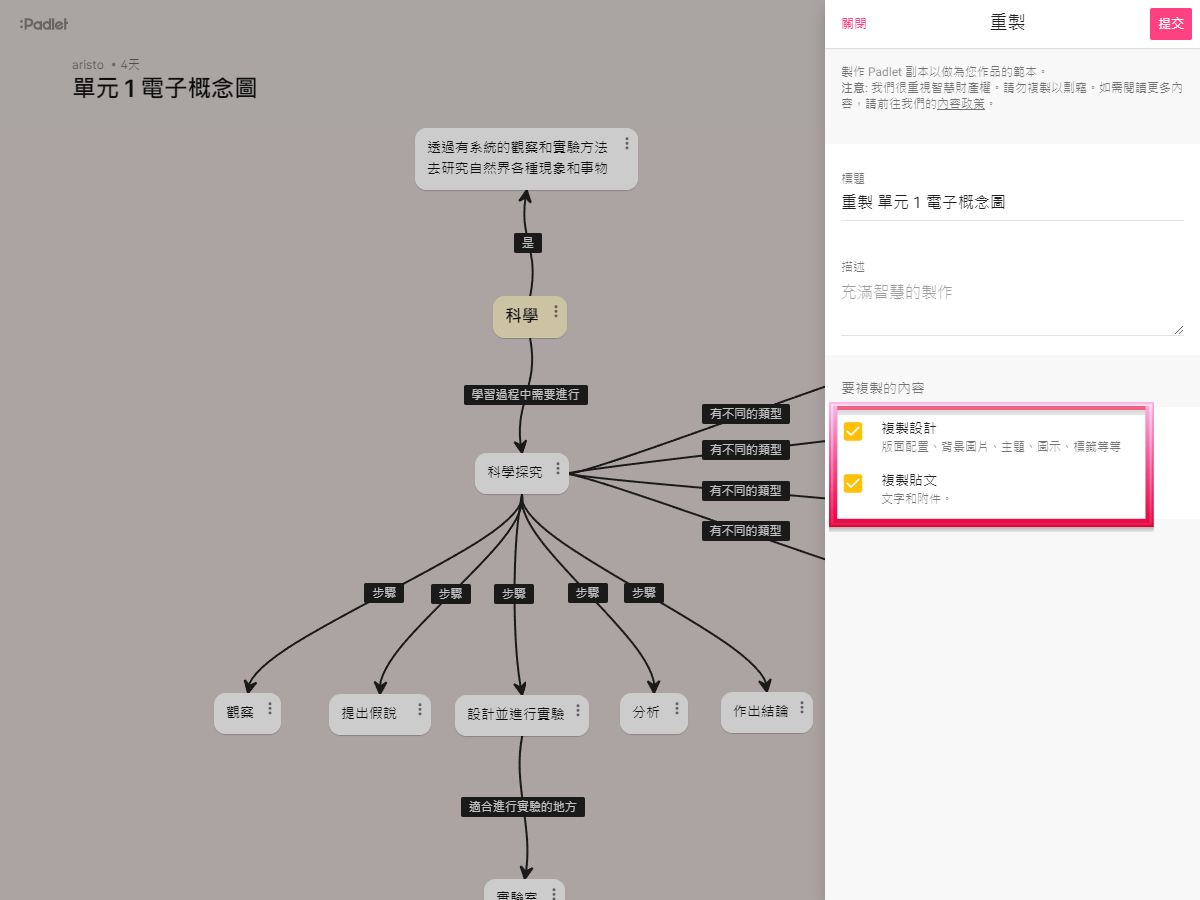
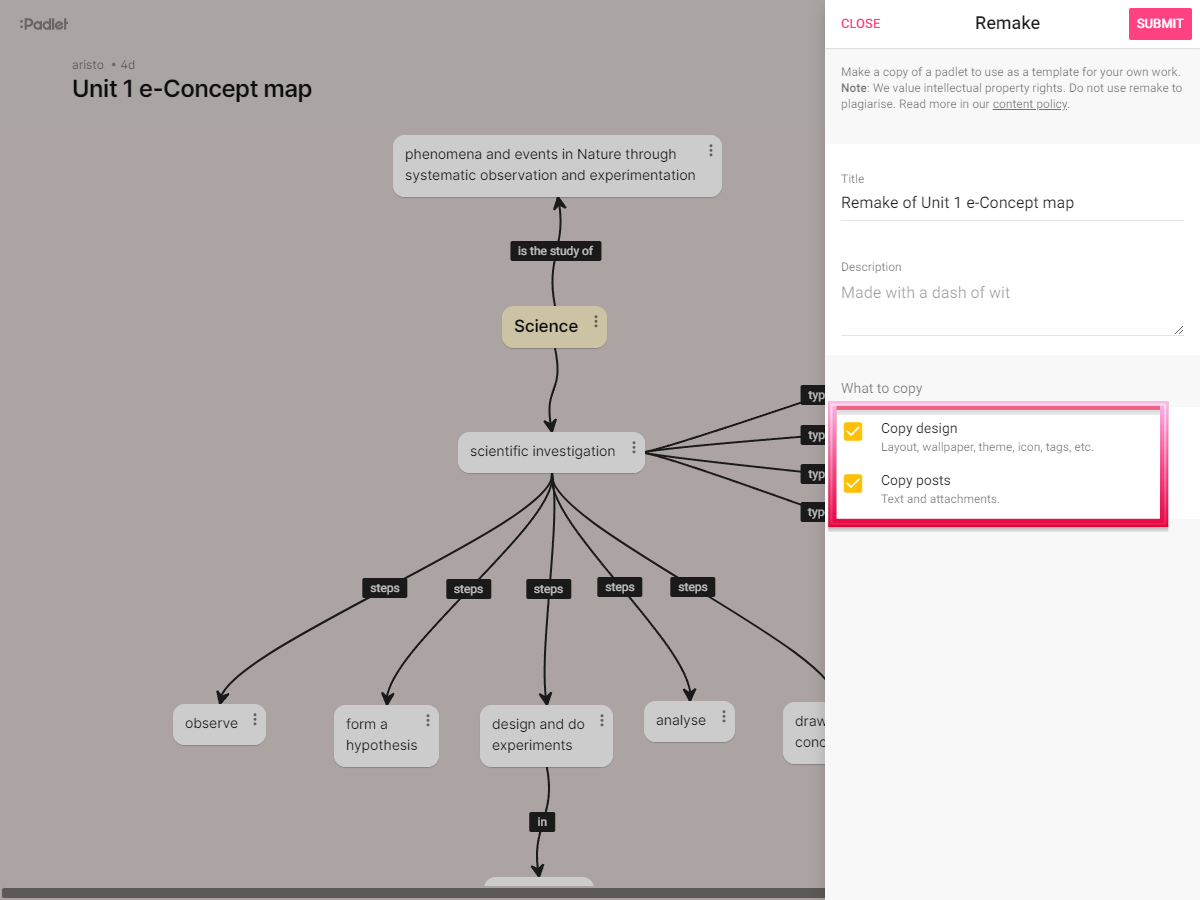
如要複製 Padlet 檔案,教師需登入自己的 Padlet 帳戶。可點按右上方的 ⋯ 按鈕,點按「註冊(Sign up)」登記或「登入(Log in)」登入。教師可使用 Google 帳戶登記及登入。
To copy the Padlet mind map, teachers will need to log in to Padlet with their own accounts. Tap the ⋯ button in the top right corner, then select Sign up to register a new account or Log in with an existing account. Teachers can also sign up and log in with their Google accounts.
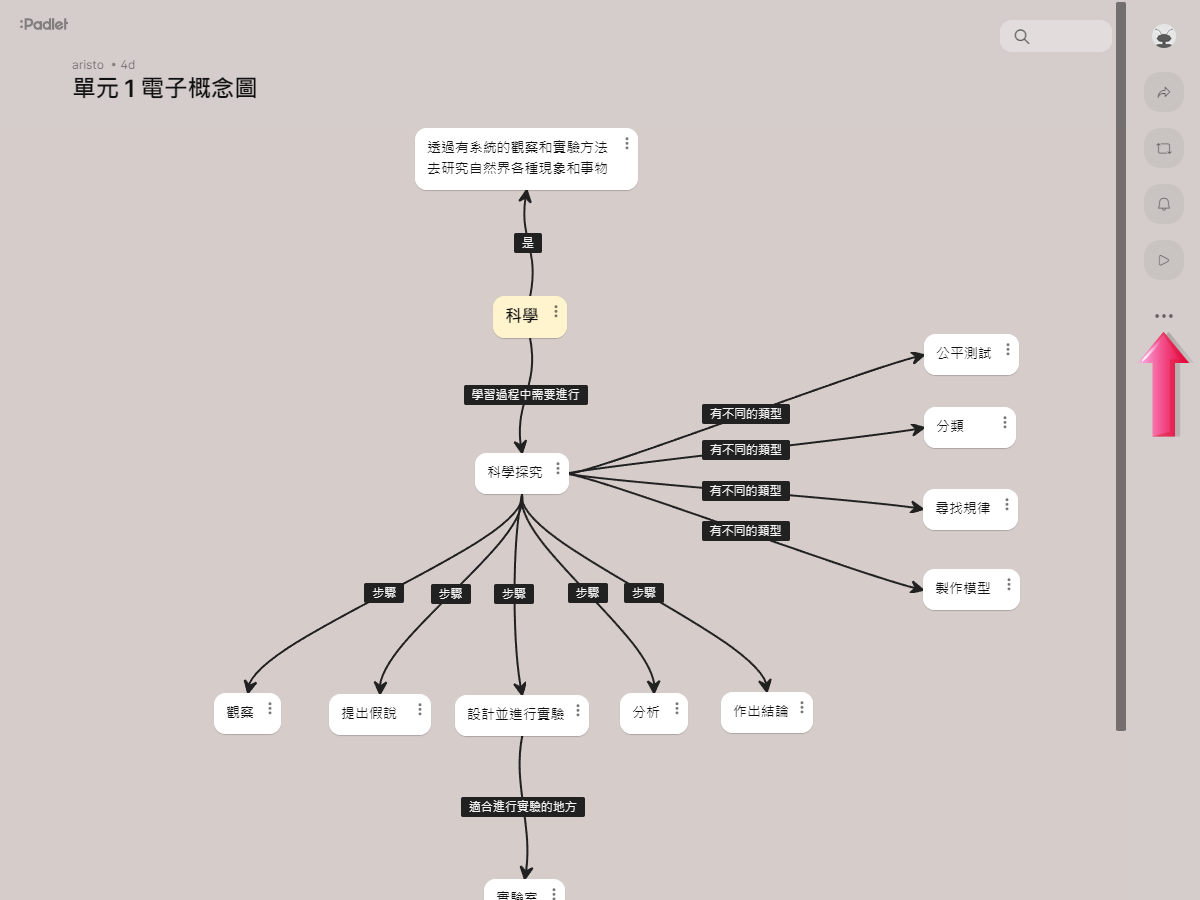
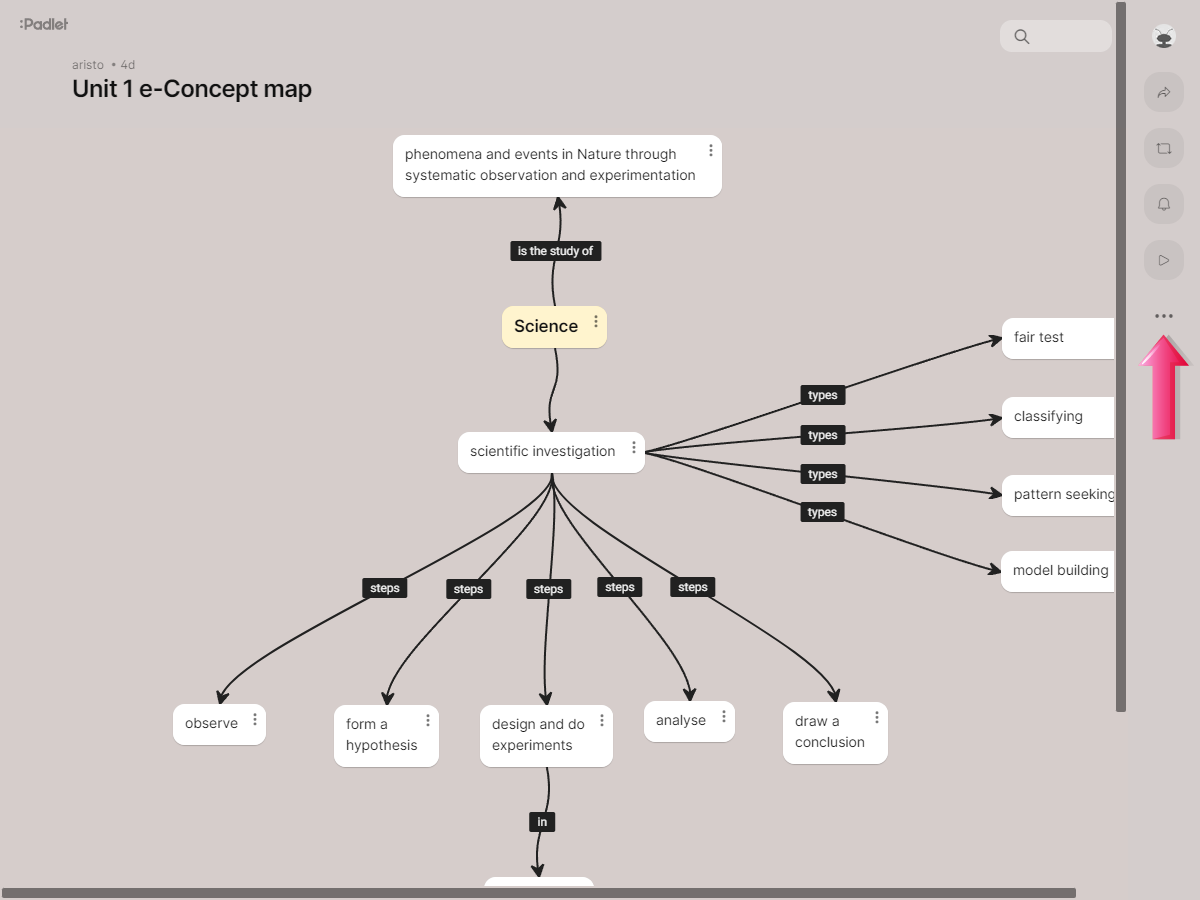
點按右上方的「複製(REMAKE)」按鈕可複製檔案。在複製(REMAKE)設定頁面,點選「複製設計(Copy design)」及「複製貼文(Copy posts)」可將腦圖內容複製到教師帳戶。
Tap the REMAKE button from the top right corner to copy the Padlet file. Under the Remake setup page, select Copy design and Copy posts to copy the contents of the mindmap to the teachers’ own accounts.
成功複製後,教師應可在腦圖左上方看到自己的帳戶名稱。
If the ‘Remake’ is successful, teachers can see their account names at the top left of the mindmap.
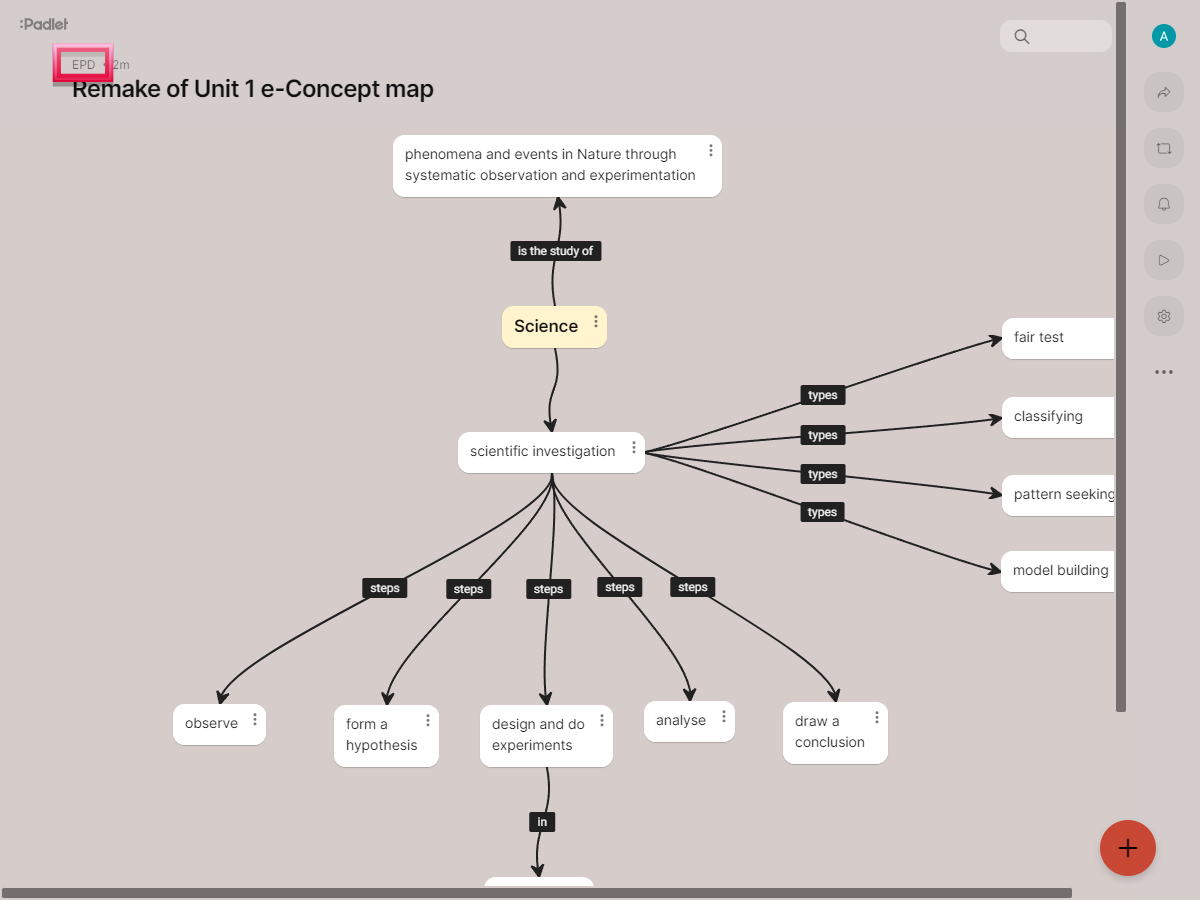
複製檔案後,教師可點按帖子並編輯腦圖內容。點按右下方的 + 按鈕來新增貼文。
After copying the Padlet file, teachers can tap on the posts to edit the mindmap. Tap the + button from the bottom right corner to add new post.
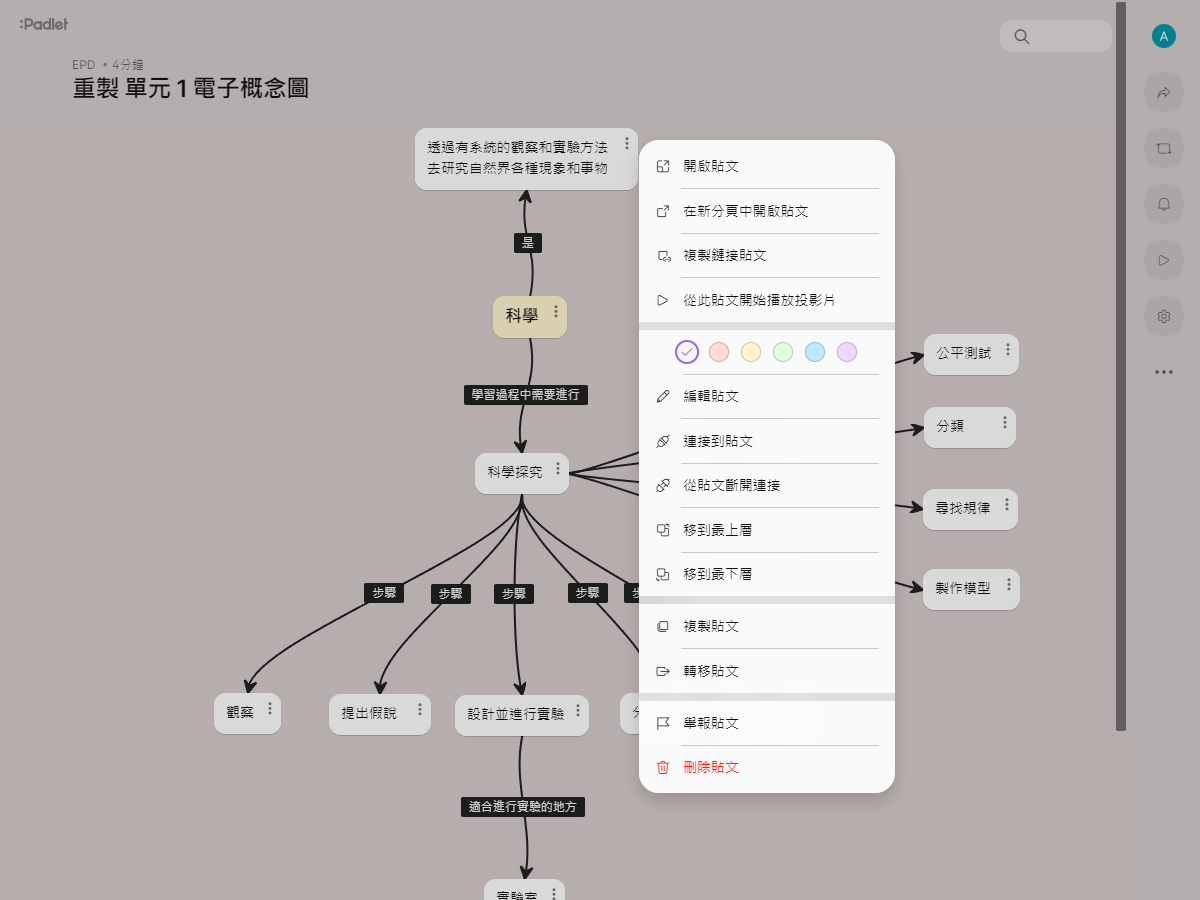
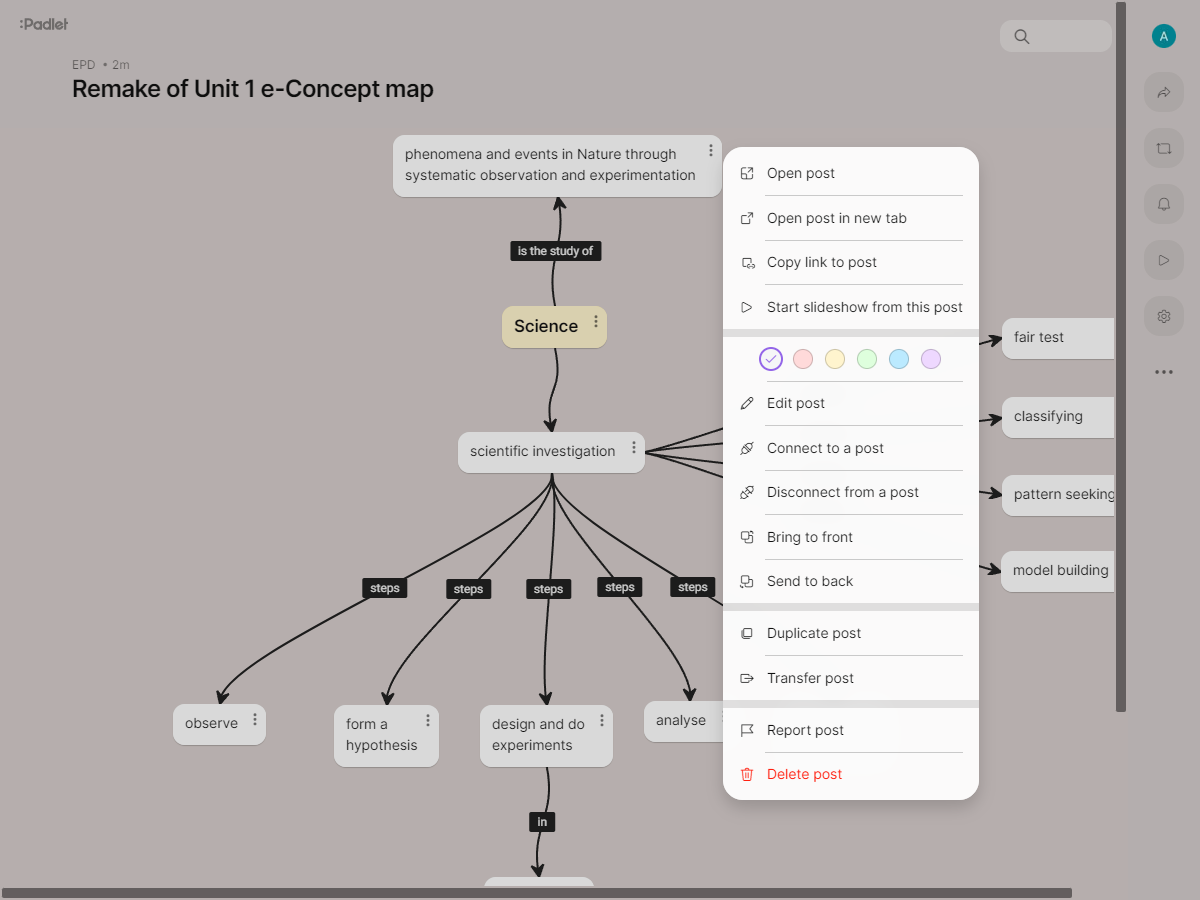
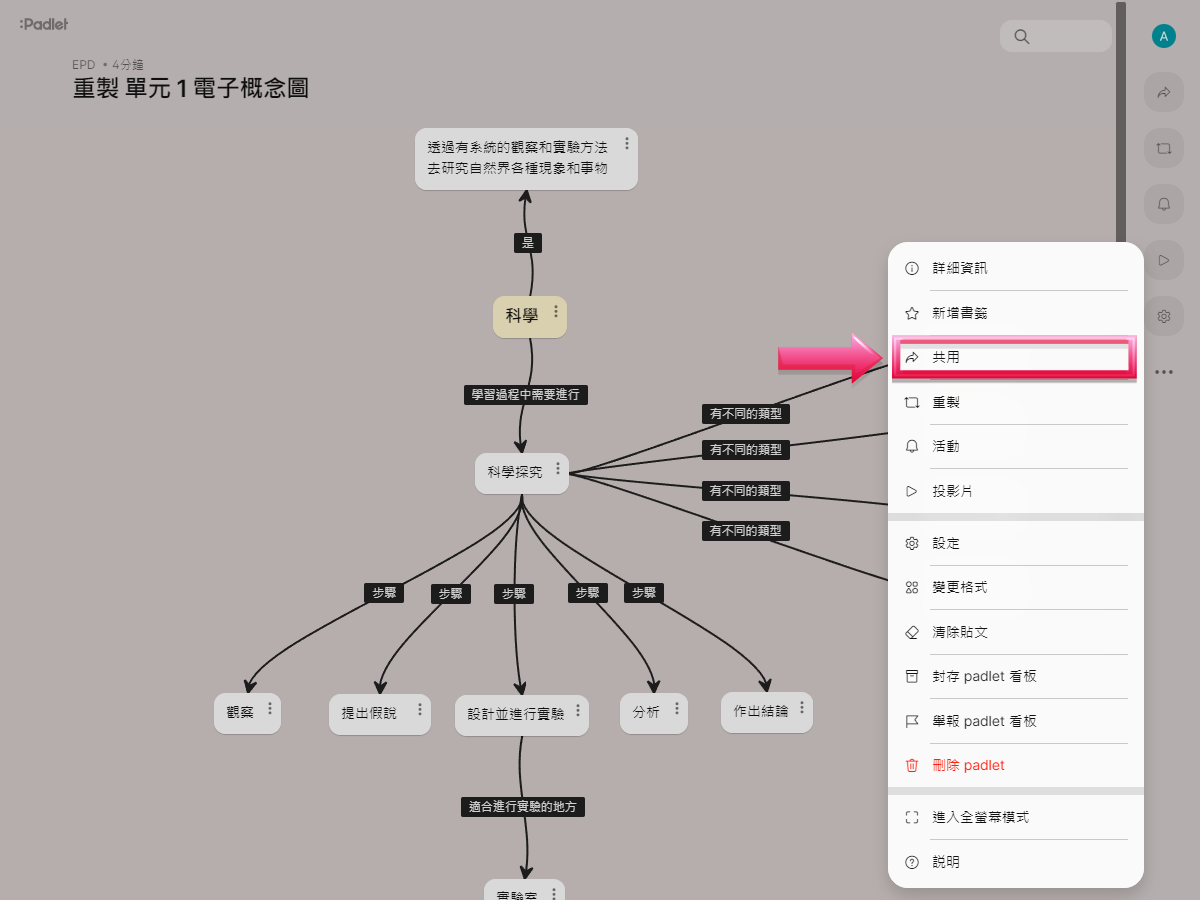
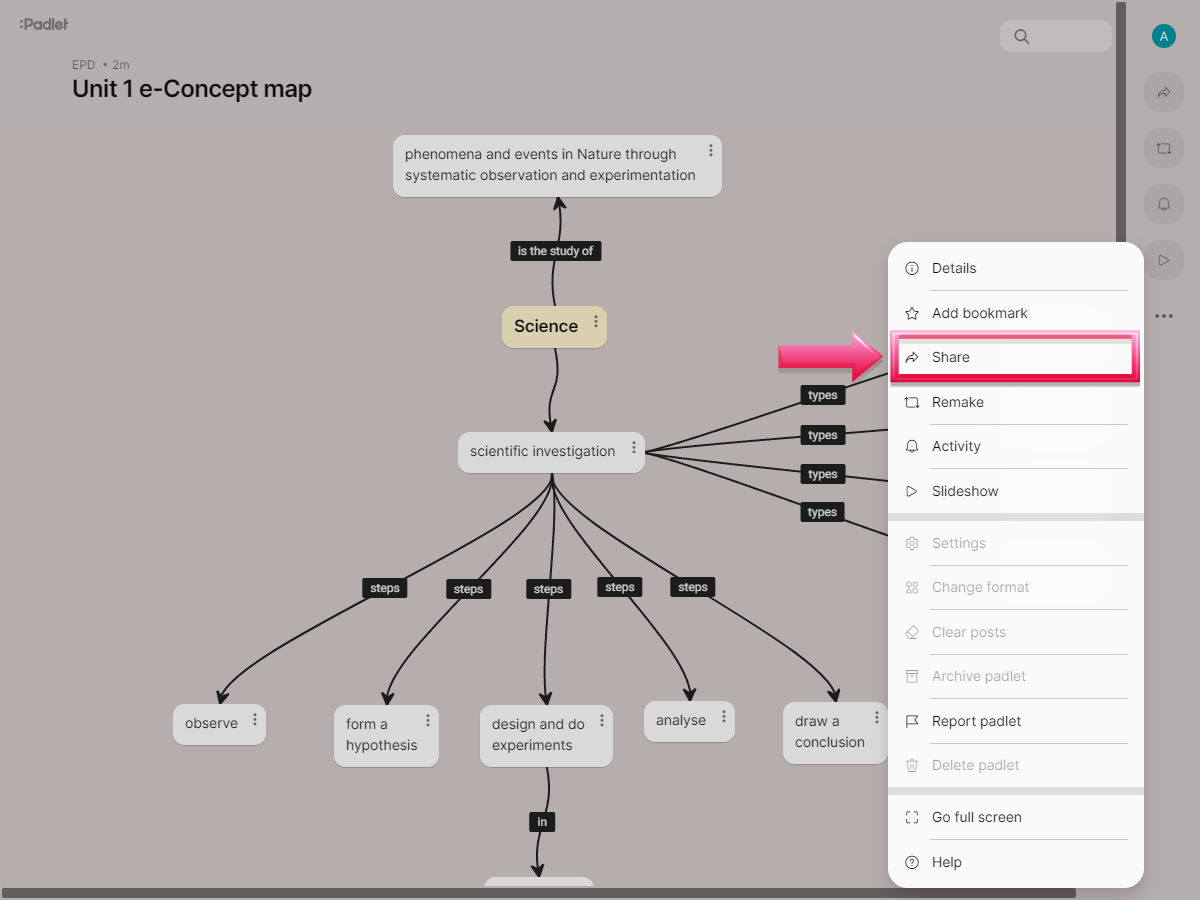
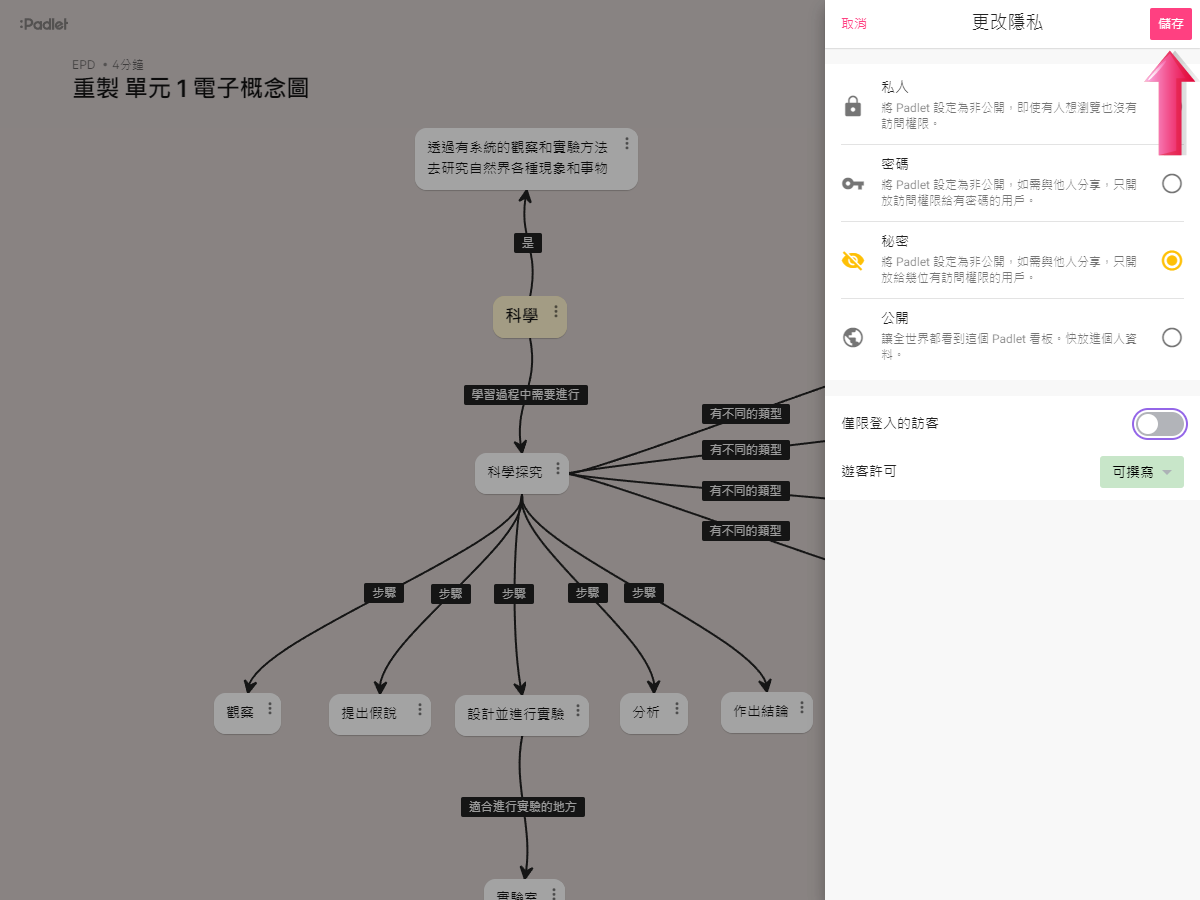
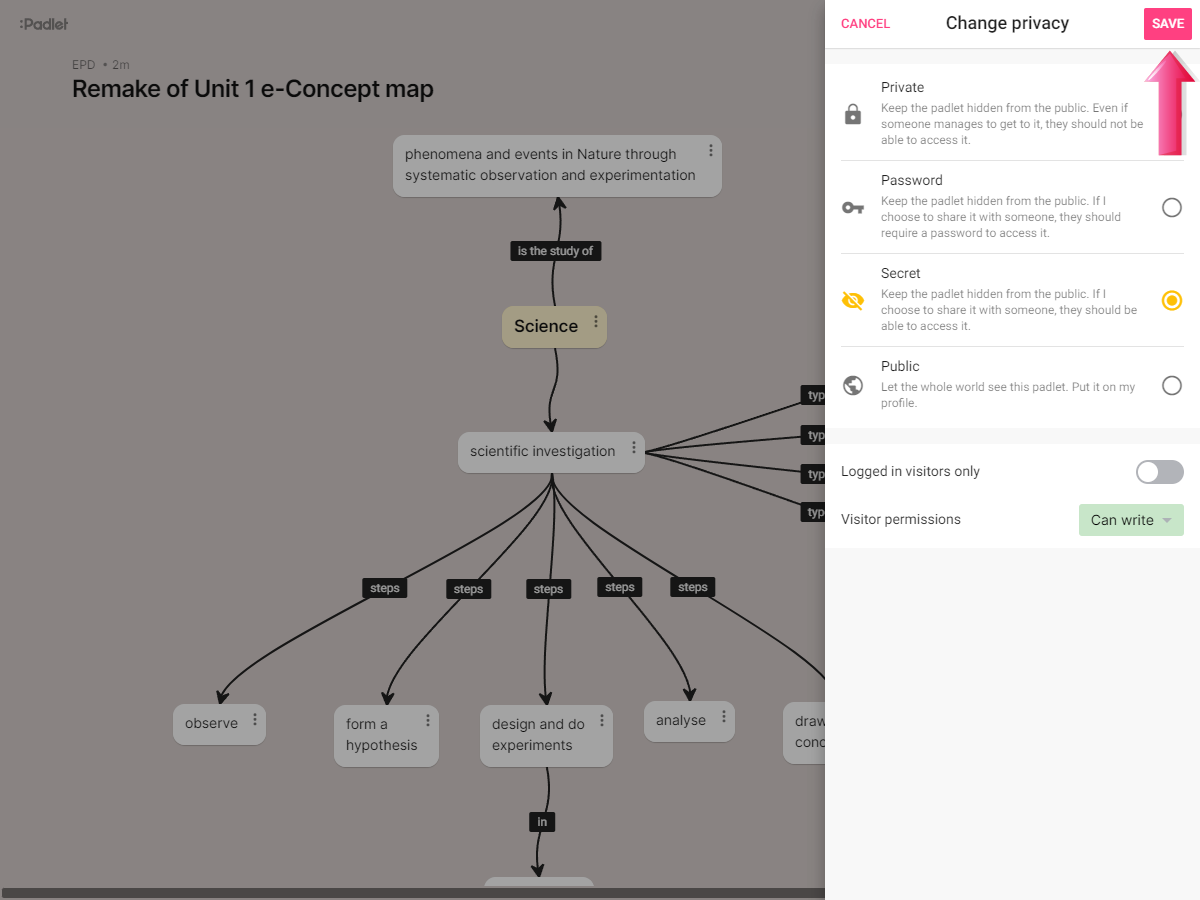
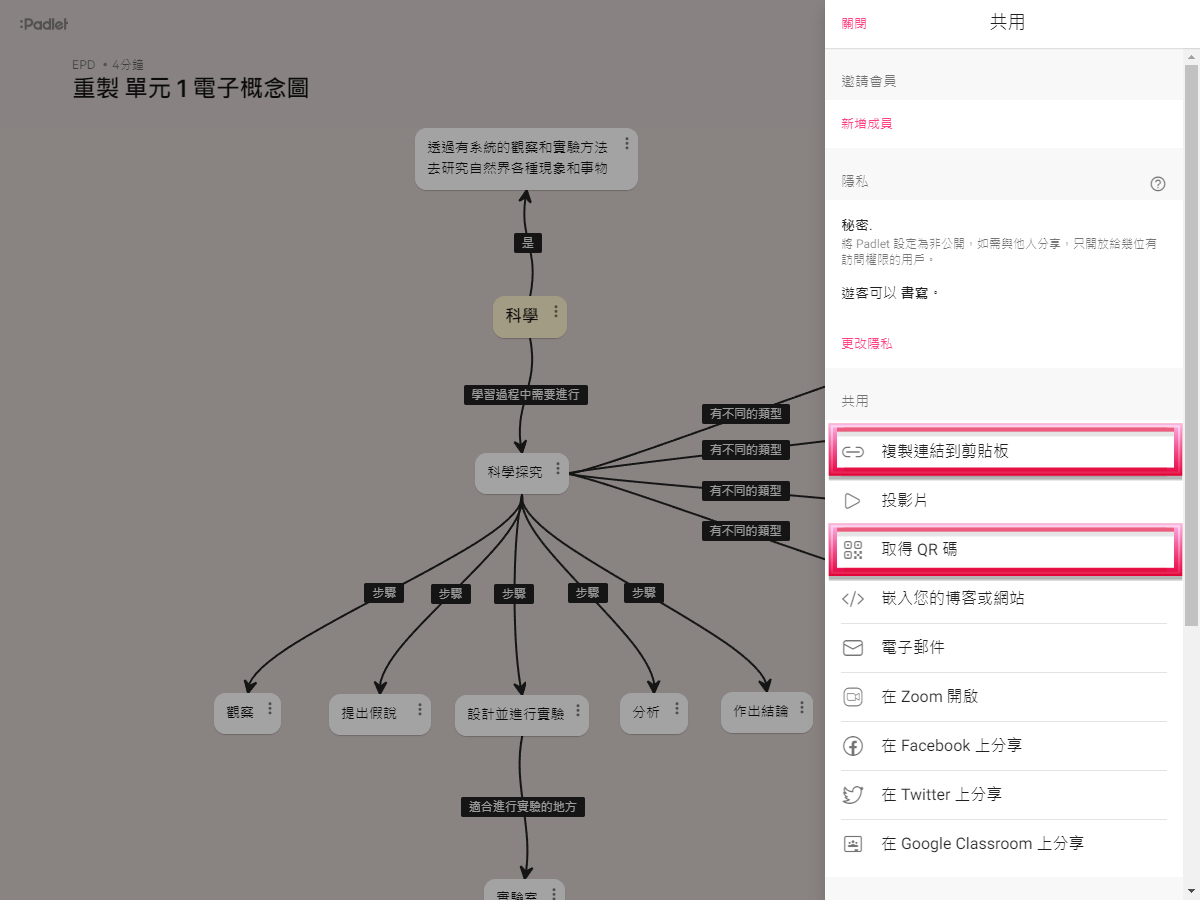
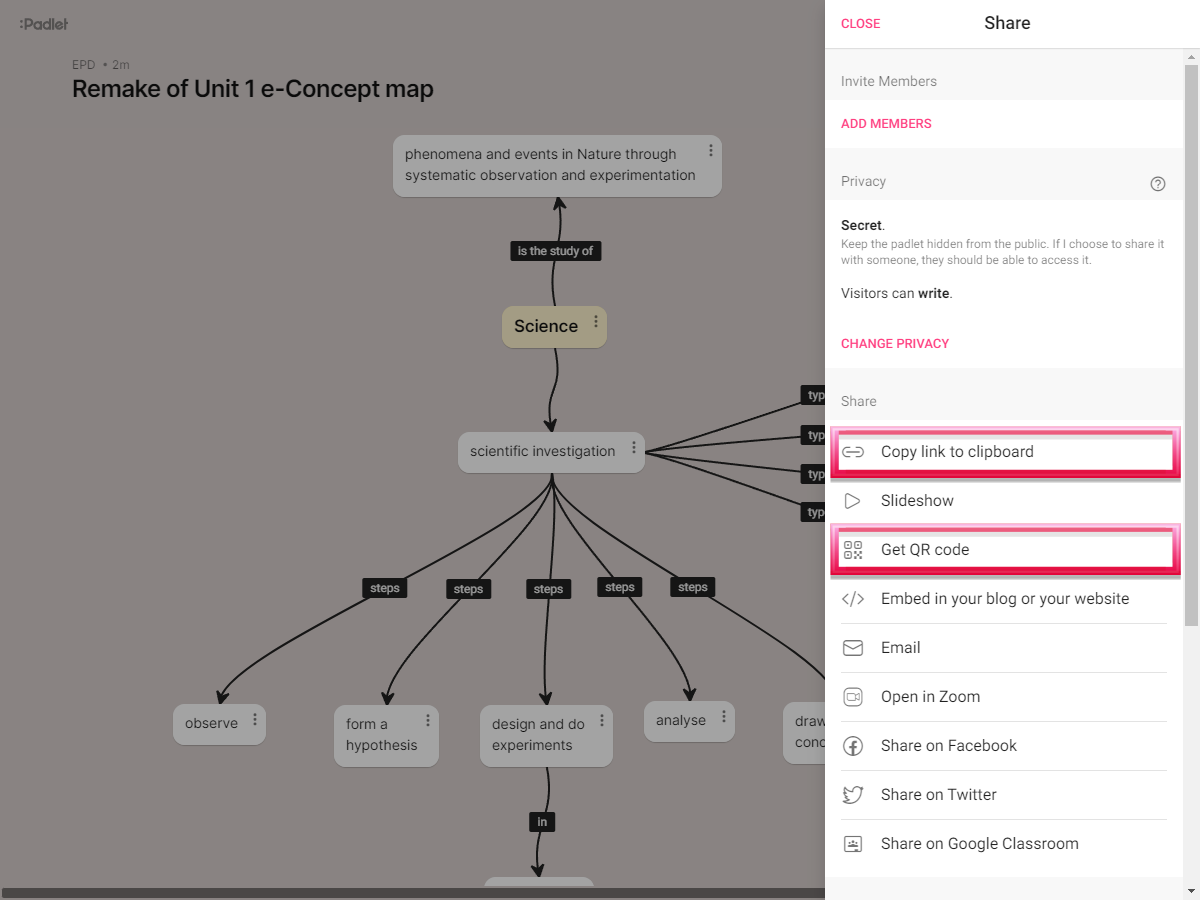
點按右上方的「共用(SHARE)」可開啟發放設定,建議先點按「更改隱私(CHANGE PRIVACY)」設定開啟權限。
Tap the SHARE button from the top right corner to open the sharing setup page. Teachers can tap CHANGE PRIVACY to set the access right of the mindmap.
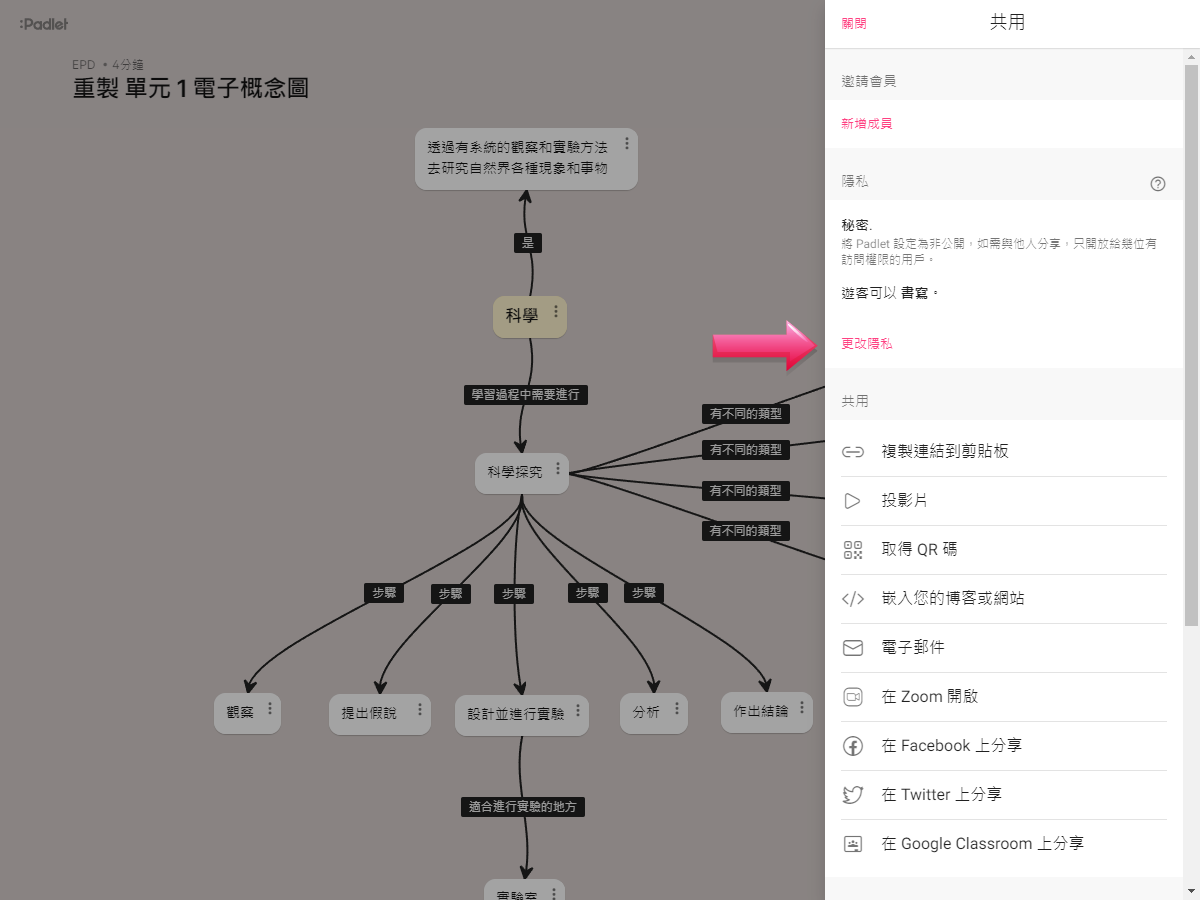
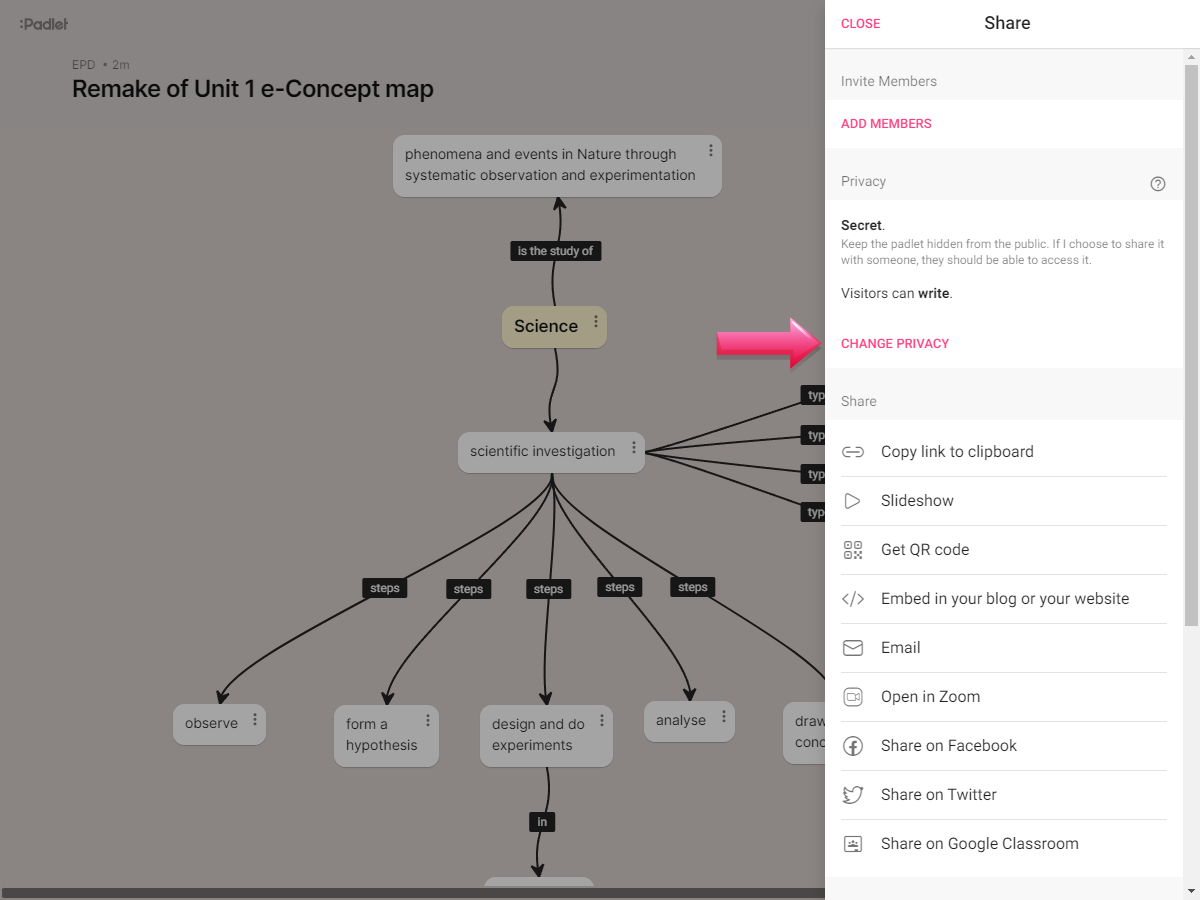
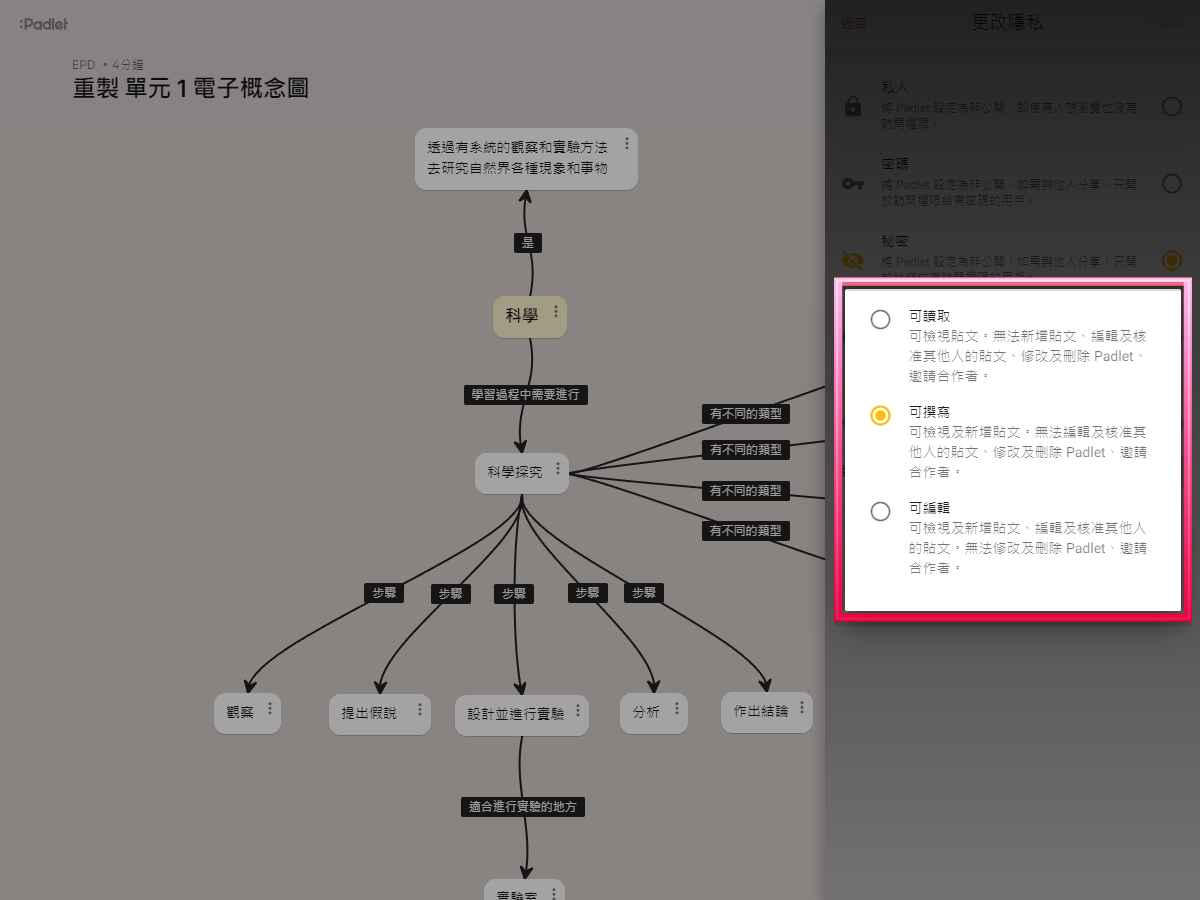
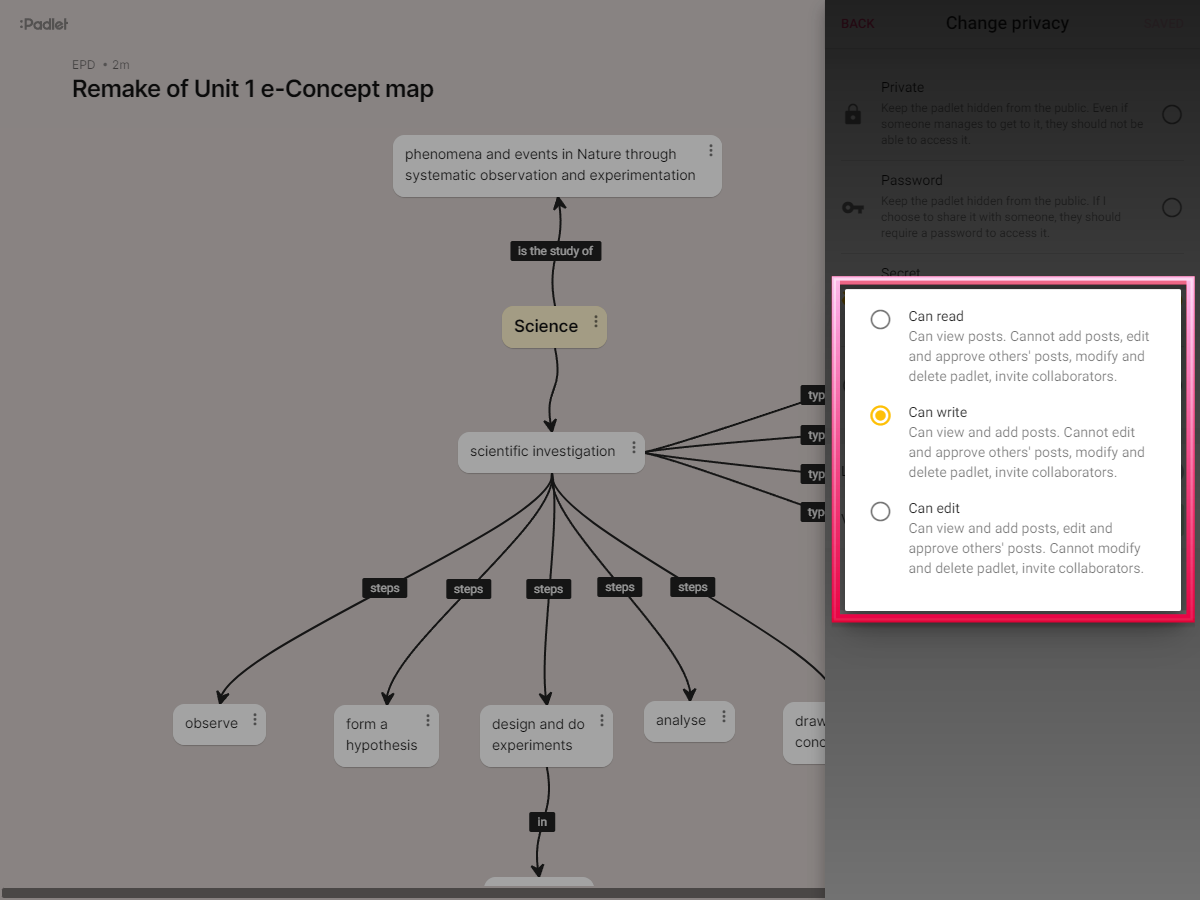
先設定開啟權限,建議選擇「秘密(Secret)」,再點按「遊客許可(Visitor permissions)」設定編輯權限。
Set the required privacy setting (‘Secret’ is suggested), then select the access right from Visitor permissions.
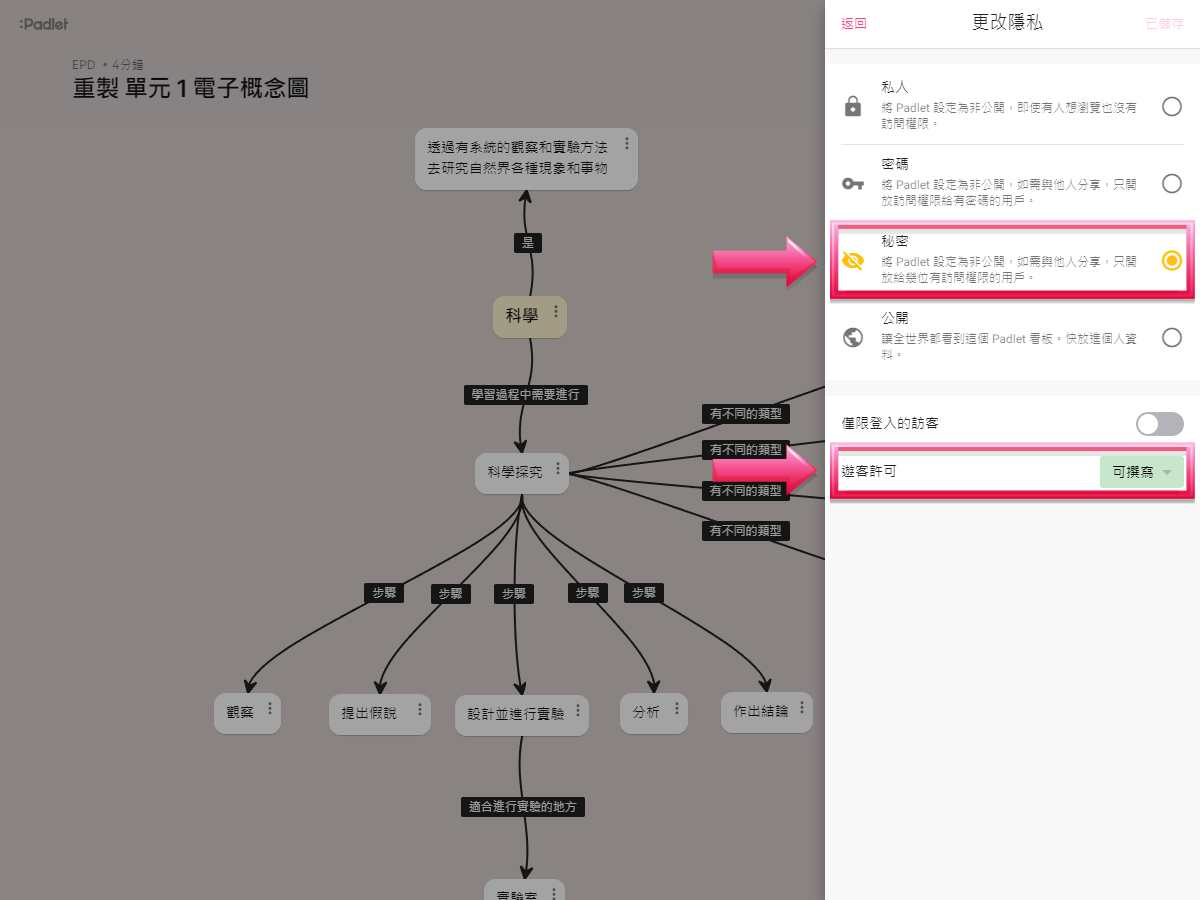
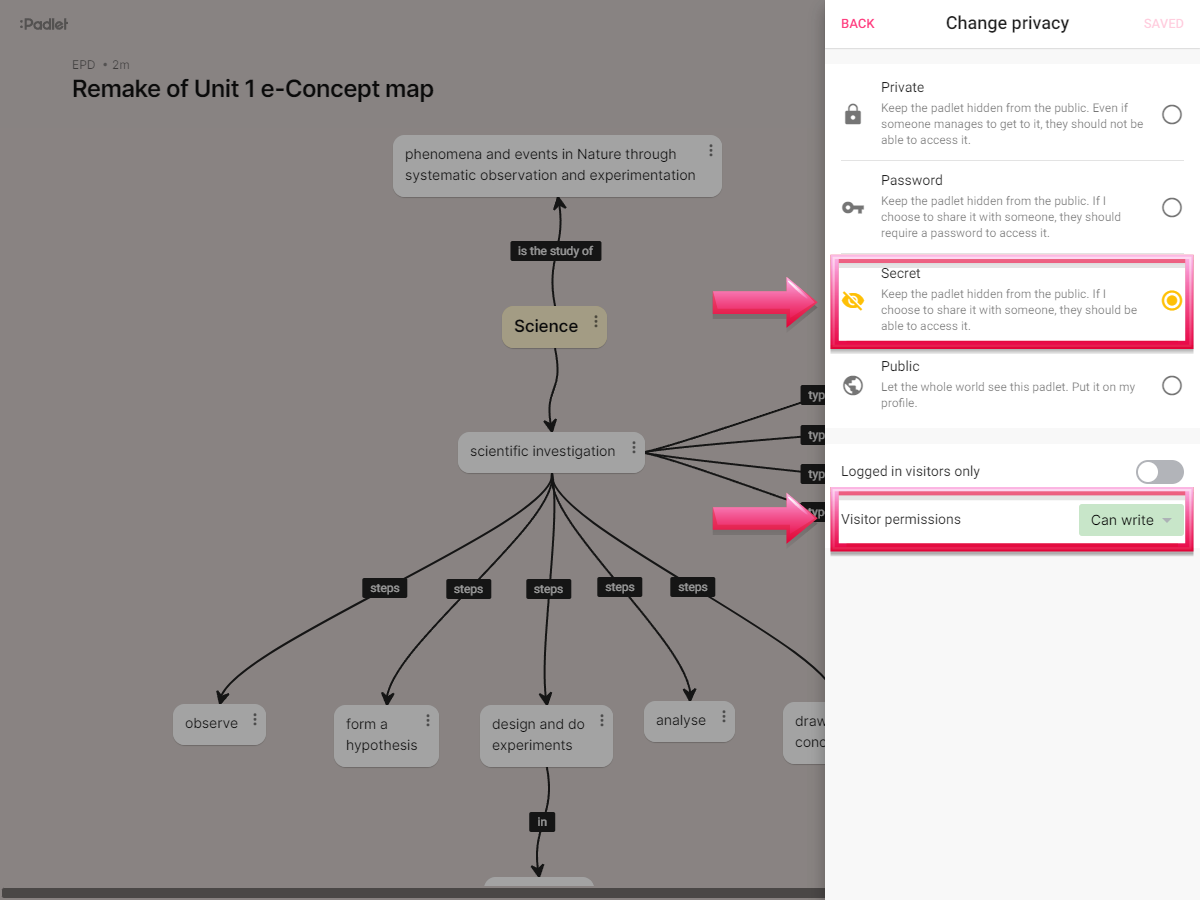
教師可因應教學需要,自行設定學生的編輯權限。
Teachers can select the appropriate access right of their students according to the learning needs.
點按右上方的「儲存(SAVE)」儲存權限設定並返回,在共用(SHARE)頁面可複製腦圖連結或以 QR 碼方式分享腦圖,方便學生立即瀏覽。
Tap the SAVE button from the top right corner to save the access right settings and return. Under the sharing setup page, teachers can copy the link or get the QR code of the mindmap, so that students can open the page and view together.
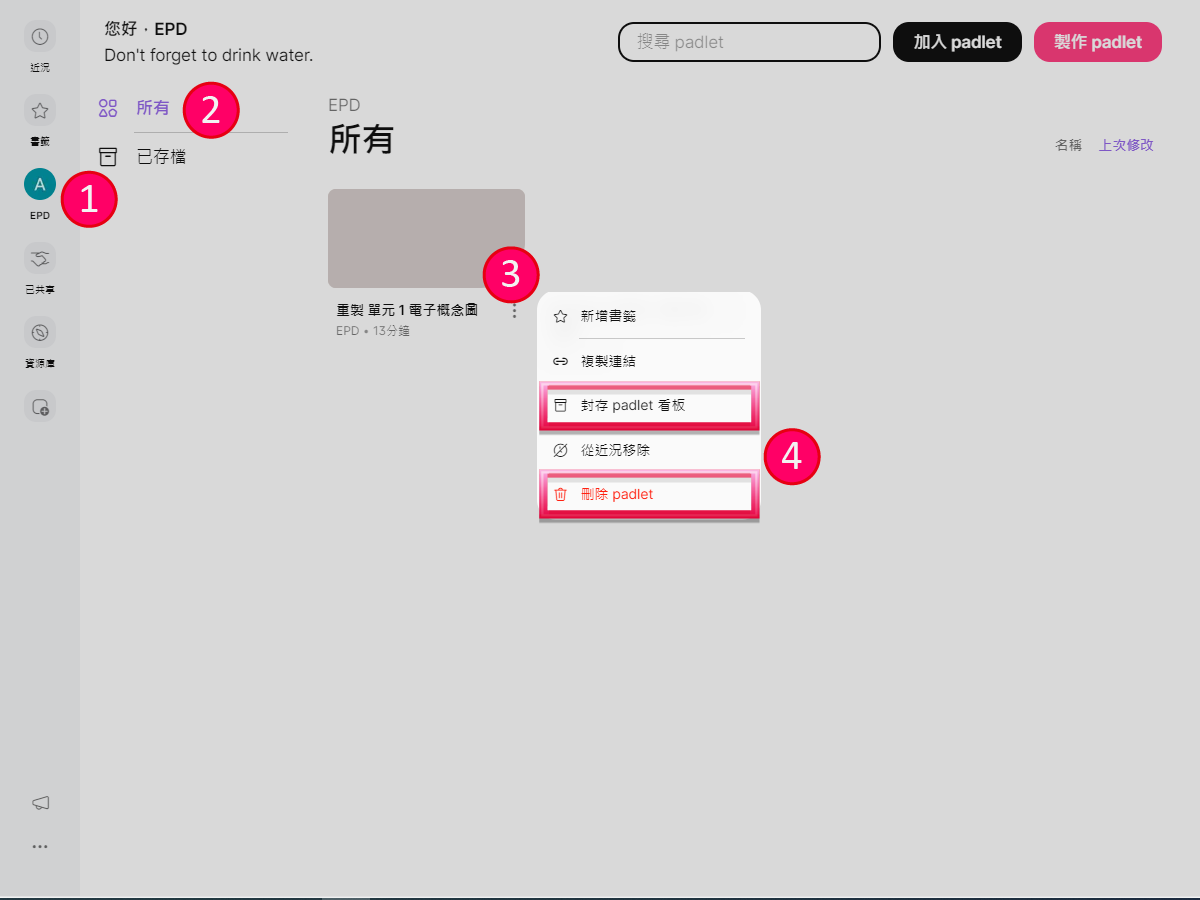
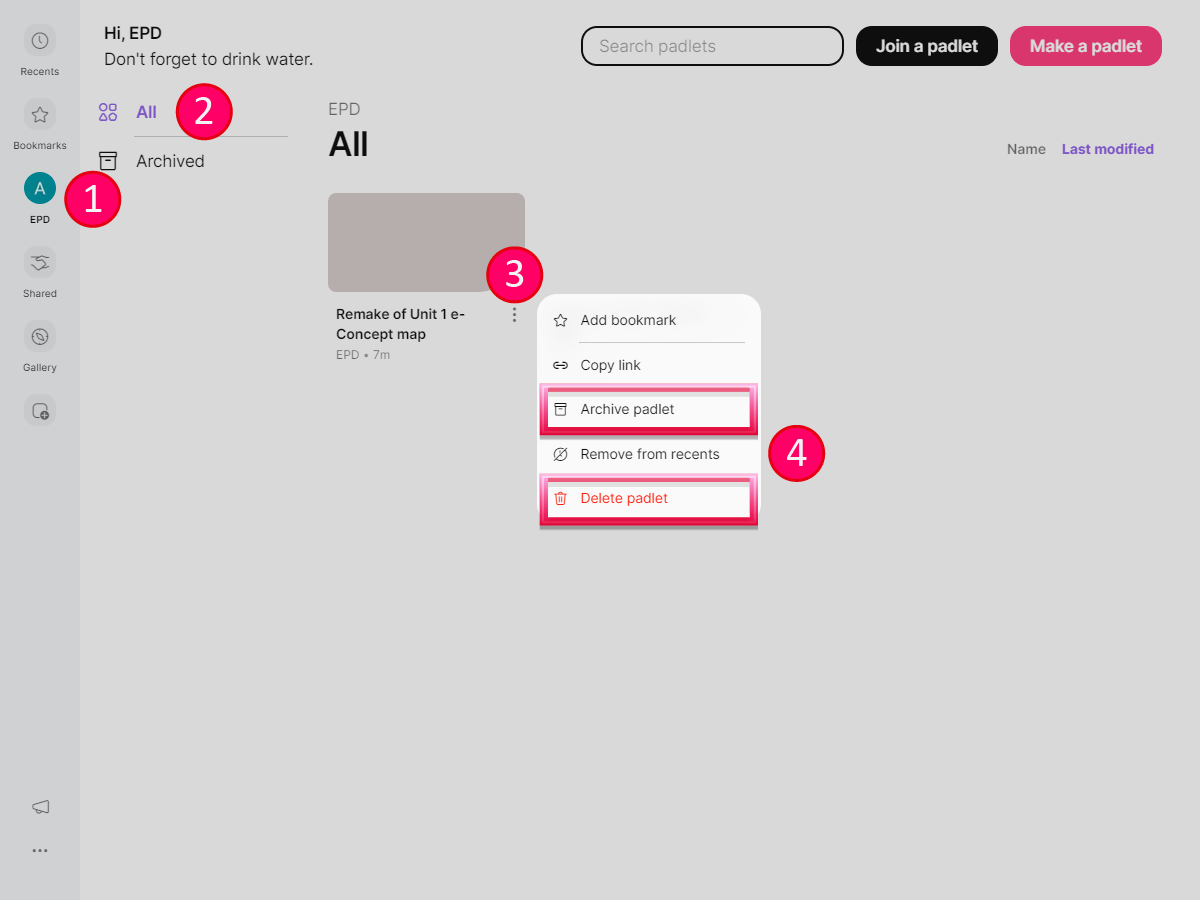
免費的 Padlet 帳戶只可同時儲存三個 Padlet 檔案。如帳戶已存有三個檔案,將不能複製新的腦圖。教師可先登入 Padlet,在左方選單上點按自己的帳戶名稱,再按「All」,然後在不需要的檔案右下方點按 ![]() ,選擇「存檔(Archive)」或「刪除 padlet(Delete padlet)」後才可複製新的腦圖。
,選擇「存檔(Archive)」或「刪除 padlet(Delete padlet)」後才可複製新的腦圖。
The free Padlet account can only store three Padlet files at a time. If there are already three files stored, teachers will be unable to copy any new files. Teachers can log in to Padlet, tap on the account name from the left menu, then tap All. Find the unnecessary file and tap the ![]() button from the bottom right to select Archive or Delete padlet. After that, teachers will be able to copy a new Padlet file.
button from the bottom right to select Archive or Delete padlet. After that, teachers will be able to copy a new Padlet file.
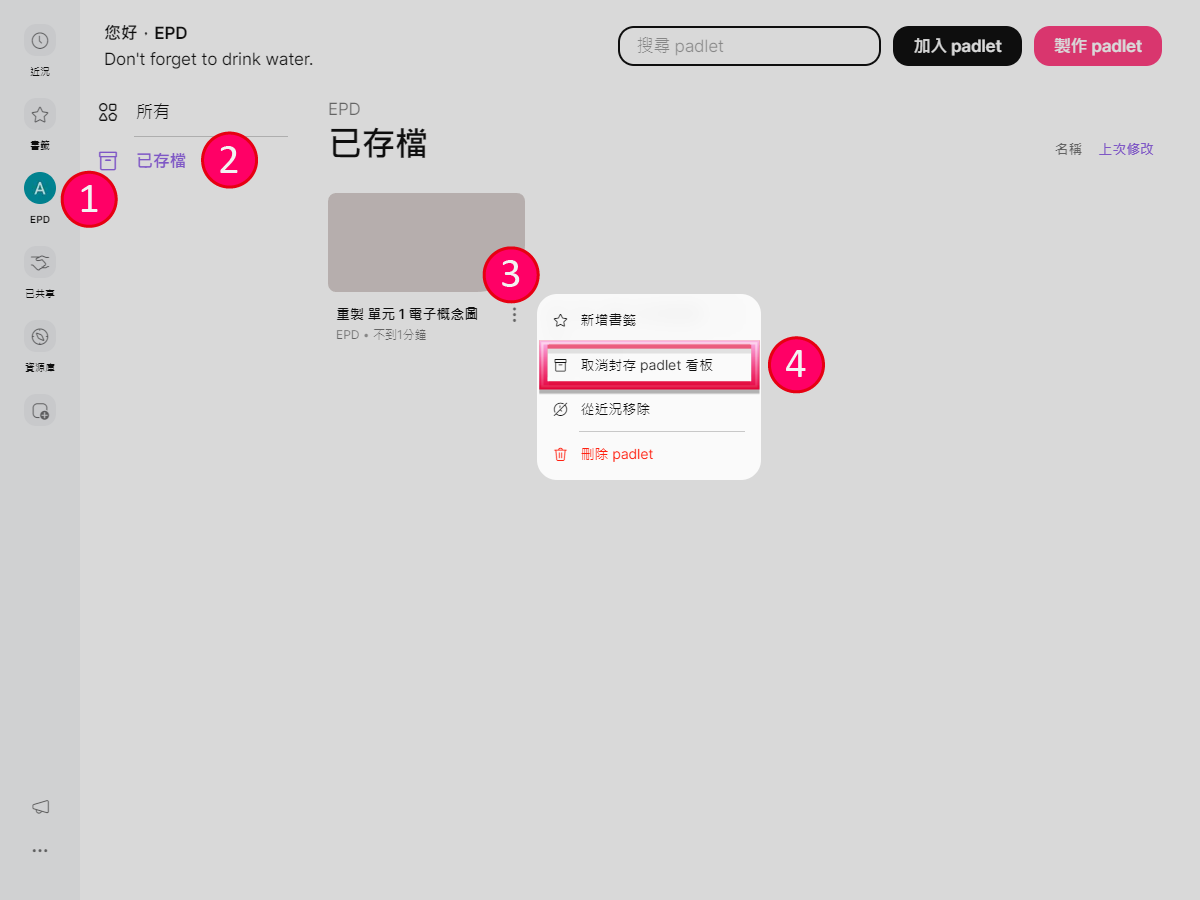
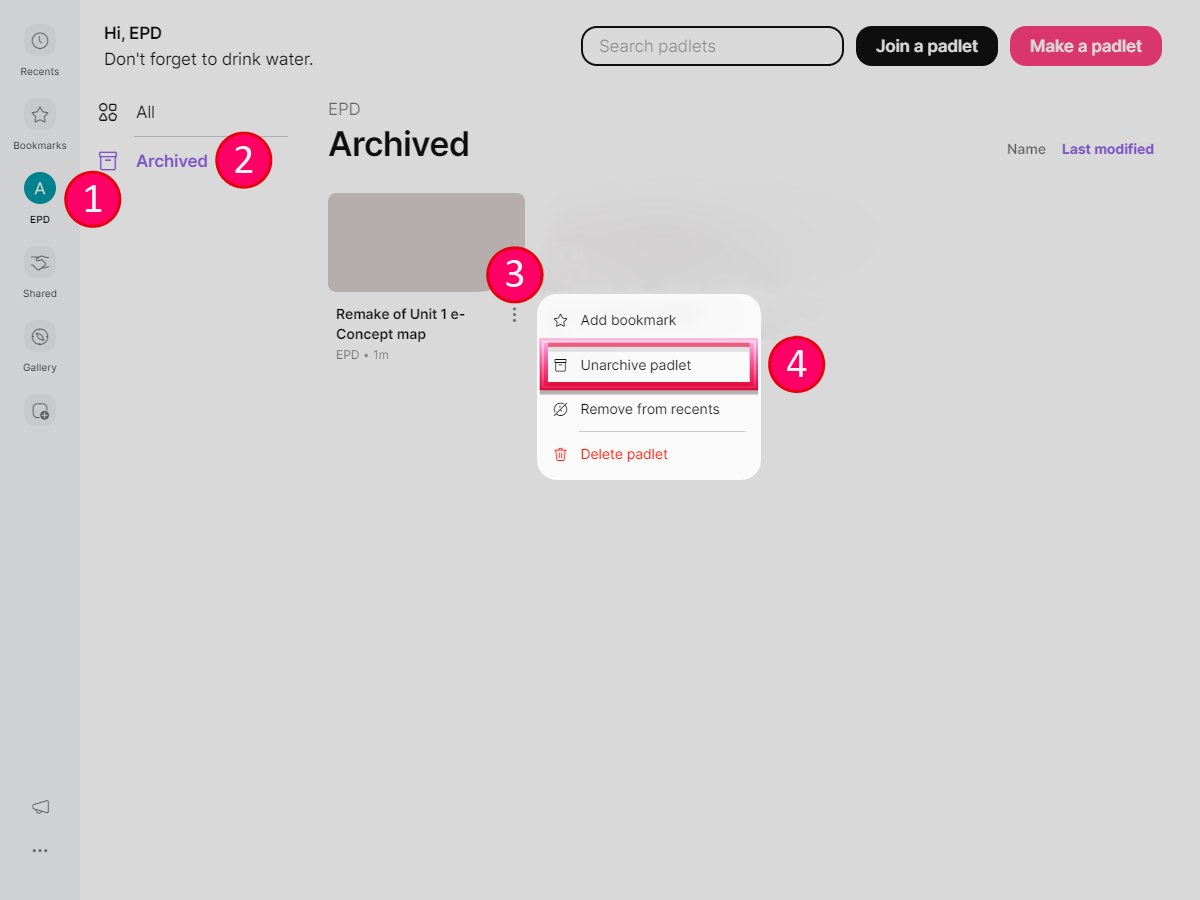
如要重開已封存的檔案,可先登入 Padlet,在左方選單上點按自己的帳戶名稱,再按「存檔(Archived)」,然後在適用的檔案右下方點按 ![]() ,選擇「取消存檔(Unarchive)」便可再編輯或發放檔案。
,選擇「取消存檔(Unarchive)」便可再編輯或發放檔案。
To unarchive a file, log in to Padlet, tap on the account name from the left menu, then tap Archived. Find the required file and tap the ![]() button from the bottom right to select Unarchive. After that, teachers can edit and share this file again.
button from the bottom right to select Unarchive. After that, teachers can edit and share this file again.
(暫只提供中文版本)
(Only the Chinese version is provided now.)
使用「我不會畫圖 (I can’t draw)」功能來製作AI生成圖像
Using ‘I can’t draw’ function to create AI-generated images
- 從雅集網站複製一張 Padlet 腦圖到你的個人 Padlet 帳戶。
- 點按 (+) 來製作新貼文。
- 點按 (...) 來顯示更多附件類型。
- 點按「我不會畫圖 (I can’t draw)」。
- 寫上所需圖片的描述,然後按「輸入」鍵。
- 有關詳細資訊,請按此。
- Copy a Padlet mind map from Aristo’s website to your own Padlet account.
- Click the (+) button to create a new post.
- Click the (...) button to show more attachment options.
- Click ‘I can’t draw’.
- Write a description of the image you want and hit the ‘Enter’ key.
- For more information, please click here.
示範影片:
Demonstration videos:
|
|
| 在雅集預製的腦圖上,製作AI生成的圖像。 Create AI-generated images on Aristo’s pre-made Padlet mind map. |
|---|
使用Adobe Acrobat Reader開啟
Open with Adobe Acrobat Reader
下載Adobe Acrobat Reader
Download Adobe Acrobat Reader


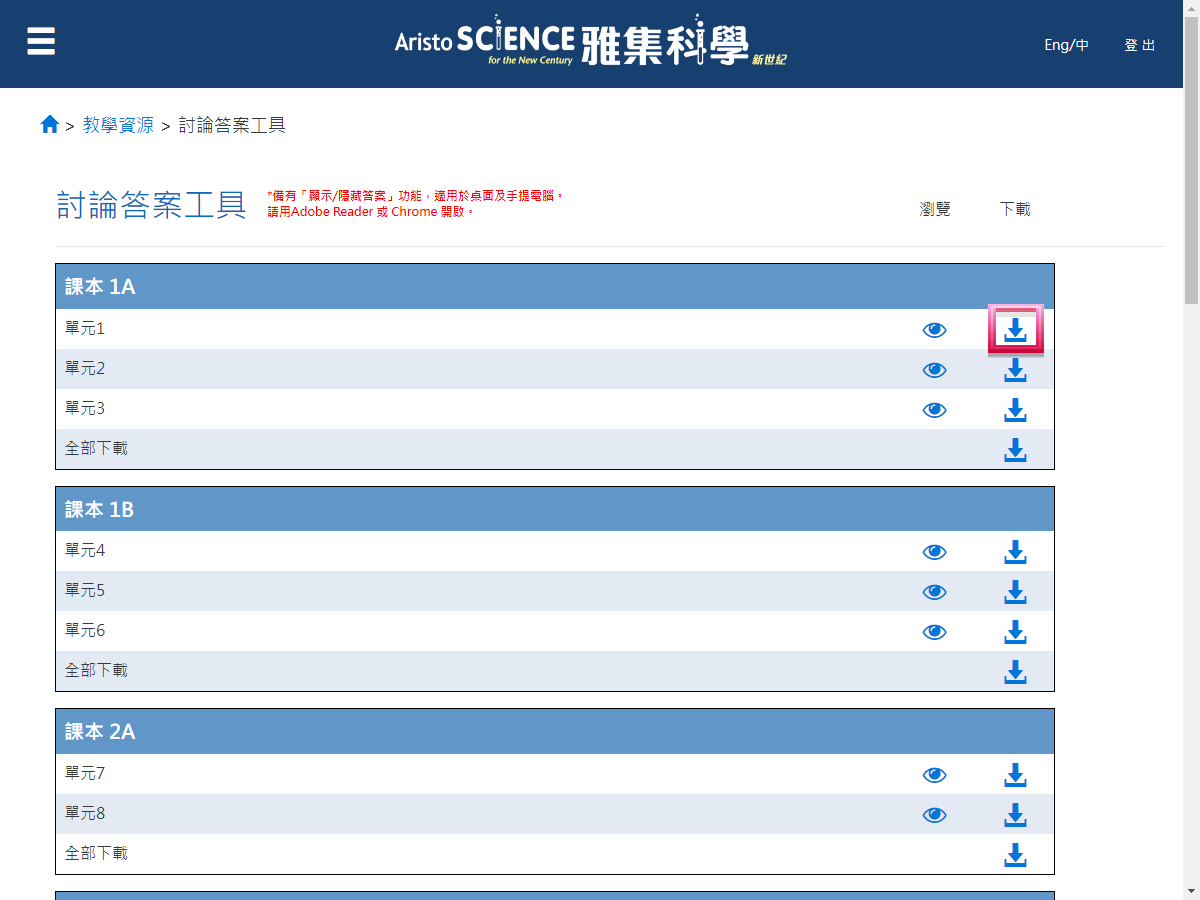
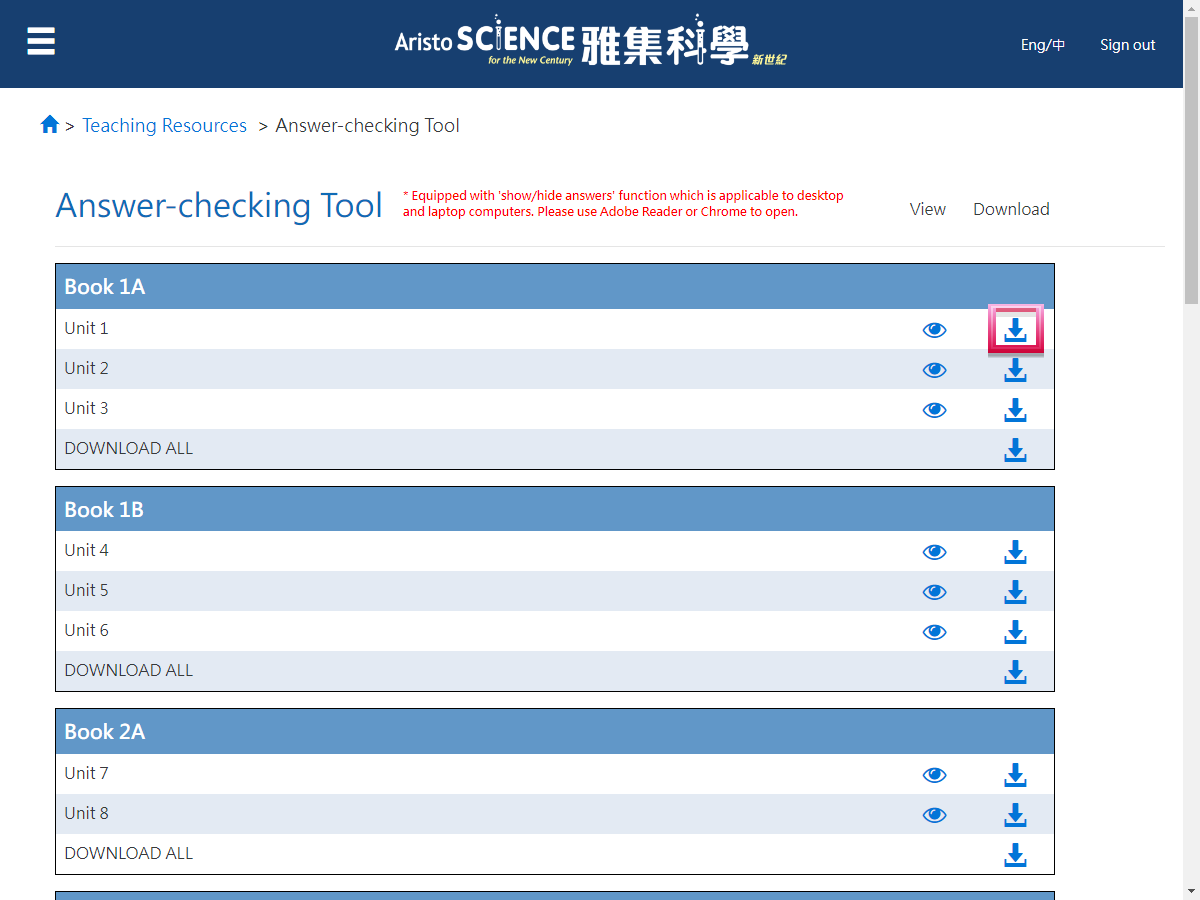
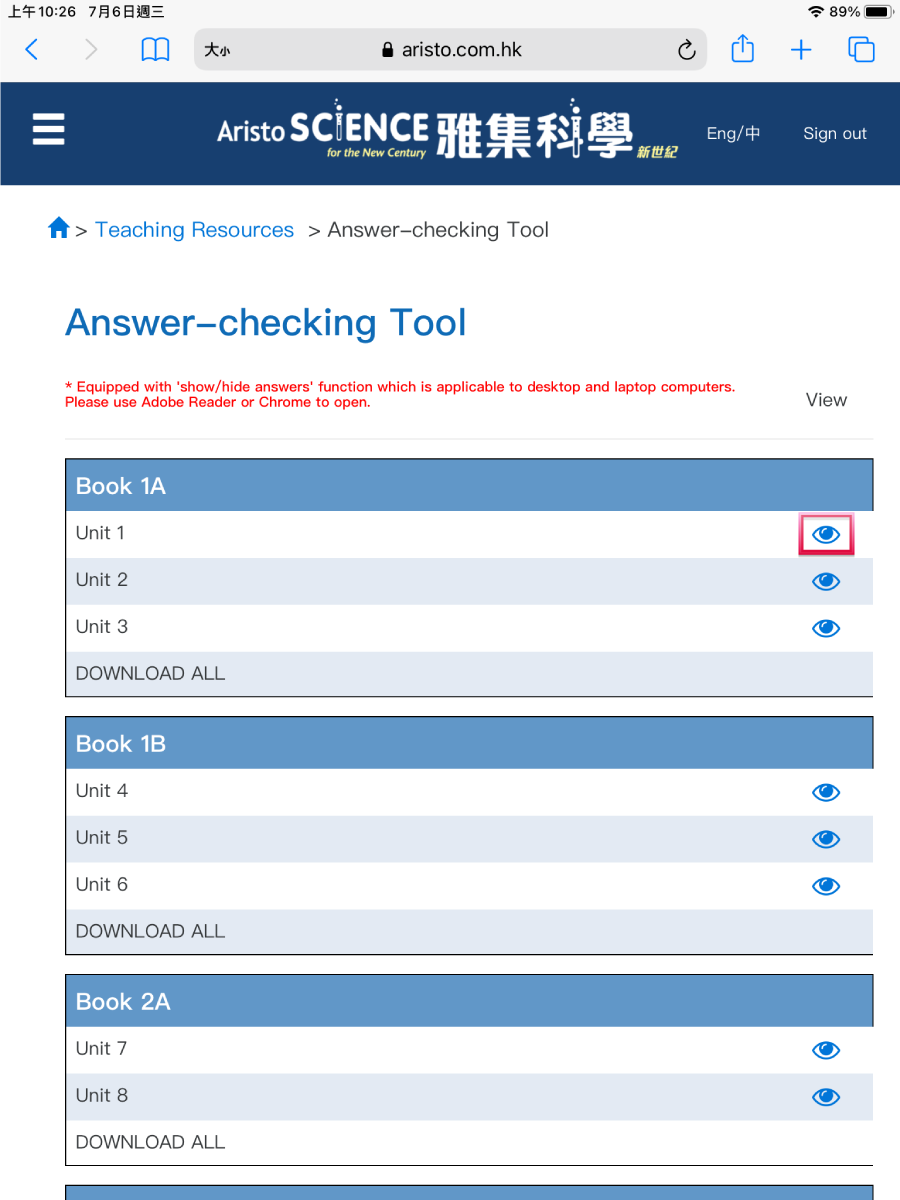
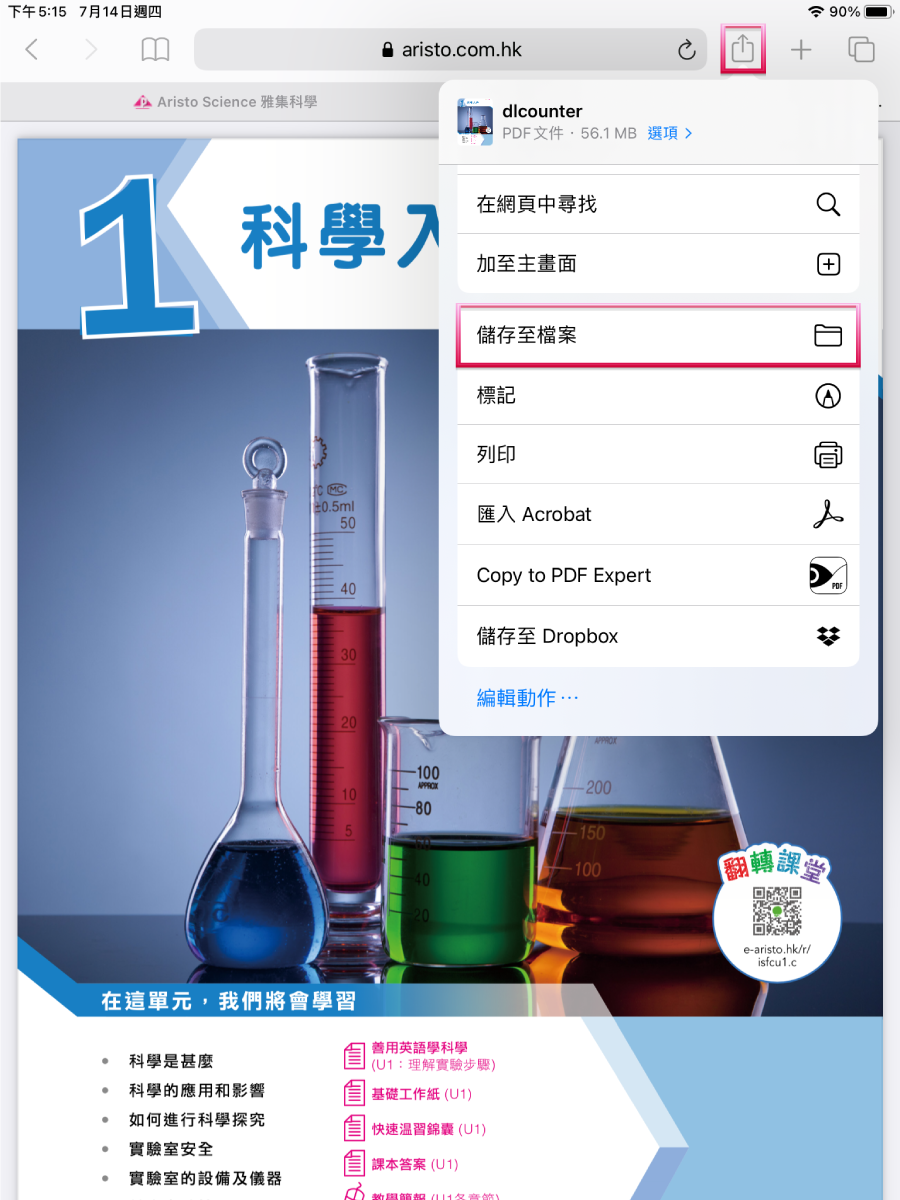
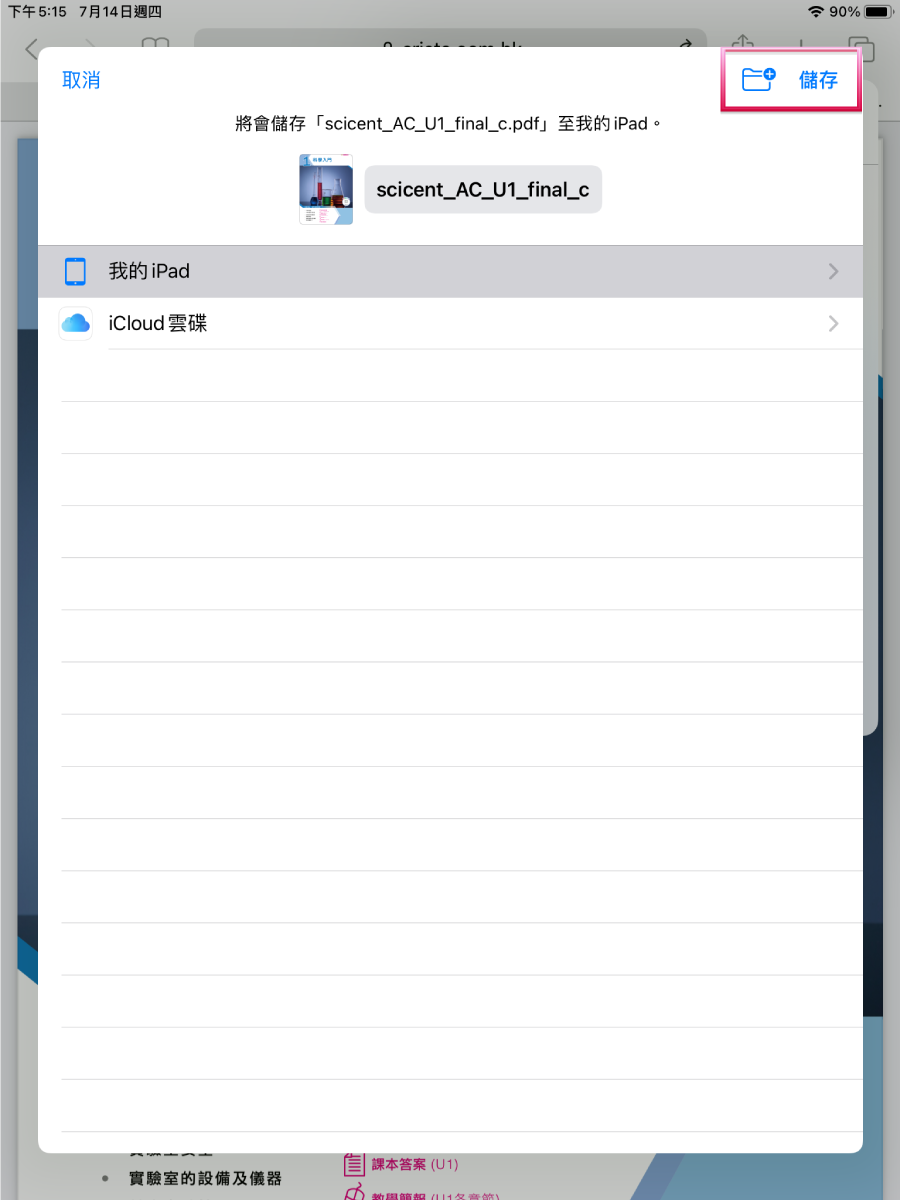
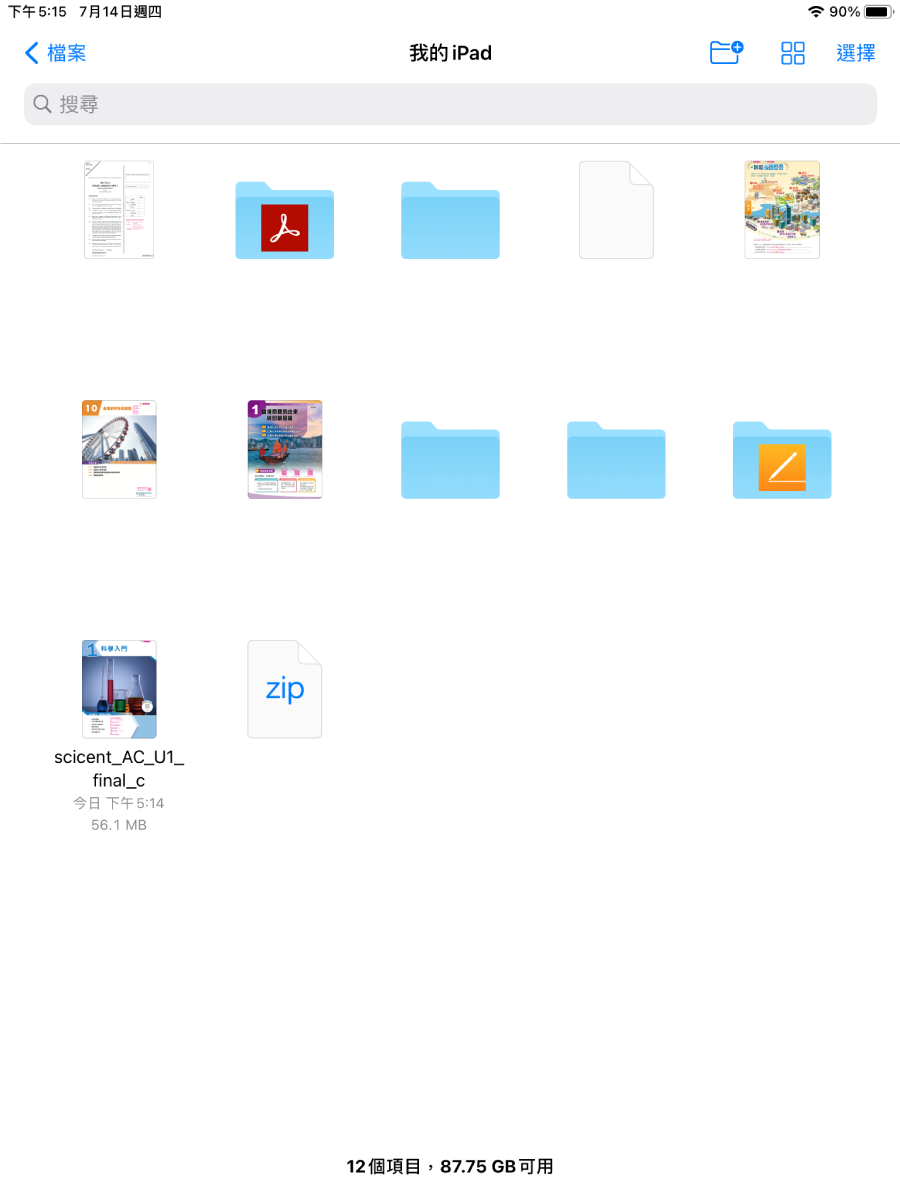
下載並開啟討論答案工具
Download and open Answer-checking Tool

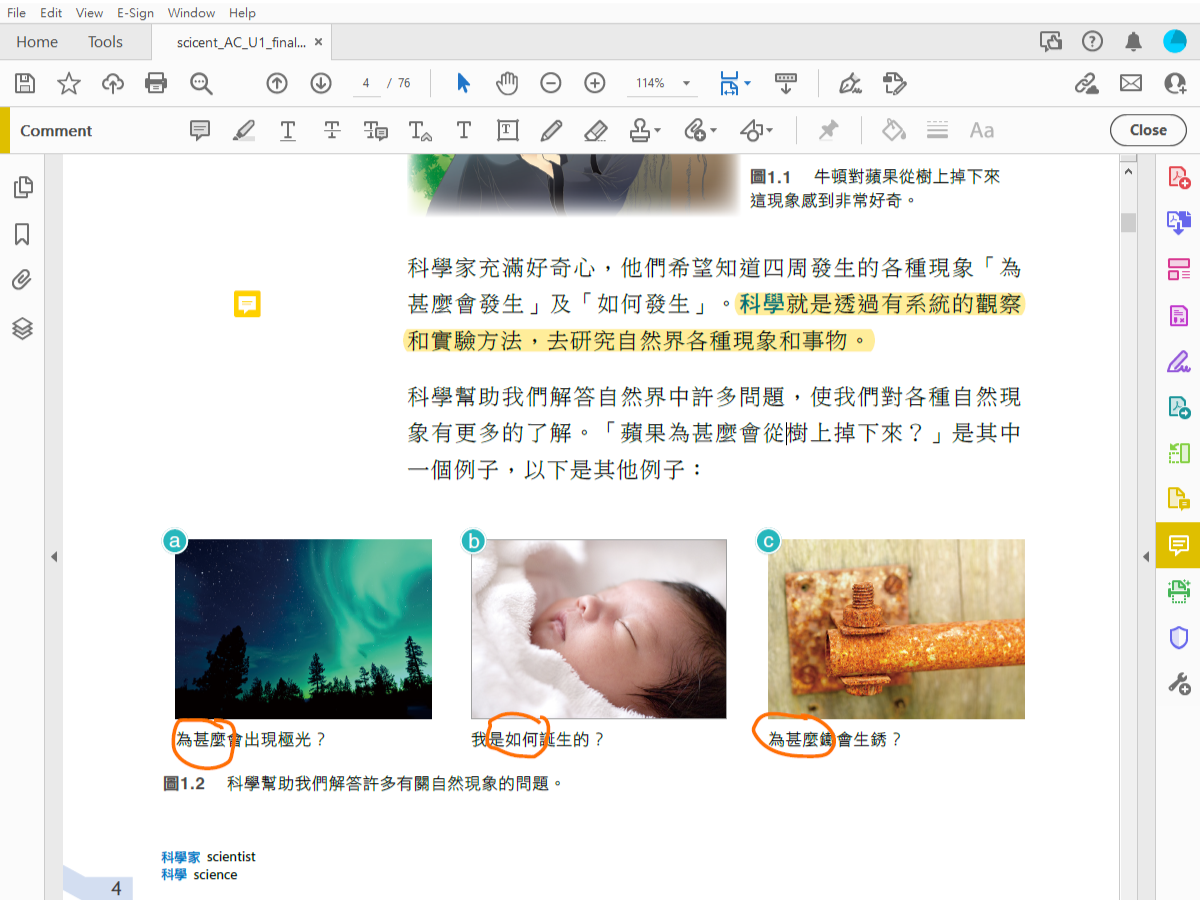
在討論答案工具上加上注釋
Add comments on Answer-checking Tool

使用瀏覽器開啟
Open with a browser
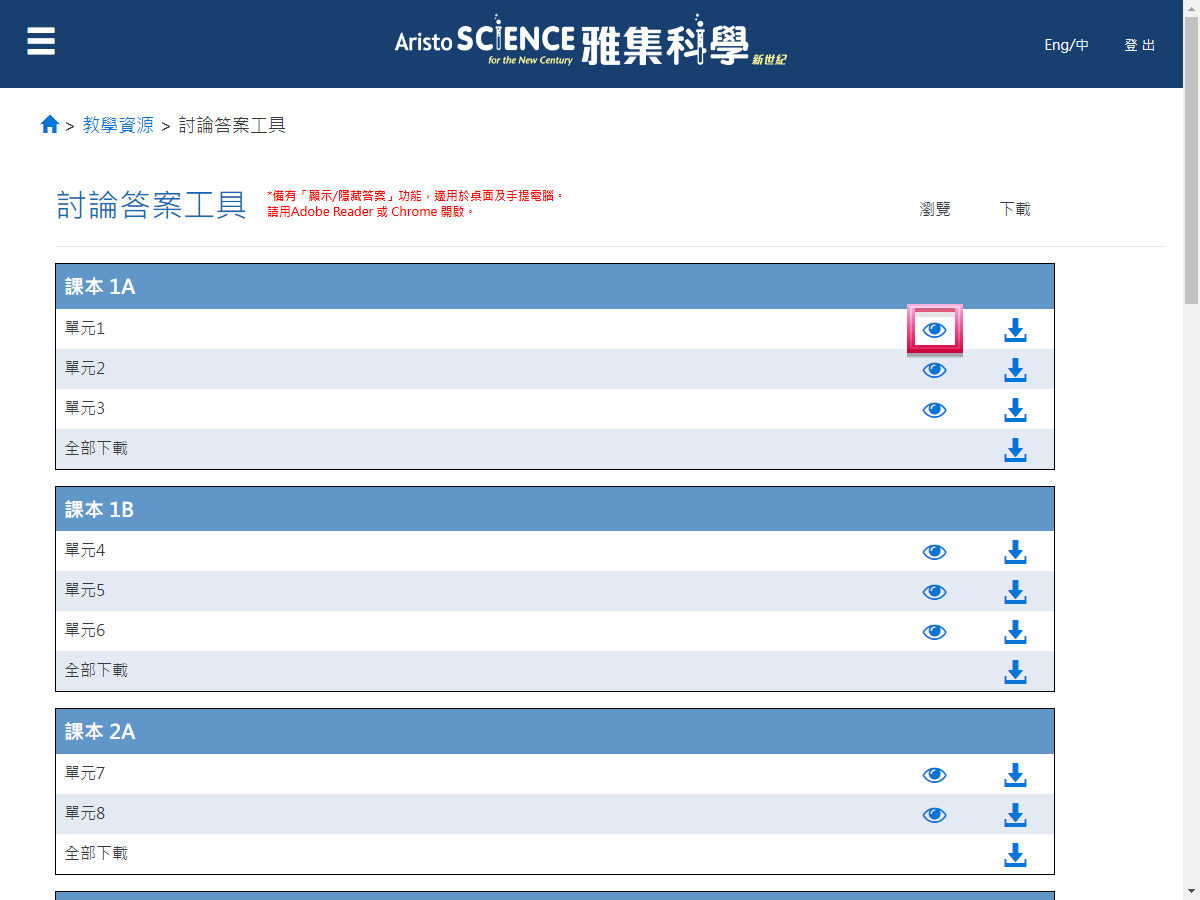
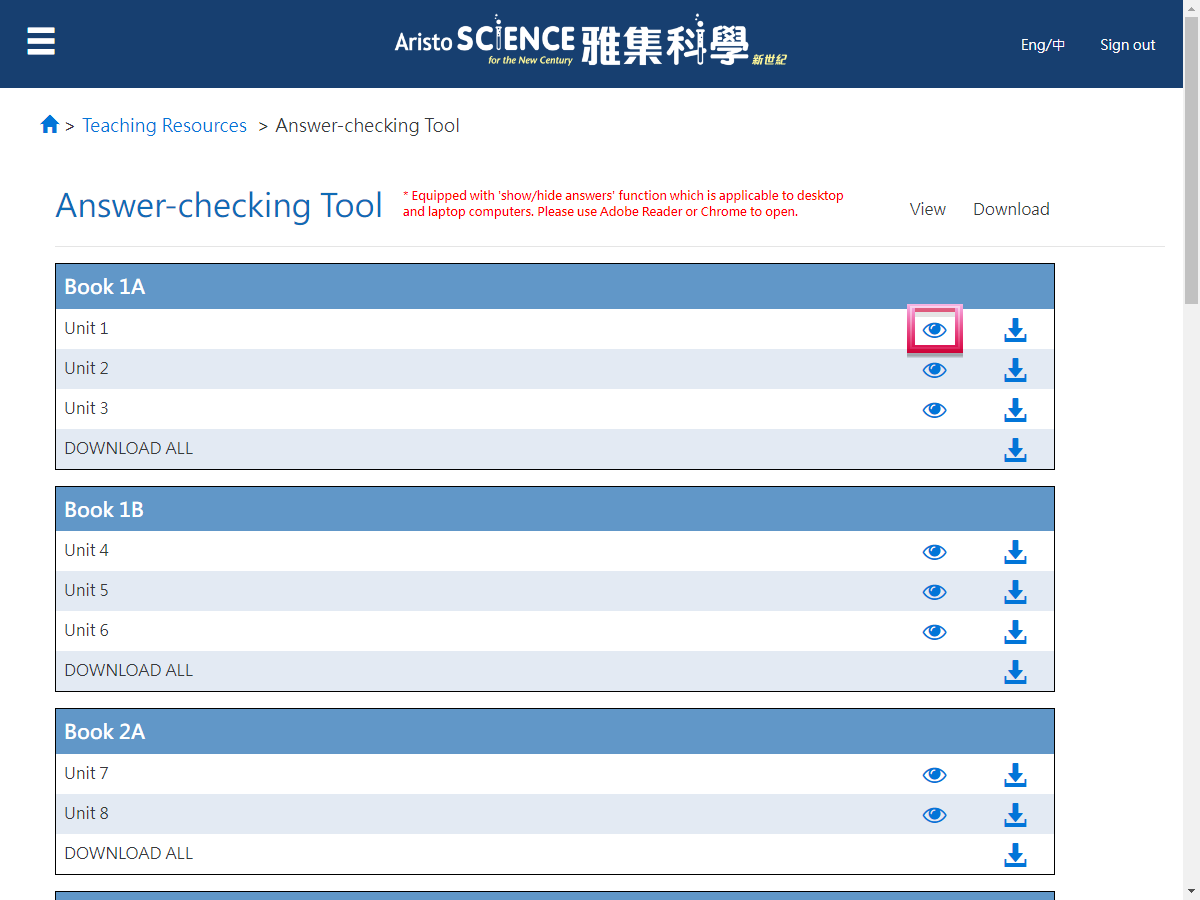
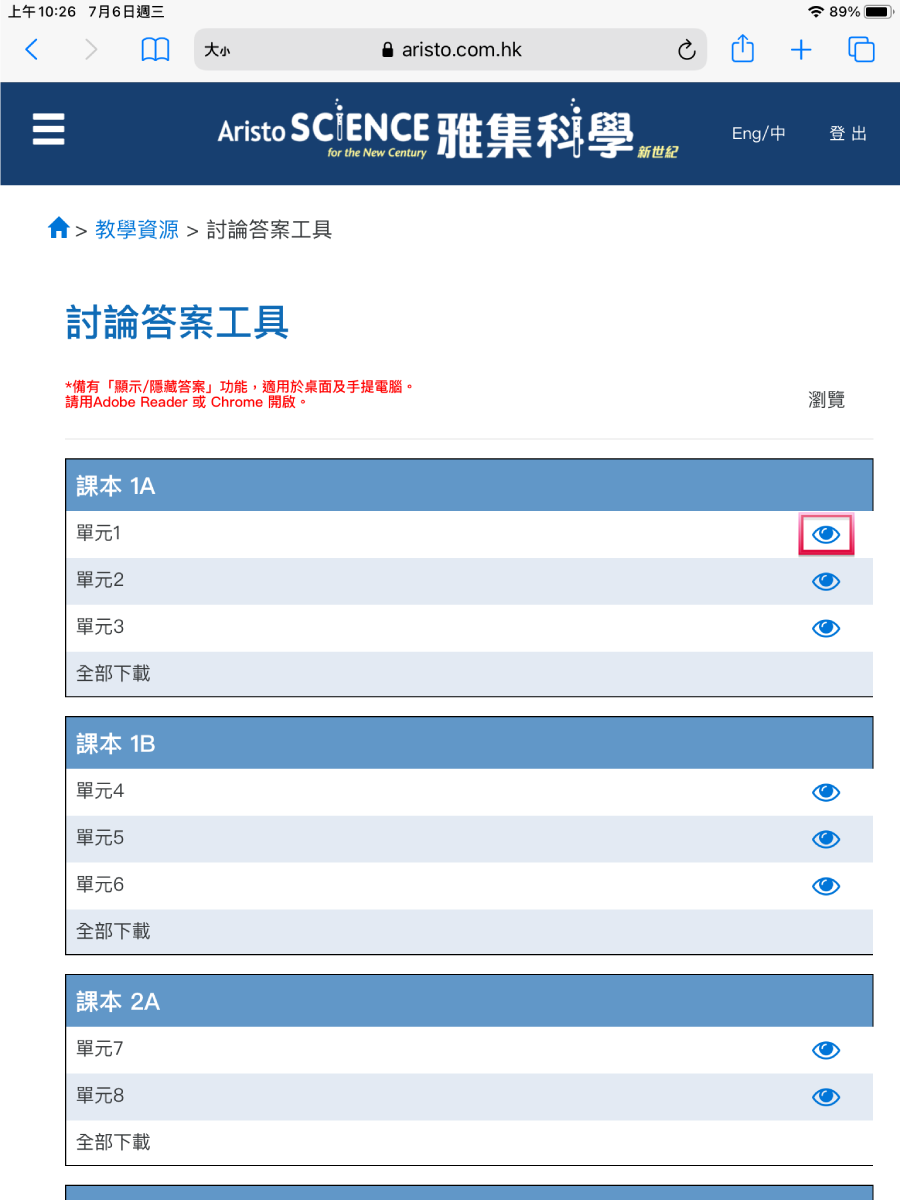
登入雅集帳戶後,在雅集資源頁面點擊 ![]() 可使用瀏覽器直接開啟討論答案工具。建議使用 Google Chrome 或 Microsoft Edge 開啟。
可使用瀏覽器直接開啟討論答案工具。建議使用 Google Chrome 或 Microsoft Edge 開啟。
After signing in with an Aristo account, click the ![]() button on our resources page to view the Answer-checking Tool with the browser directly. It is suggested to use Google Chrome or Microsoft Edge to open.
button on our resources page to view the Answer-checking Tool with the browser directly. It is suggested to use Google Chrome or Microsoft Edge to open.
在瀏覽器中開啟討論答案工具︰
Open the Answer-checking Tool with a browser:
|
Microsoft Edge (可使用繪圖工具) Microsoft Edge (Can use drawing tools) |
Google Chrome |
|---|---|
|

|
| Mozilla Firefox | |
|
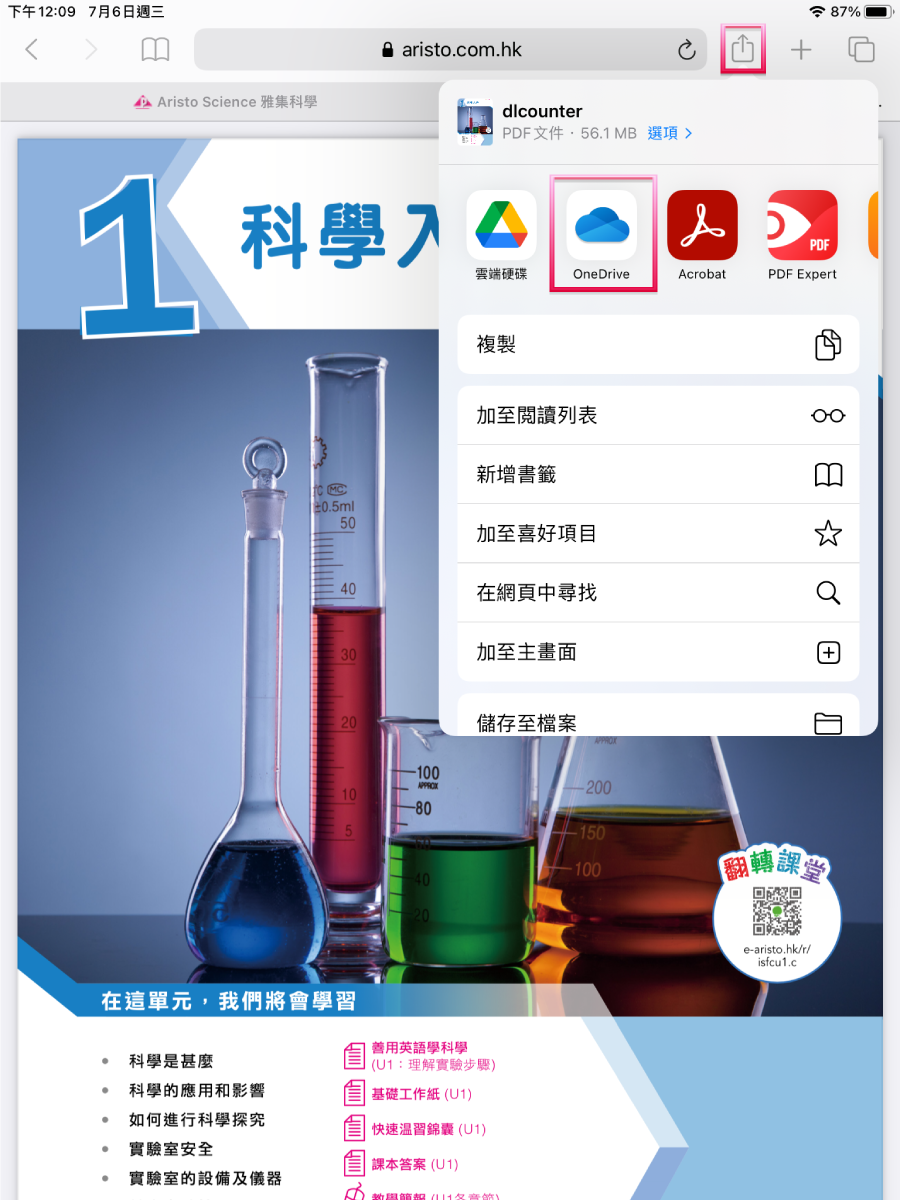
由於只有部分流動應用程式可支援附有互動功能的PDF檔,如要在流動裝置(平板電腦或智能電話)上開啟討論答案工具,建議使用以下介紹的程式。
Since there are only a few mobile apps that can support viewing the PDF files with interactive functions, the following apps are suggested if you want to open the Answer-checking Tool on a mobile device (tablet / smartphone).
Microsoft OneDrive
Microsoft OneDrive
下載Microsoft OneDrive
Download Microsoft OneDrive
Microsoft OneDrive是Microsoft所推出的雲端儲存服務,經OneDrive內置的PDF閱覽器,可使用討論答案工具內的答案顯示功能。
Microsoft OneDrive is a cloud storage service provided by Microsoft. With the PDF viewer available in OneDrive, you can use the answer-showing function in the Answer-checking Tool.
下載OneDrive流動應用程式:
Download the mobile app of OneDrive:
| iOS版 iOS version | Android 版 Android version |
|---|---|

|

|
你必須有一個 Microsoft帳戶才可使用OneDrive,如未有帳戶,可按此登記。
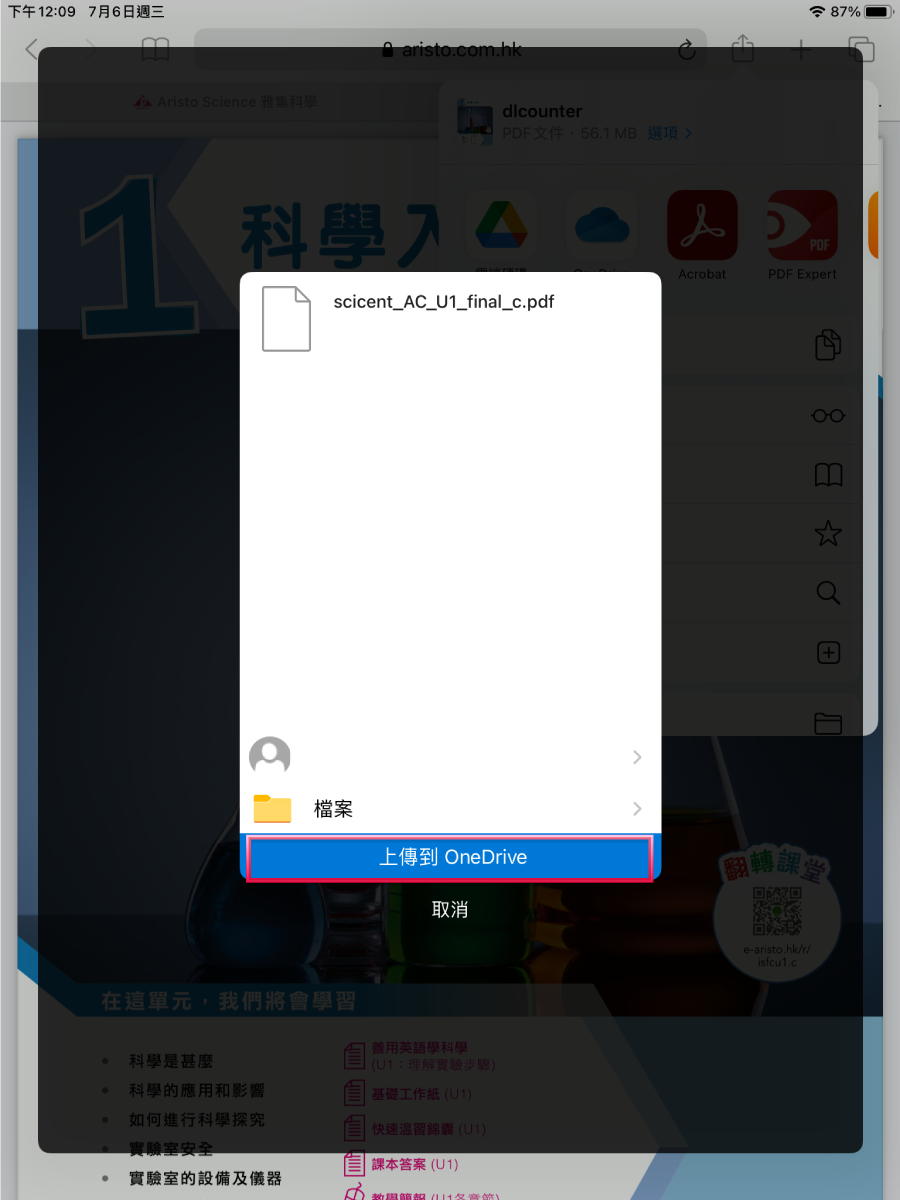
You must have a Microsoft account to use OneDrive. If you haven’t got an account yet, you can click here to register.上載討論答案工具至Microsoft OneDrive
Upload Answer-checking Tool to Microsoft OneDrive


在討論答案工具上加上筆記
Add notes on Answer-checking Tool


PDF Expert
PDF Expert
下載PDF Expert
Download PDF Expert
PDF Expert是一個PDF閱讀及編輯程式,提供免費及收費版。使用免費版一般已可使用討論答案工具內的答案顯示功能。(PDF Expert只提供iOS版本的流動應用程式。)
PDF Expert is a PDF viewing and editing app that provides a free and paid version. In general, the free version can be used to open the Answer-checking Tool with the answer-showing function. (PDF Expert only provides the mobile app for iOS.)
下載PDF Expert流動應用程式:
Download the mobile app of PDF Expert:


在PDF Expert載入PDF檔
Import Answer-checking Tool into PDF Expert


在討論答案工具上加上筆記
Add notes on Answer-checking Tool


Dropbox
Dropbox
下載Dropbox
Download Dropbox
Dropbox是一個雲端儲存服務,經Dropbox內置的PDF閱覽器,可使用討論答案工具內的答案顯示功能。
Dropbox is a cloud storage service. With the PDF viewer available in Dropbox, you can use the answer-showing function in the Answer-checking Tool.
下載Dropbox流動應用程式:
Download the mobile app of Dropbox:
| iOS版 iOS version | Android 版 Android version |
|---|---|


|


|
你必須有一個Dropbox帳戶才可使用Dropbox,如未有帳戶,可按此登記。
You must have a Dropbox account to use Dropbox. If you haven’t got an account yet, you can click here to register.上載討論答案工具至Dropbox
Upload Answer-checking Tool to Dropbox


在討論答案工具上加上筆記
Add notes on Answer-checking Tool


為什麼我無法在流動裝置上開啟討論答案工具和一些雅集PDF檔?
Why can't I open the Answer-checking Tool and some other PDF files from Aristo on my mobile device?
如要在流動裝置上開啟附有互動功能的PDF檔,例如討論答案工具,建議使用本指引所介紹的流動應用程式,詳情請參閱步驟2。
另外,由於一些流動應用程式未能支援PDF檔的安全設定,也會令程式未能開啟部分其他雅集PDF檔。如遇此情況,建議使用其他PDF閱覽程式來開啟。
To open the PDF file with interactive functions, such as the Answer-checking Tool, on a mobile device, it is suggested to use the apps as introduced in this User Guide (please refer to Step 2).
Besides, since some apps do not support the security settings in the PDF, these apps may not be able to open some other PDF files from Aristo too. In this case, it is suggested to open the files with another PDF viewing app.

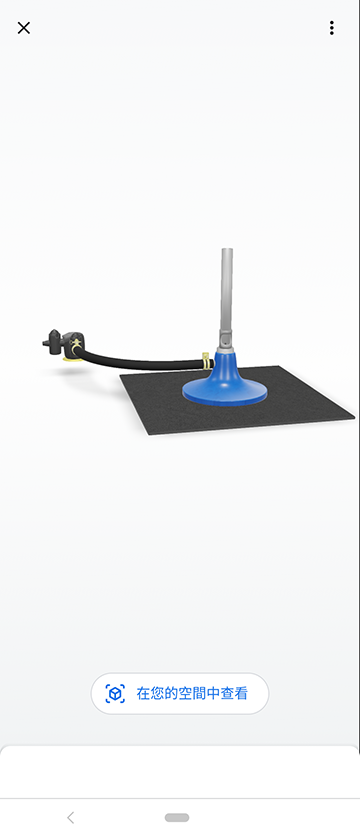
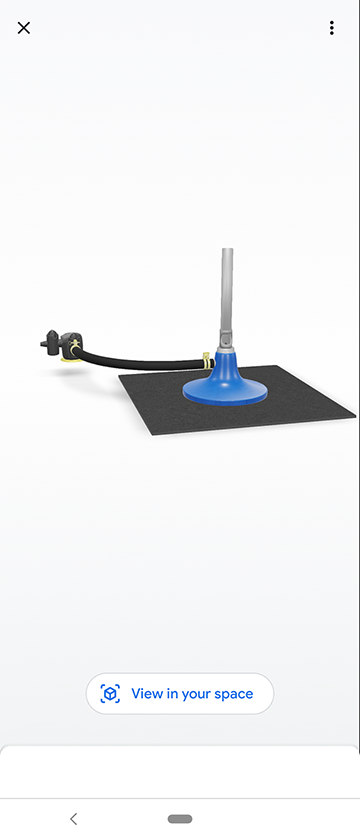
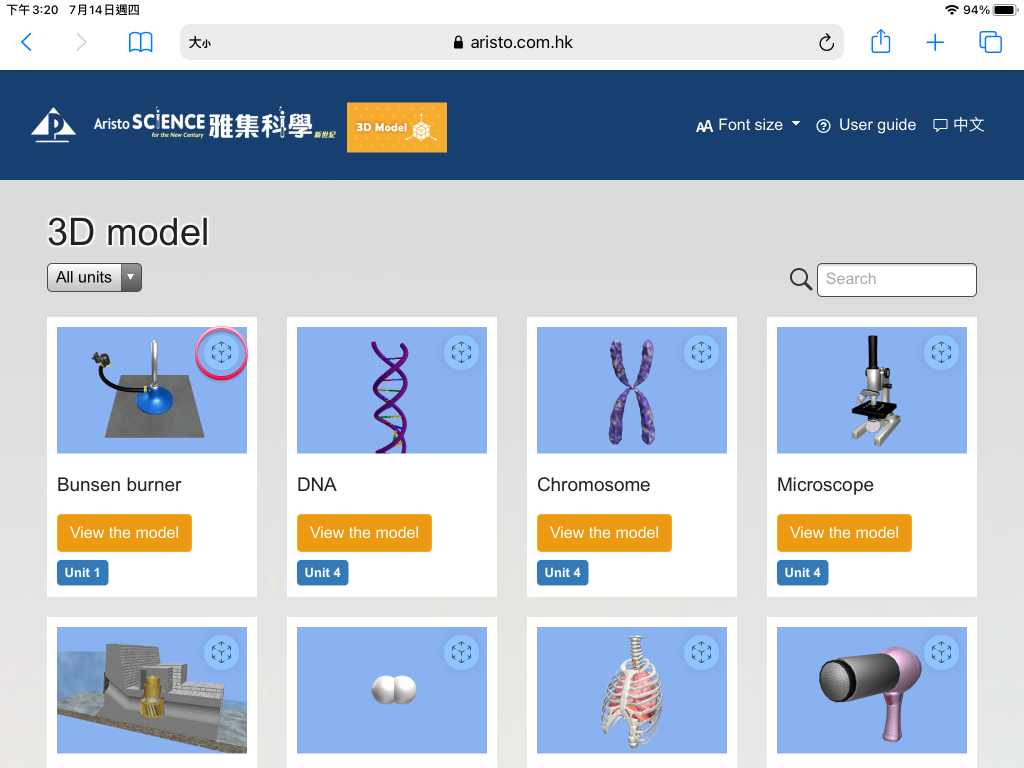
| 1 | 按此直接在瀏覽器上觀看模型。 Click here to view the model from web browser directly. | |||||
| 2 | 按此下載立體打印模型及鐳射切割模型(如有提供)。 Click here to download the model (if available). | |||||
| 3 |
按此進入 AR 模式。
Click here to enter AR mode.
|
以下是使用 iPad 觀看 AR 模式的示範:
The following demonstration of AR mode is made by using iPad:

(1) 按此進入 AR 模式。
(1) Click here to enter AR mode.
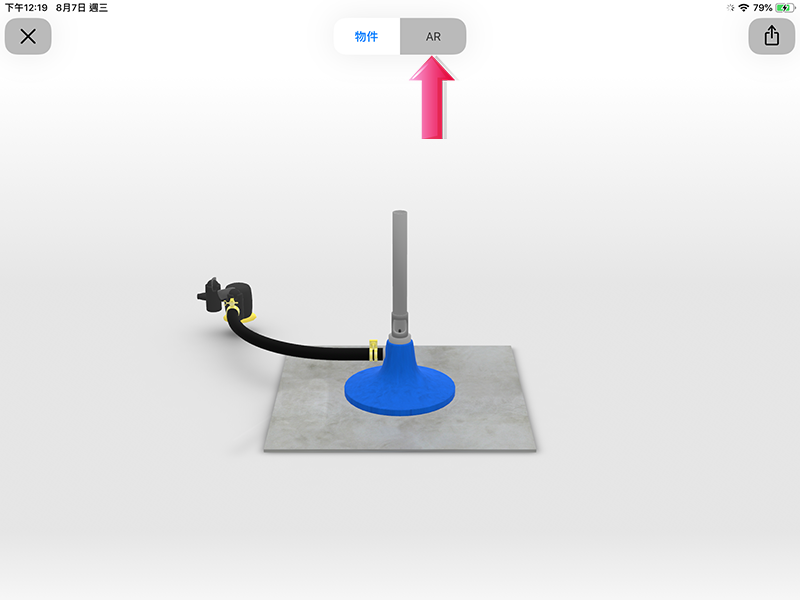

(2) 點按「擴增實境」以切換至 AR 觀看模式。
(2) Click ‘AR’ to switch to AR viewing mode.

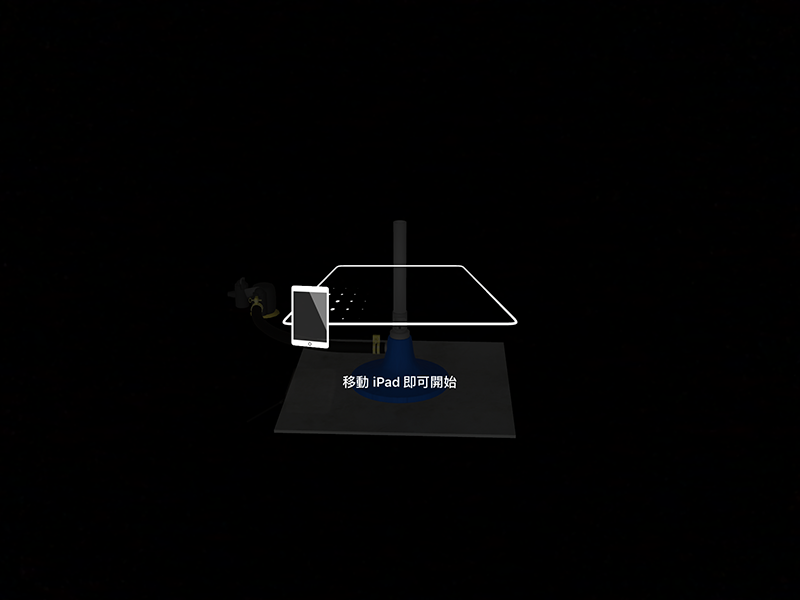
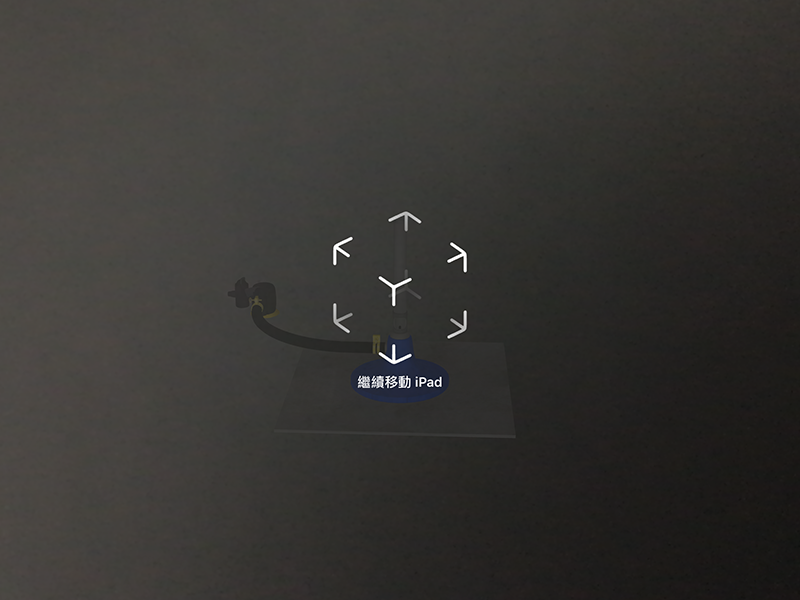

(3) 依屏幕所示,左右移動 iPhone 或 iPad 以讓裝置檢測到水平表面。
(3) Follow the instruction on the screen, move the iPhone or iPad to left or right to let it detect a horizontal surface.

(4) 可在桌面或地面上放上一張白紙,讓裝置更易檢測到水平表面。
(4) You may put a white paper on the table or floor, to make it easier for the device to detect the horizontal surface.


放大Zoom


轉動Rotate
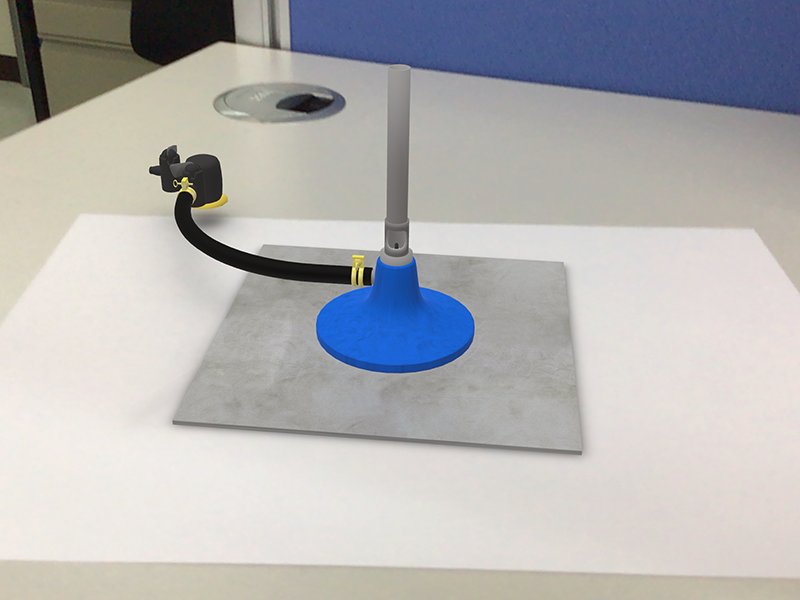
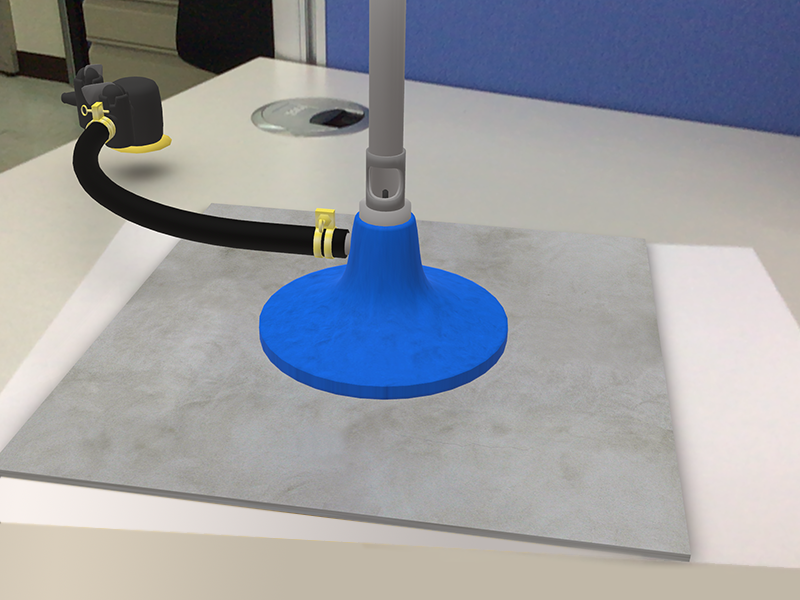
(5) 如成功顯示該模型,可使用以上手勢放大或轉動。
(5) After the model is loaded, you can zoom or rotate it with above gestures.

(6) 如未能成功載入模型(例如出現以上畫面),請重新載入頁面再嘗試。
(6) If the model cannot be loaded (such as showing the above screen), please refresh the web page and try again.
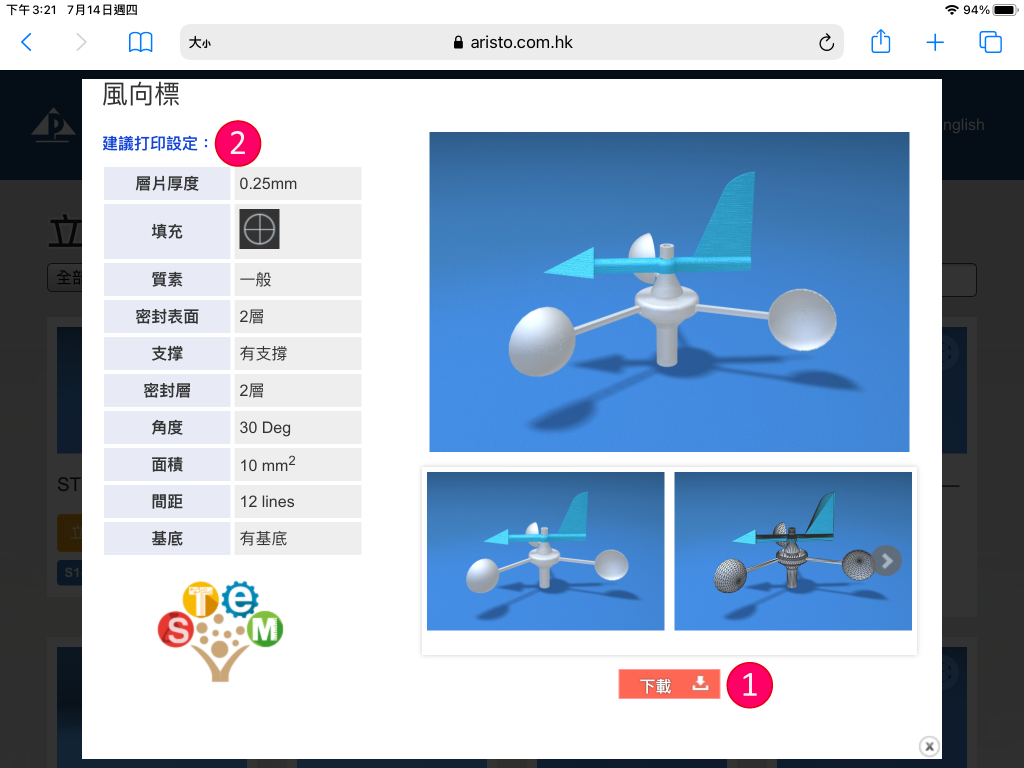
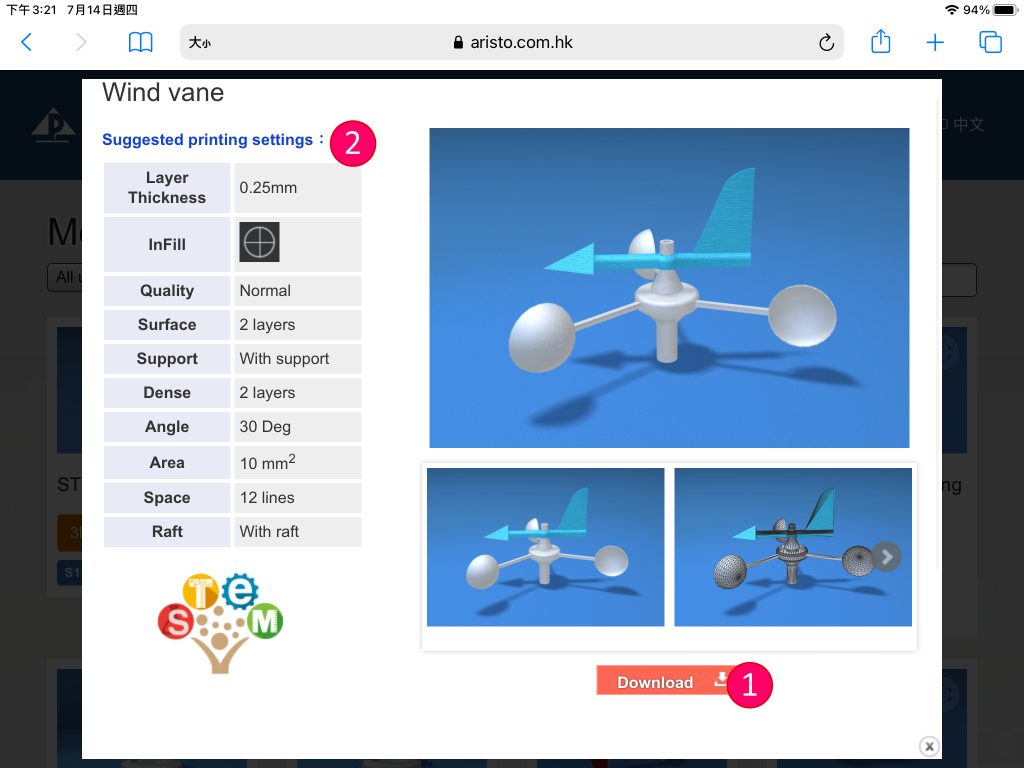
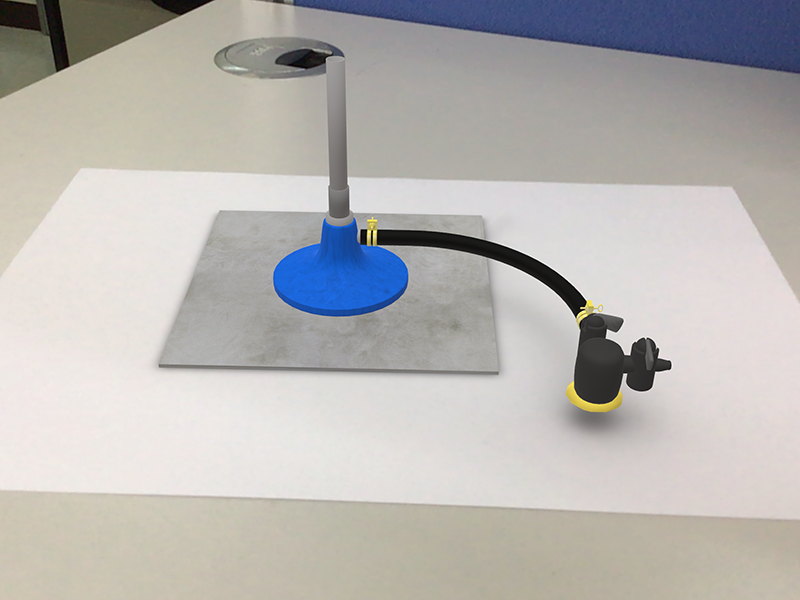
| 1 | 按此下載可供立體打印機使用的檔案。檔案或以 ZIP 形式儲存,僅支援桌面或手提電腦。 Click here to download the model(s) for 3D printer. The file(s) may be saved in ZIP format, that can be viewed with desktop or laptop computers only. |
| 2 | 學校可參考有關模型的建議參考設定。 School may refer to the suggested printing settings of the model(s). |
(暫只提供中文版本)
(Only the Chinese version is provided now.)
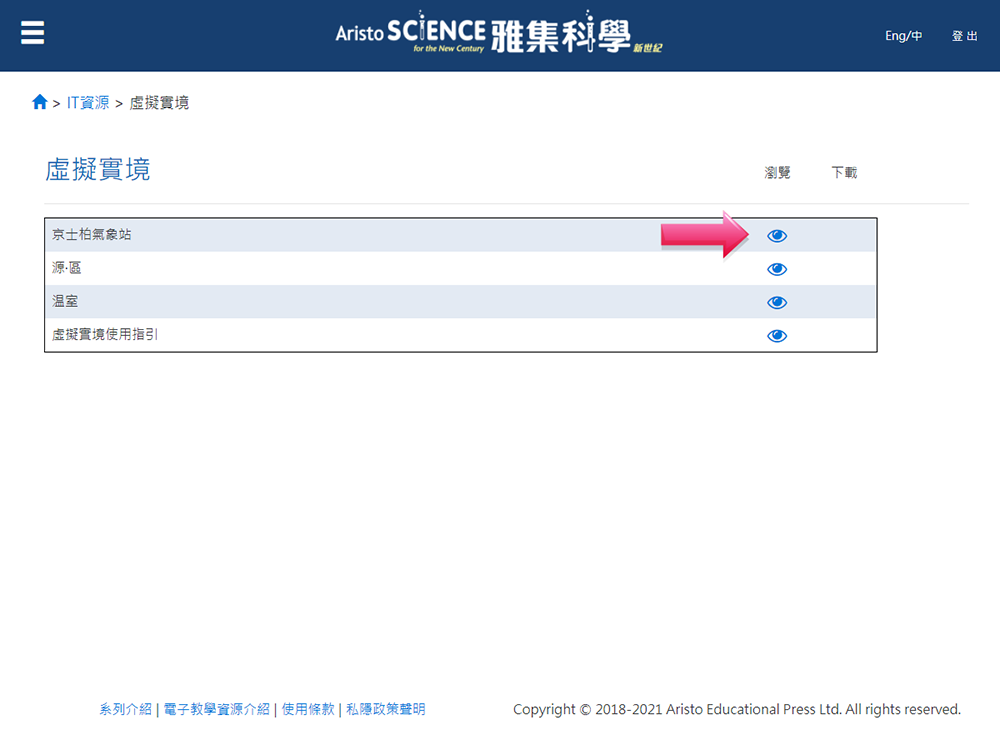
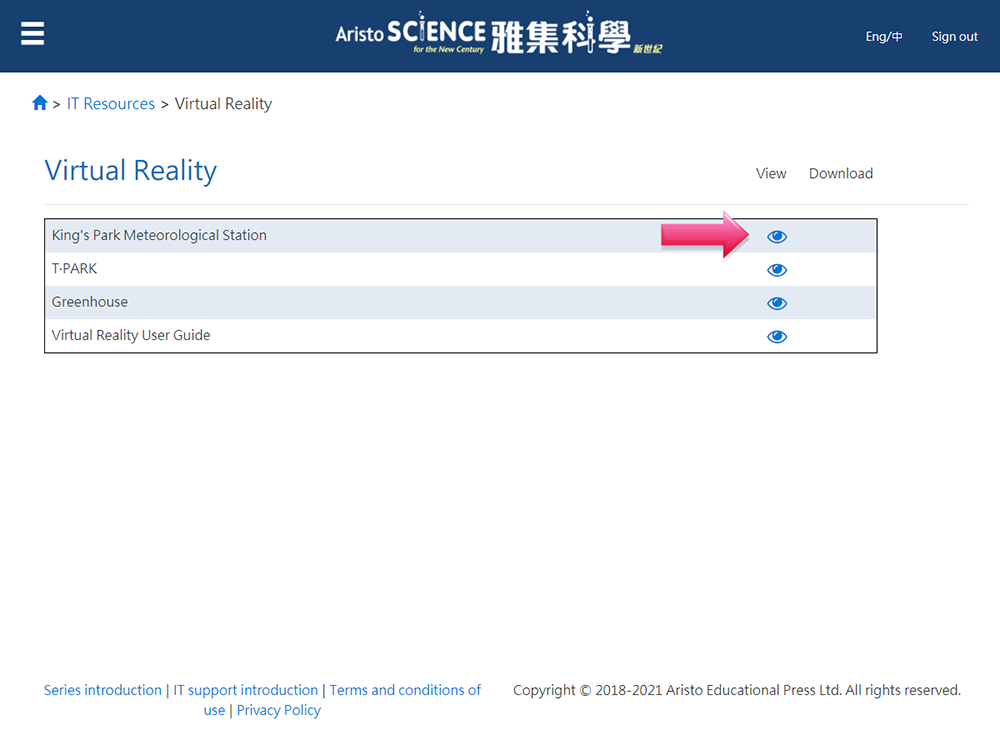
從我們的網站開啟虛擬實境頁面,如下圖。
Enter the VR page from our website as follows:
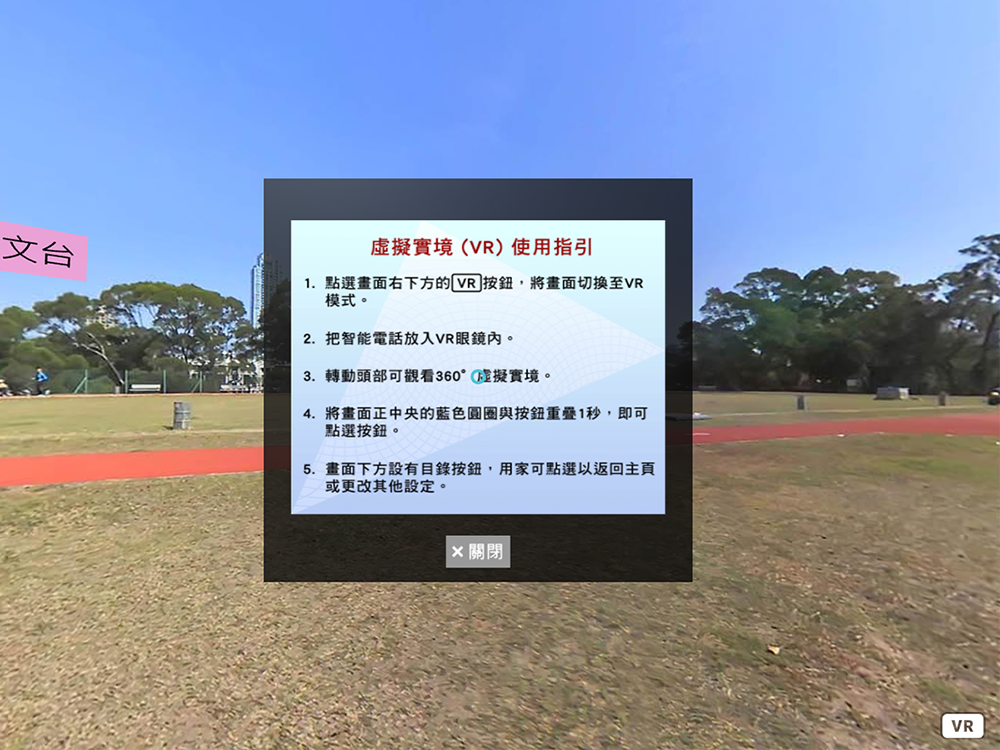
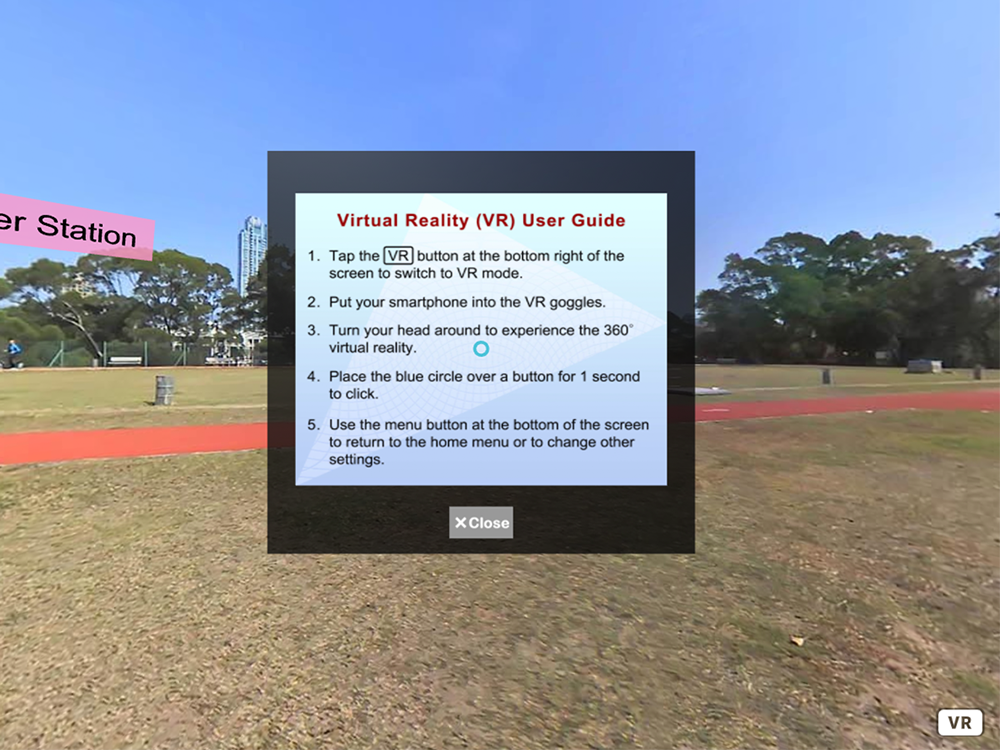
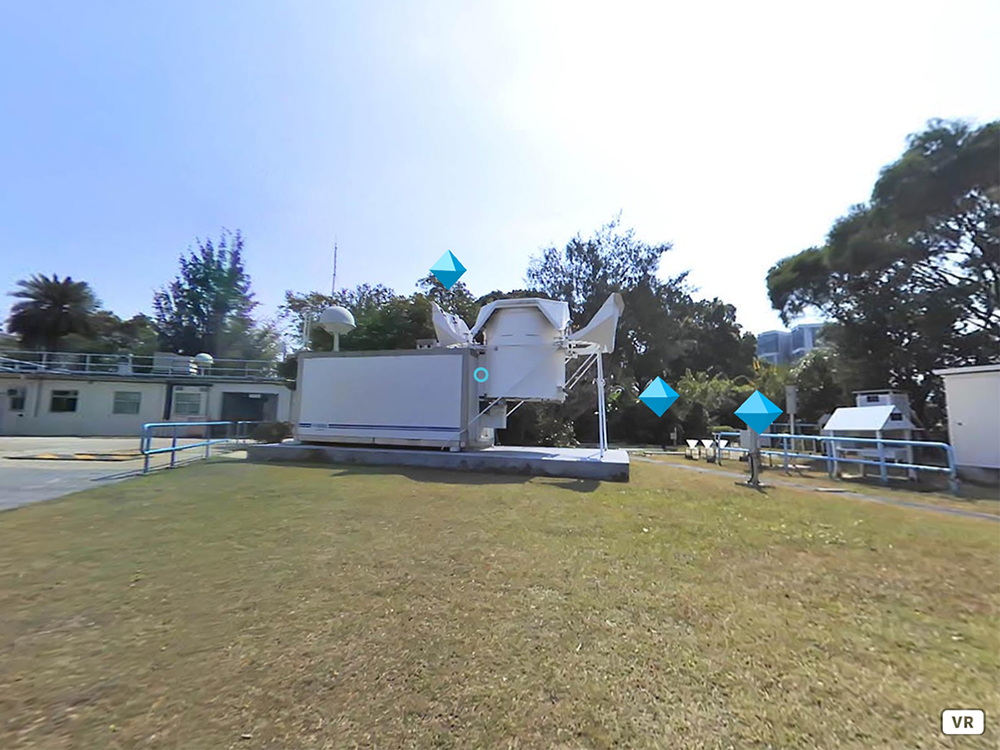
在畫面上拖曳並將正中央的藍色圓圈與場景內的按鈕重疊 1 秒,即可點選該按鈕。
Drag on the scene to move the blue circle at the centre of the screen. Make this blue circle overlap with a button on the scene for 1 second to click on that button.
可點選不同按鈕來查看補充資料或切換場景。
Click on different buttons to view the supplementary information or switch to another scene.
| 查看補充資料 View the supplementary information |
|---|
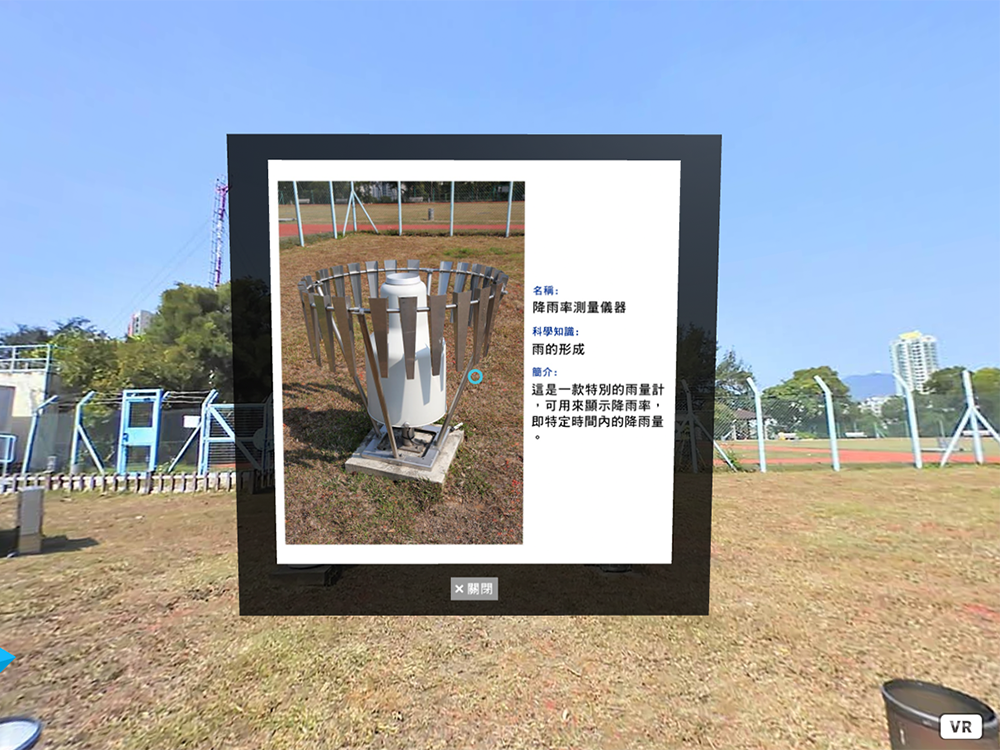
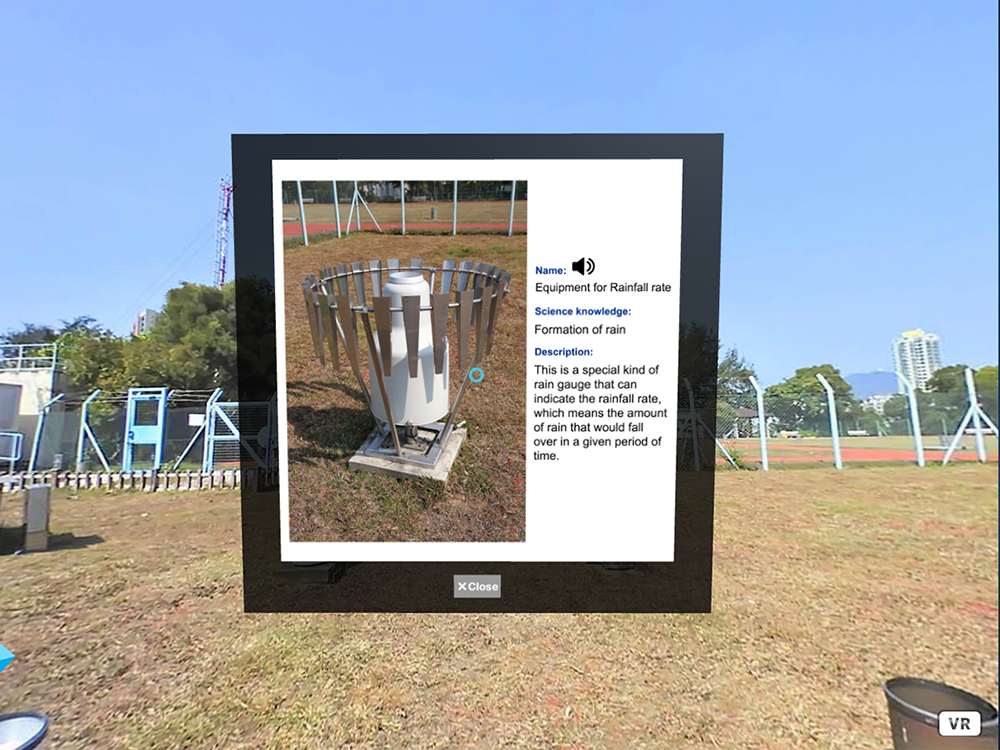
|
| 切換場景 Switch to another scene |
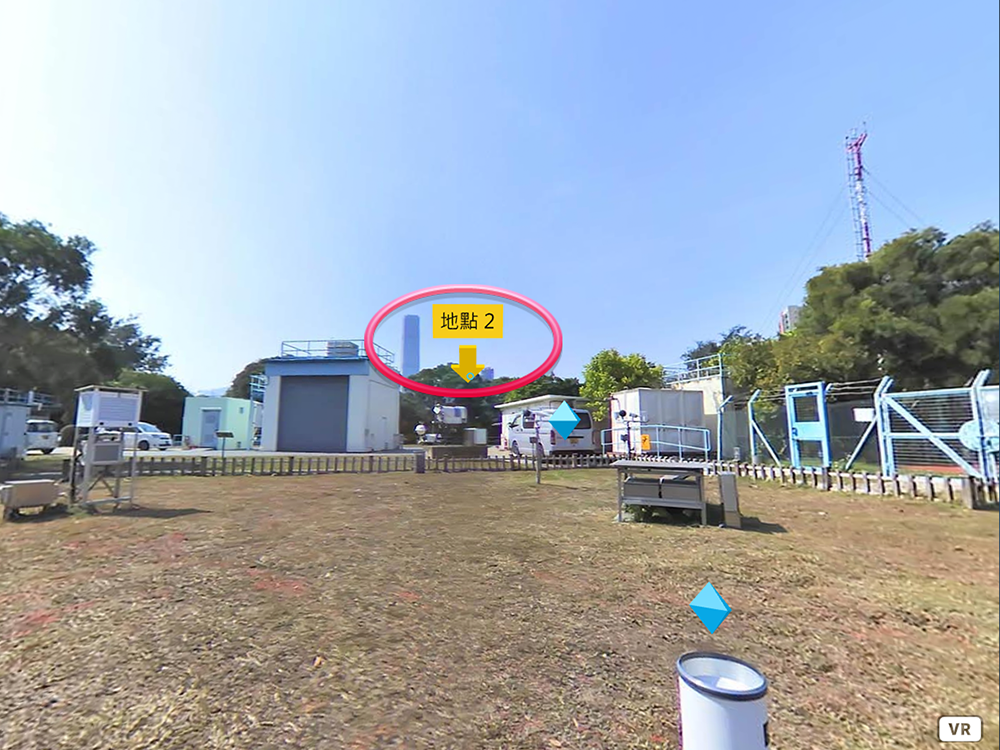
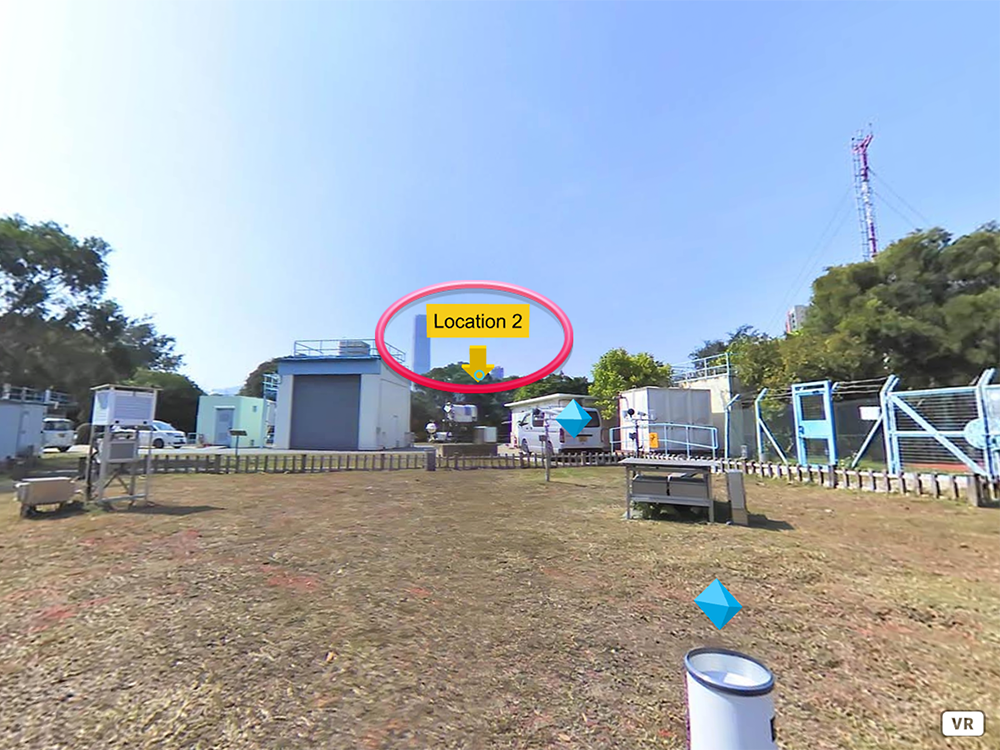

|
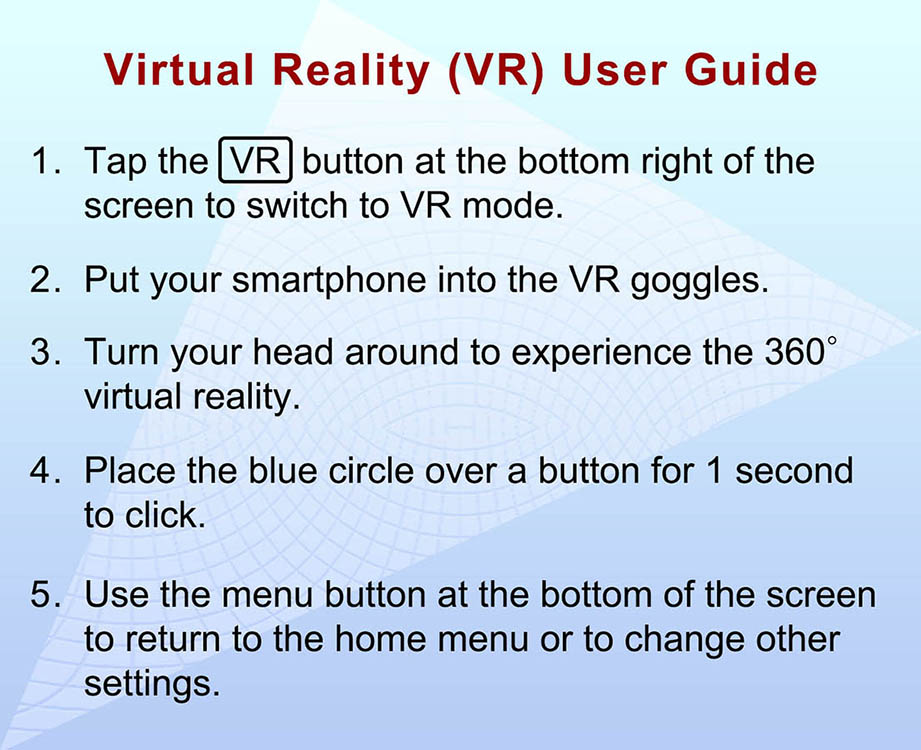
如使用 VR 眼鏡觀看虛擬實境,可使用智能電話開啟虛擬實境的網頁,並依照畫面上的使用指引進行。
To view the VR with VR glasses, use a smartphone to open the VR web page and follow the instructions on the screen to start.

iOS 12.2-12.4 + Safari 瀏覽器
iOS 12.2-12.4 + Safari browser
(1) 開啟設定 (Settings) > Safari。
(1) Open Settings (設定) > Safari.
(2) 開啟動作與定向取用 (Motion & Orientation Access)。
(2) Turn on Motion & Orientation Access (動作與定向取用).
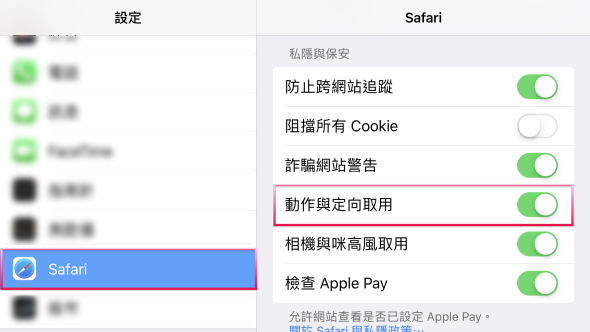
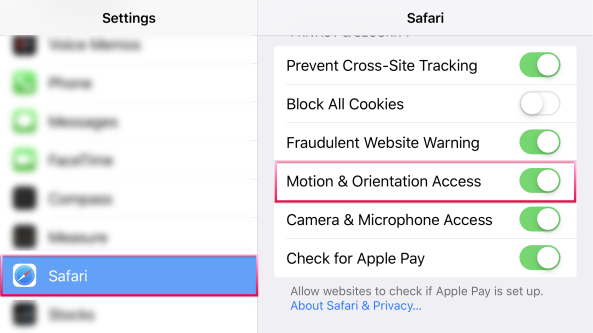
(3) 重新開啟雅集網頁上的 VR 旅程。
(3) Open the VR tour on Aristo web page again.
iOS 13.0 或以上 + Safari 瀏覽器
iOS 13.0 or above + Safari browser
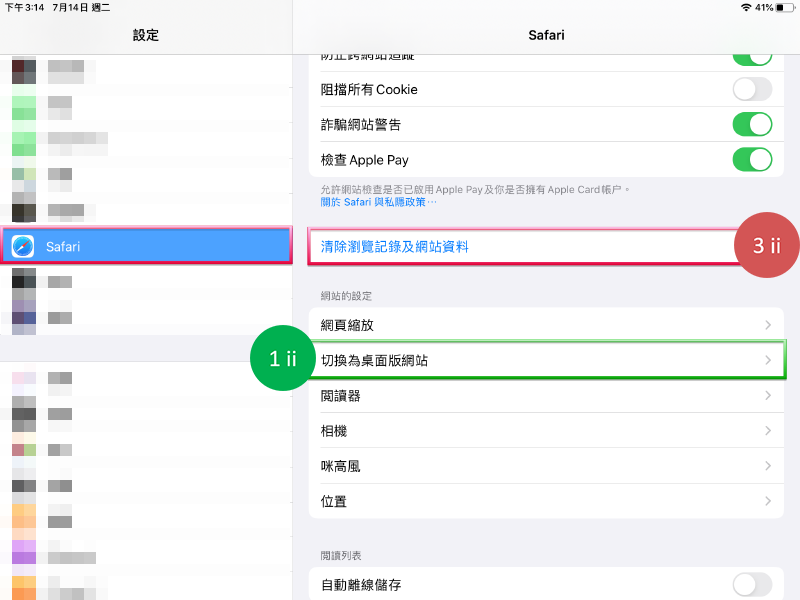
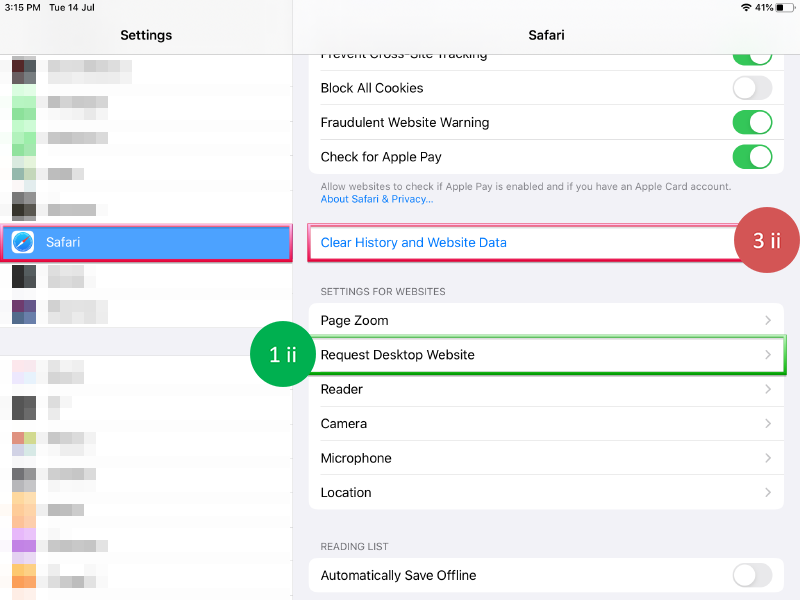
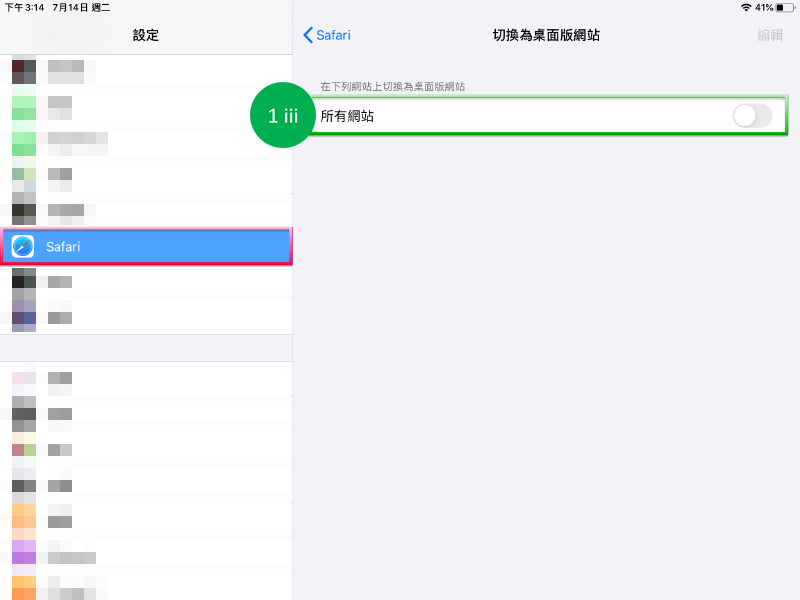
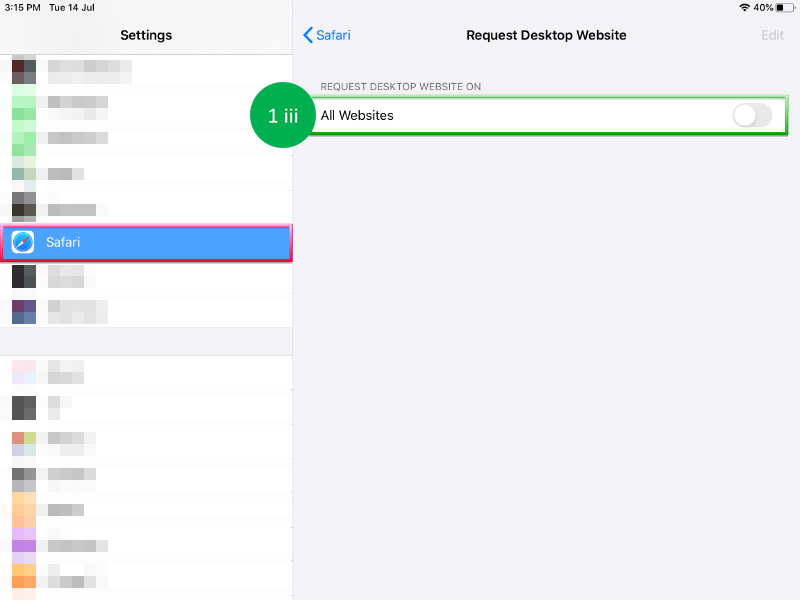
(1) 如使用iPad,請先:
(1) If you are using iPad, please:
- 開啟設定 (Settings) > Safari;
- 點按切換為桌面版網站 (Request Desktop Website);
- 關閉所有網站 (All Websites)。
- open Settings (設定) > Safari;
- tap Request Desktop Website (切換為桌面版網站);
- turn off All Websites (所有網站).
(2) 重新開啟雅集網頁上的 VR 旅程,點按上方的啟動「動作與定向」並允許。
(2) Open the VR tour on Aristo web page again, tap Activate ‘Motion & Orientation’ on the top and allow.
(3) 如你取消了啟動,請:
(3) If you have cancelled to activate, please:
- 開啟設定 (Settings) > Safari;
- 點按清除瀏覽記錄及網站資料 (Clear History and Website Data);
- 重新載入雅集網頁上的 VR 旅程,點按啟動「動作與定向」並允許。
- open Settings (設定) > Safari;
- tap Clear History and Website Data (清除瀏覽記錄及網站資料);
- reload the VR tour on Aristo web page again, tap Activate ‘Motion & Orientation’ and allow.
(暫只提供中文版本)
(Only the Chinese version is provided now.)
| iPad / iPhone iPad / iPhone | Android 平板電腦/智能電話 Android tablet / smartphone |
|---|---|

|

|
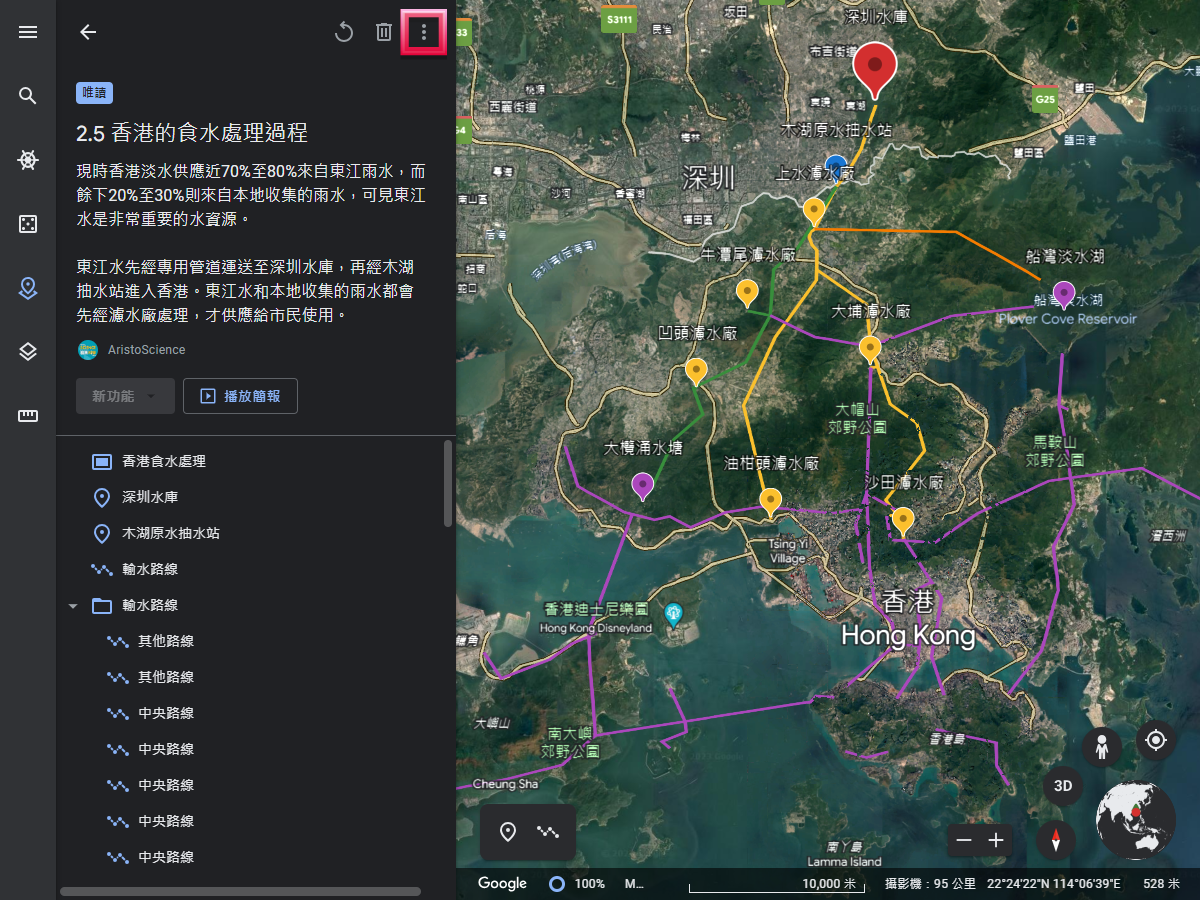
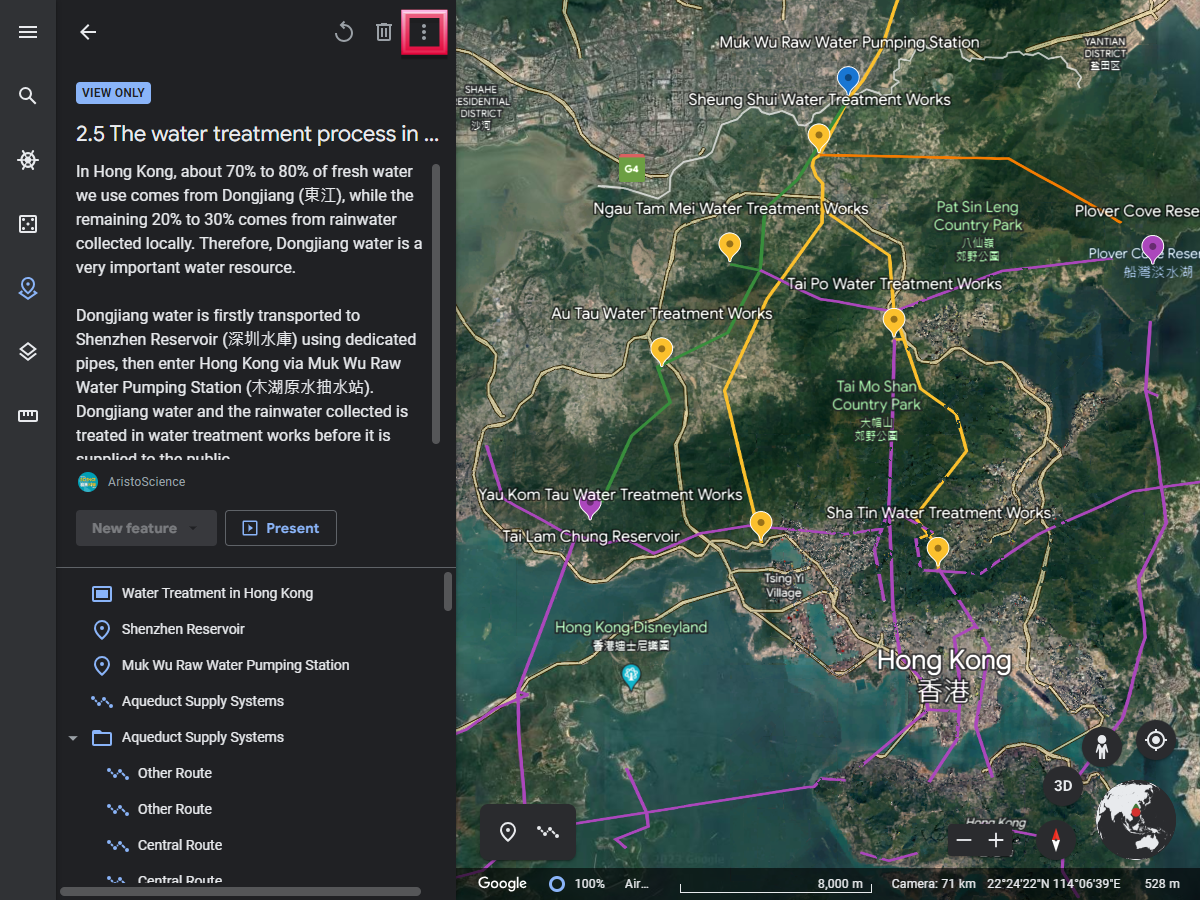
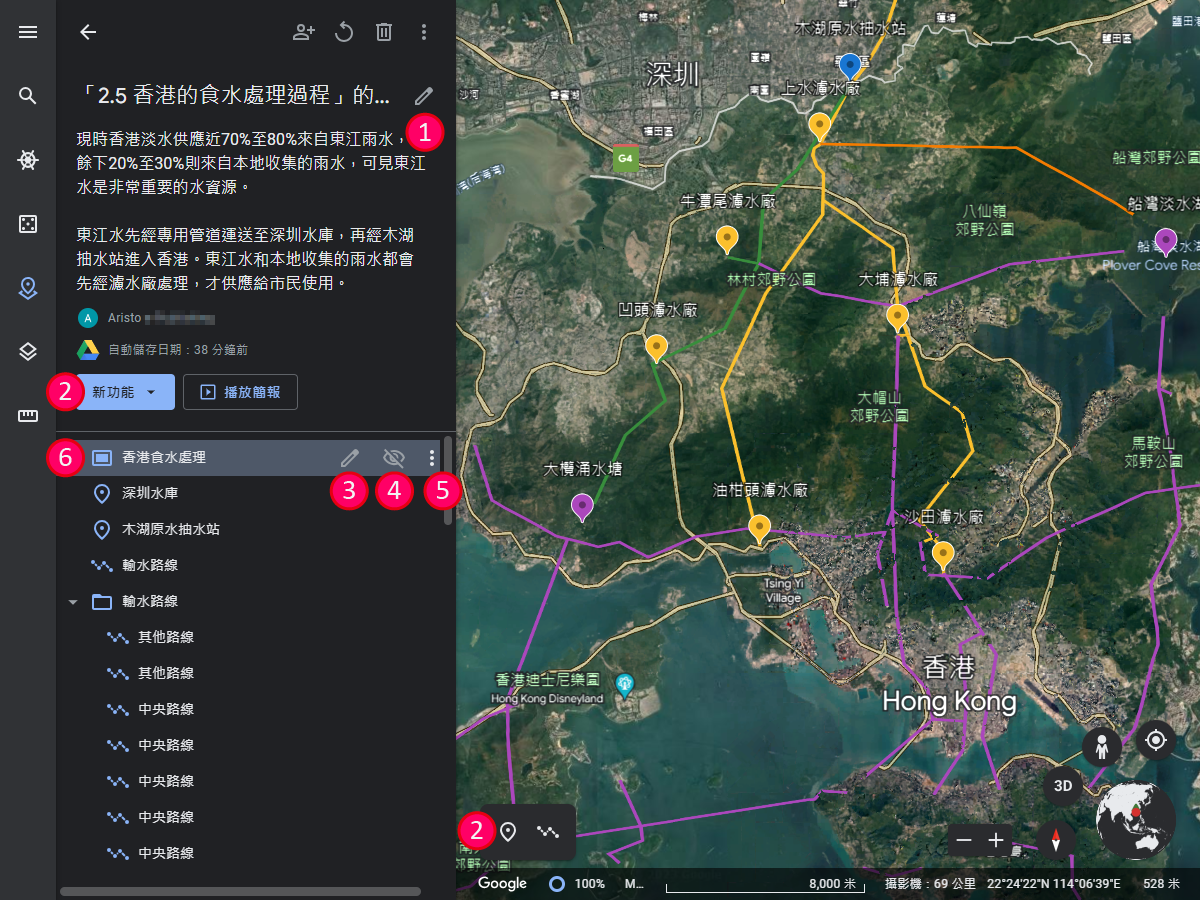
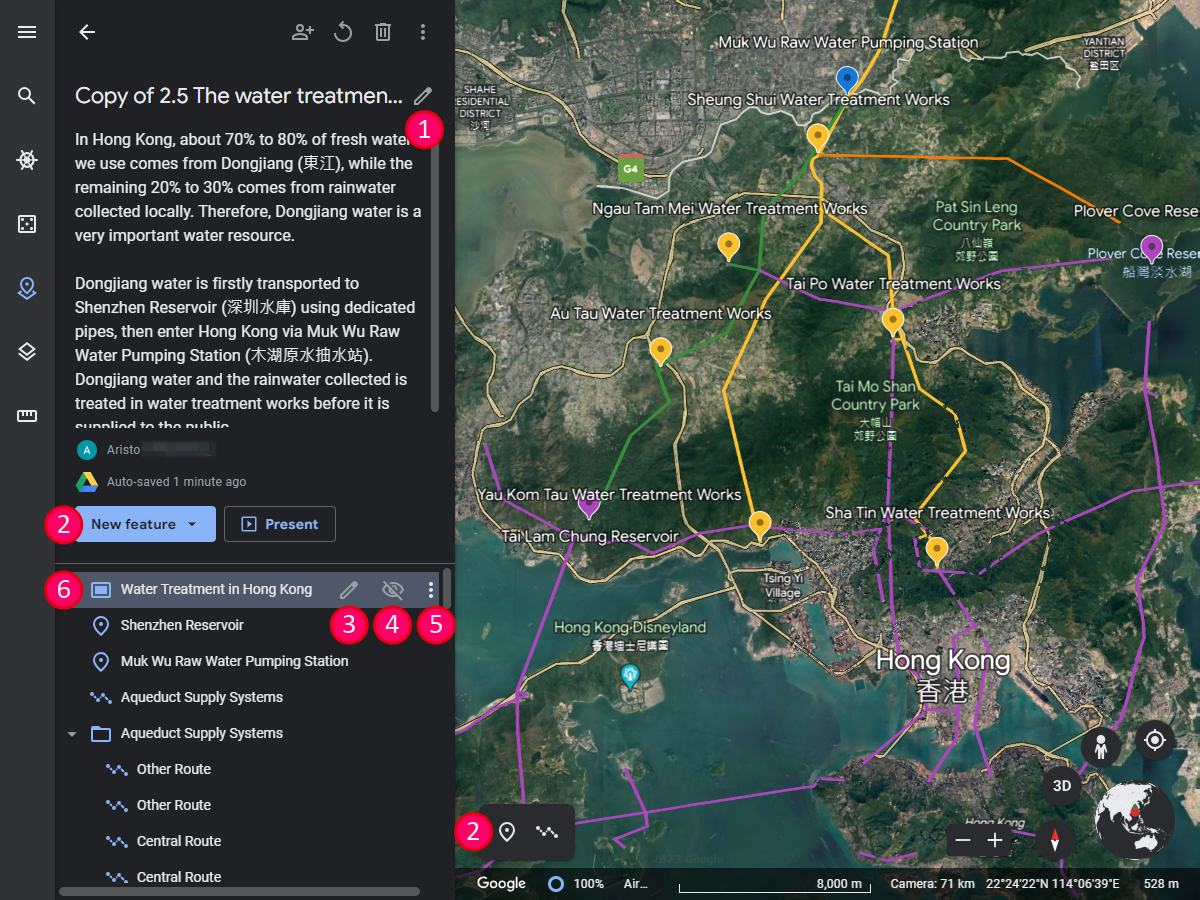
| 1 | 修改專案標題和說明 Edit the project title and description |
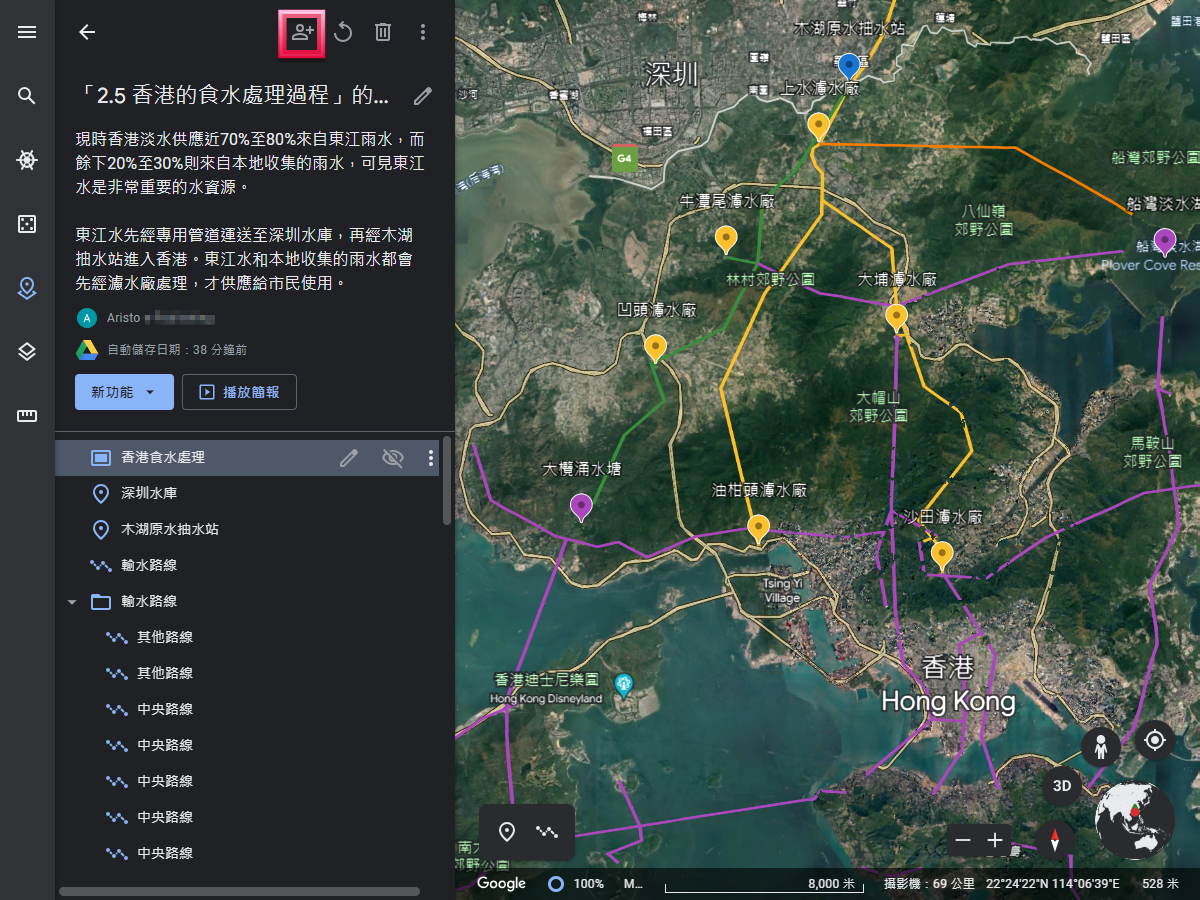
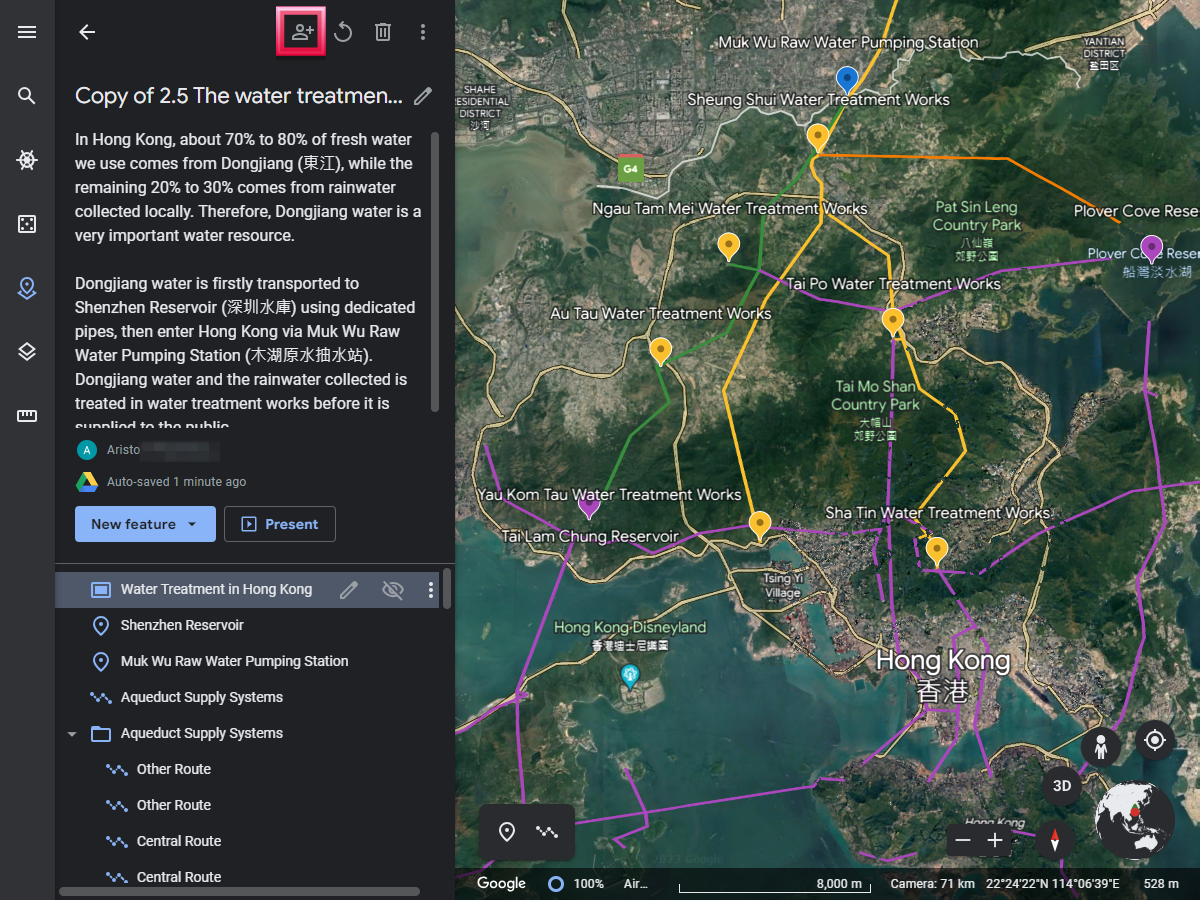
| 2 | 新增地圖項目,如地標、線條、形狀和全螢幕投影片 Add new features, including placemark, line, shape and fullscreen slide |
| 3 | 修改地圖項目的內容和對應地點 Edit the content and location of the feature |
| 4 | 隱藏地圖項目(該地圖項目會在簡報模式時隱藏) Hide feature (the feature will be hidden in presentation mode) |
| 5 | 顯示更多動作,如刪除地圖項目 Show more actions, such as deleting the feature |
| 6 | 拖曳移動以改變地圖項目的次序 Drag to change the order of the feature |
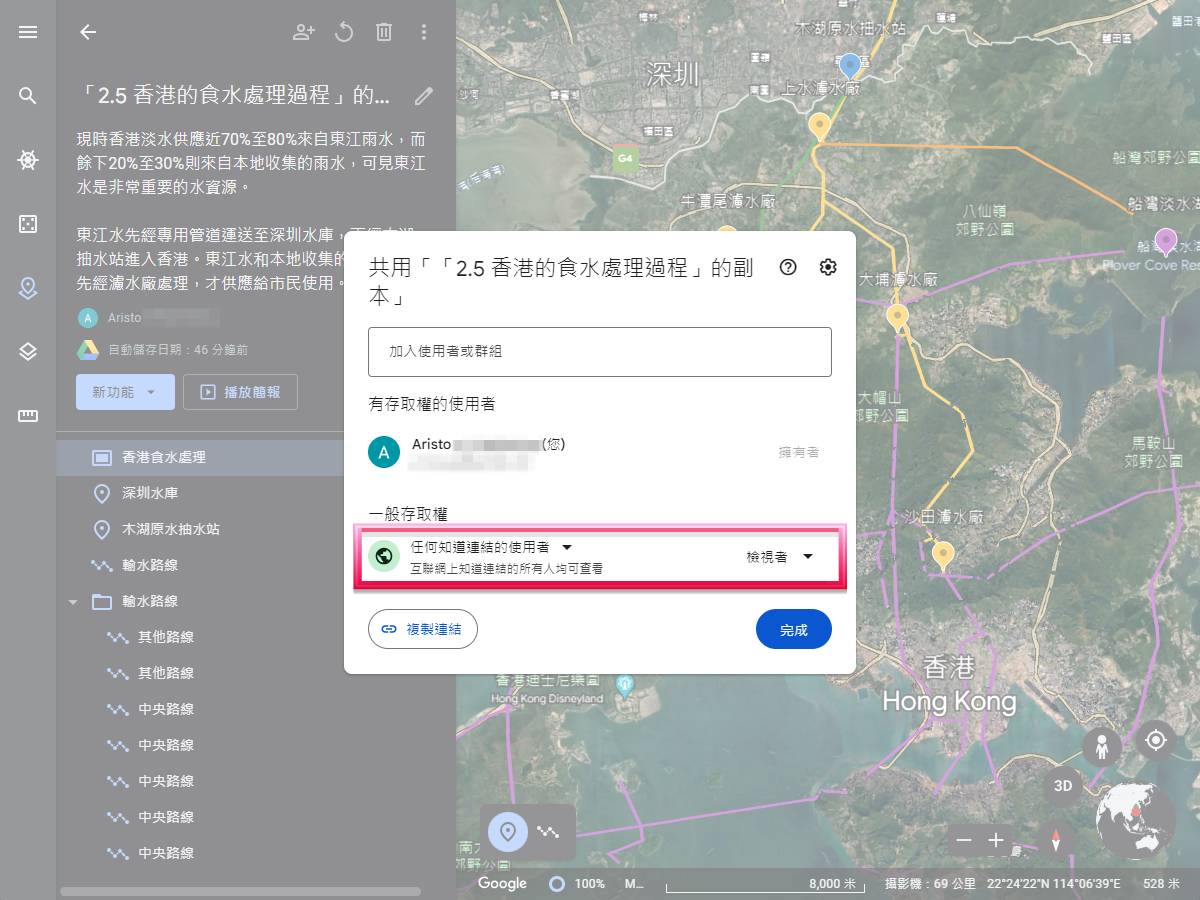
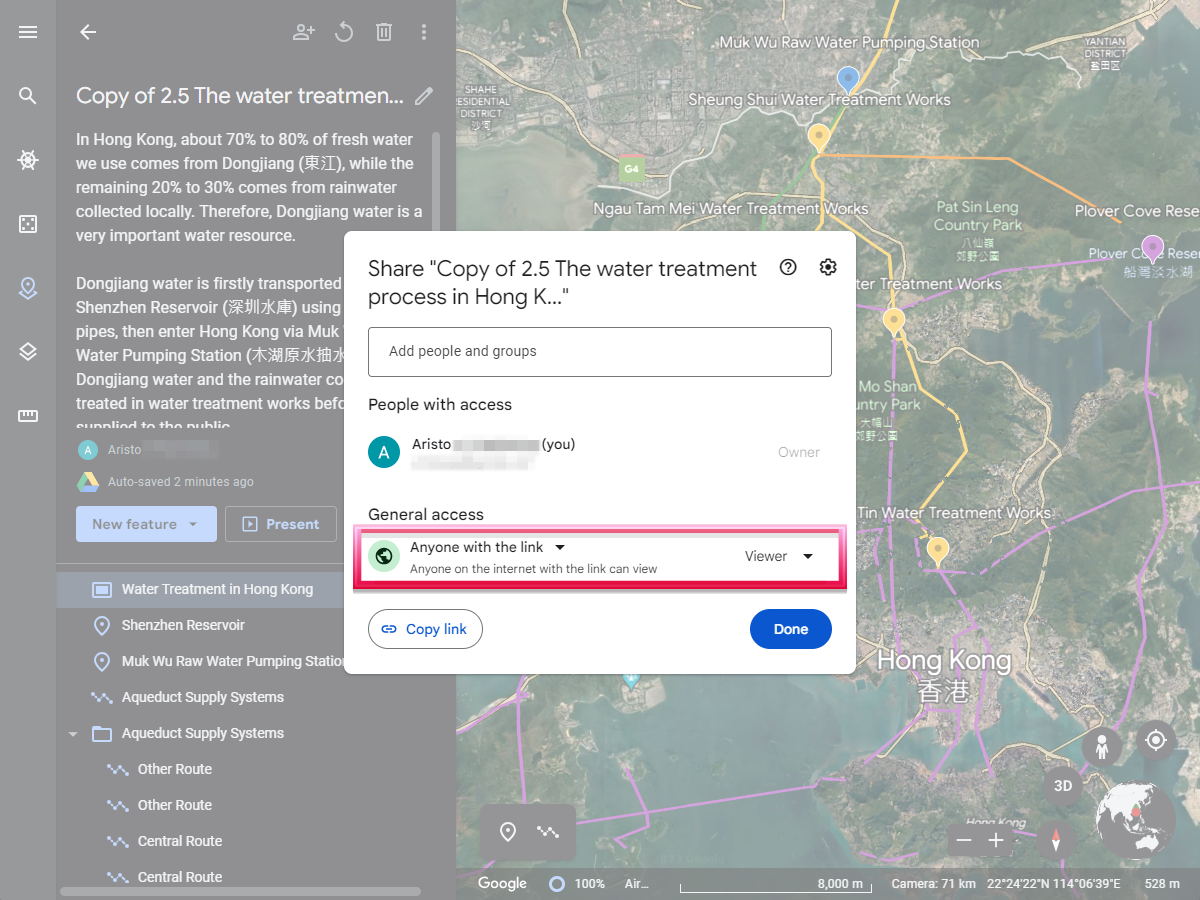
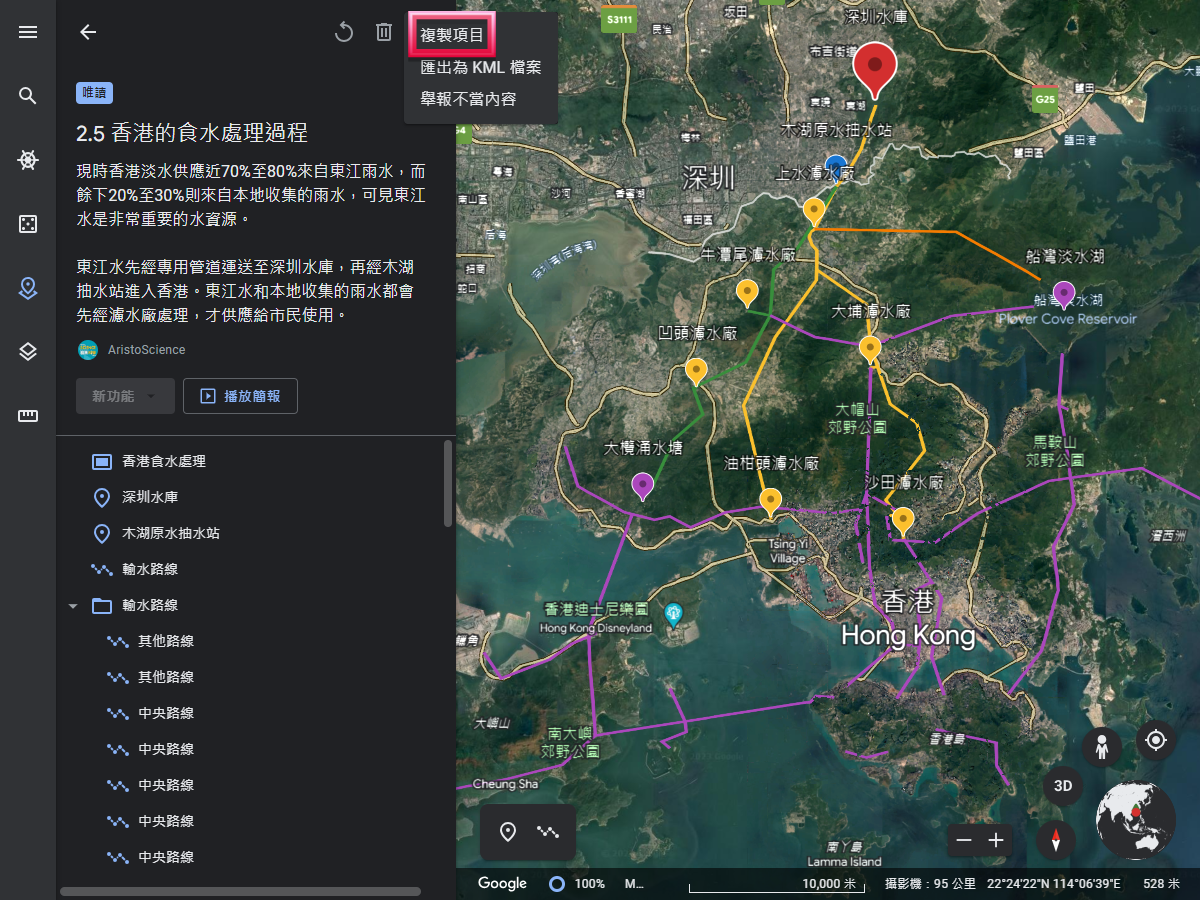
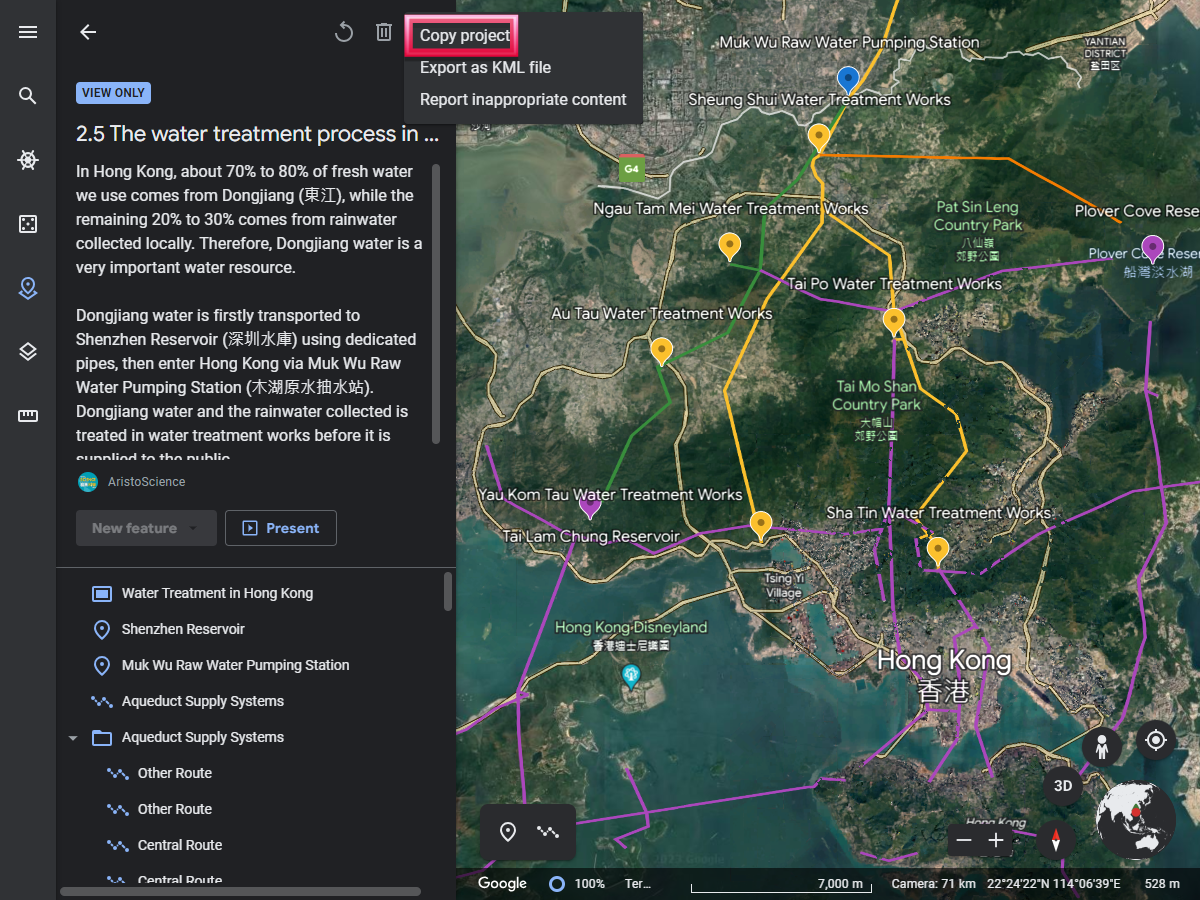
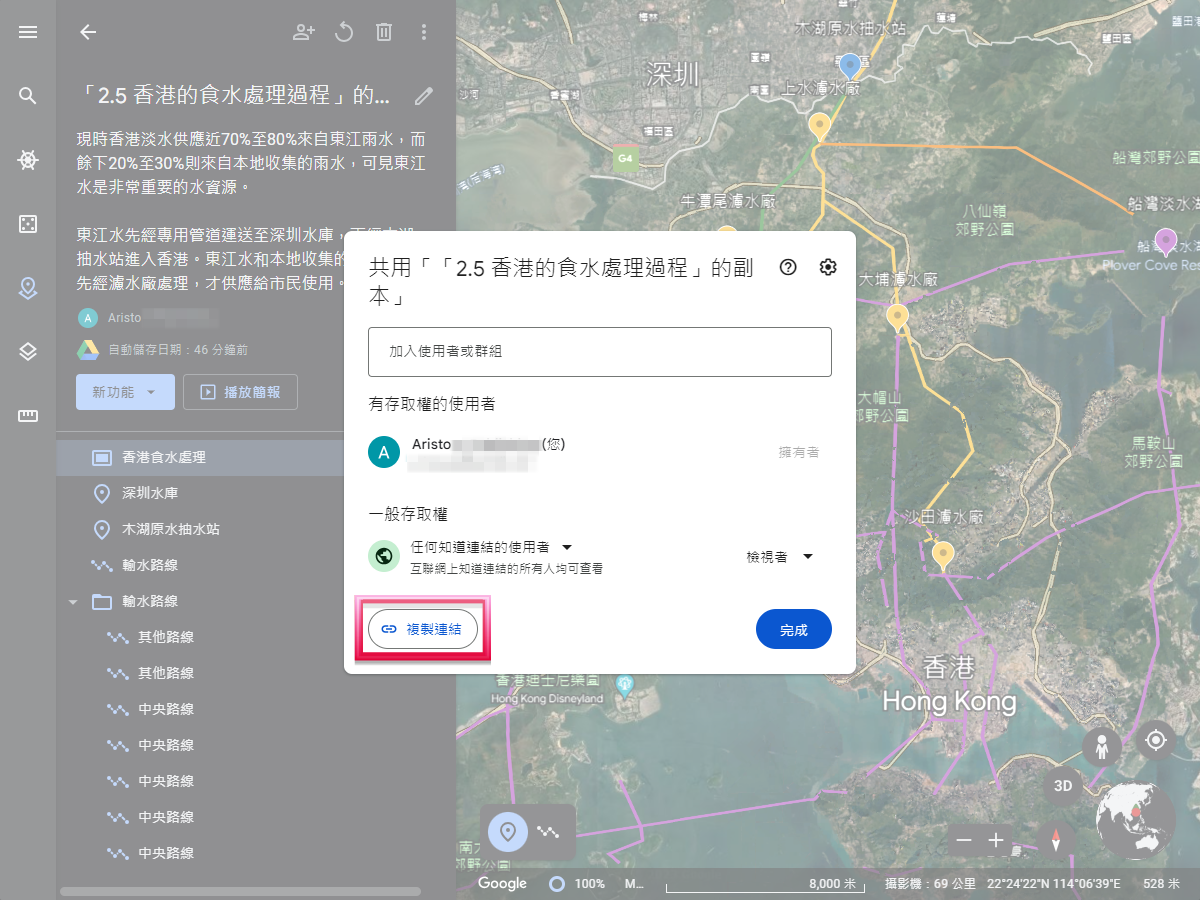
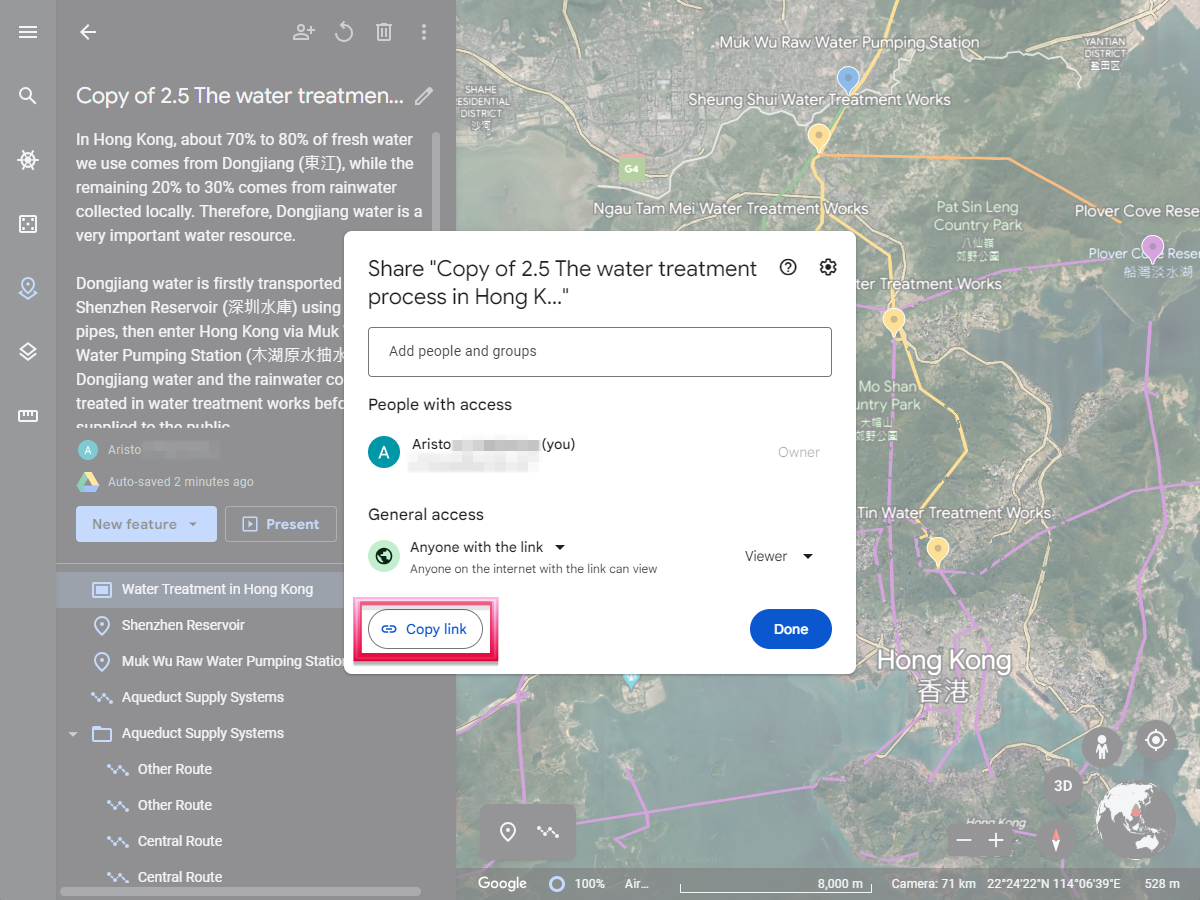
| 教師複製連結 Teachers copy the link |
|---|
|
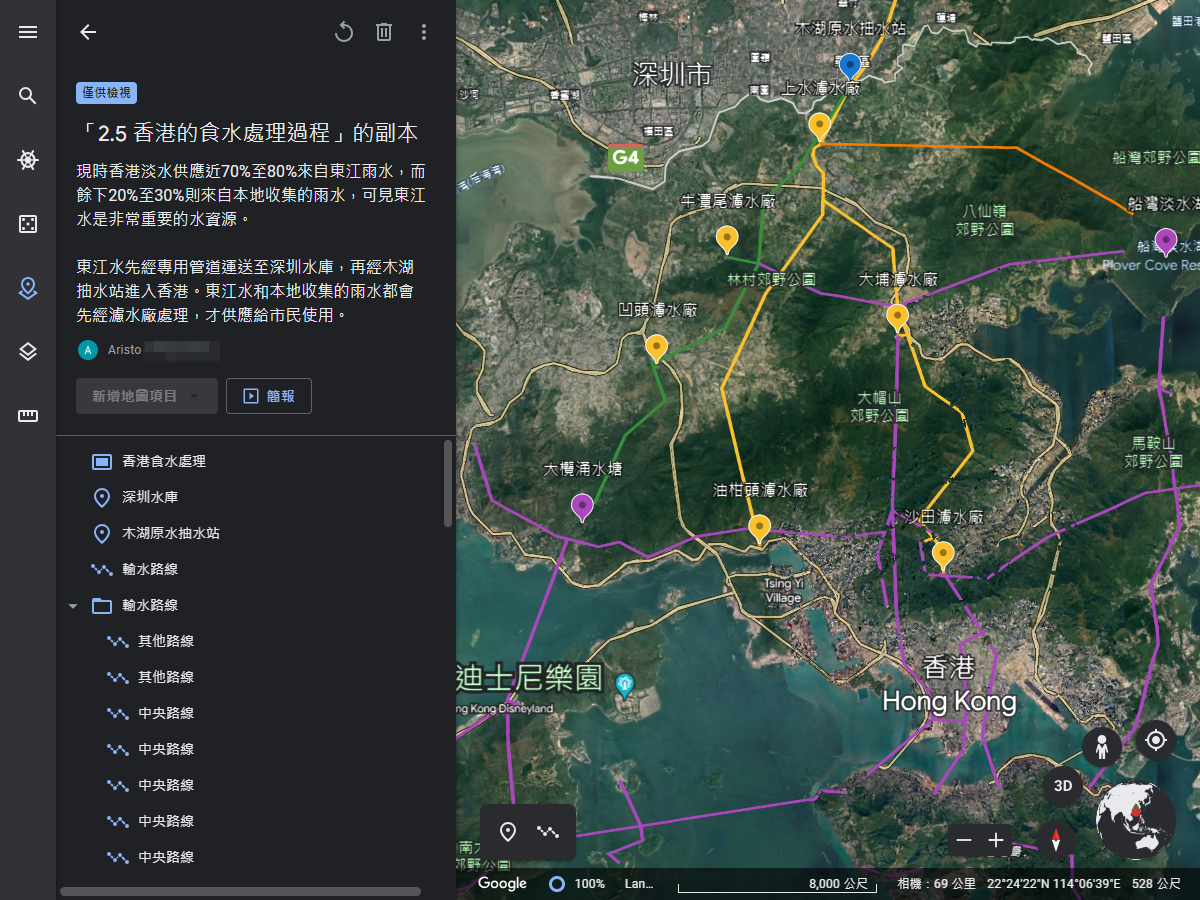
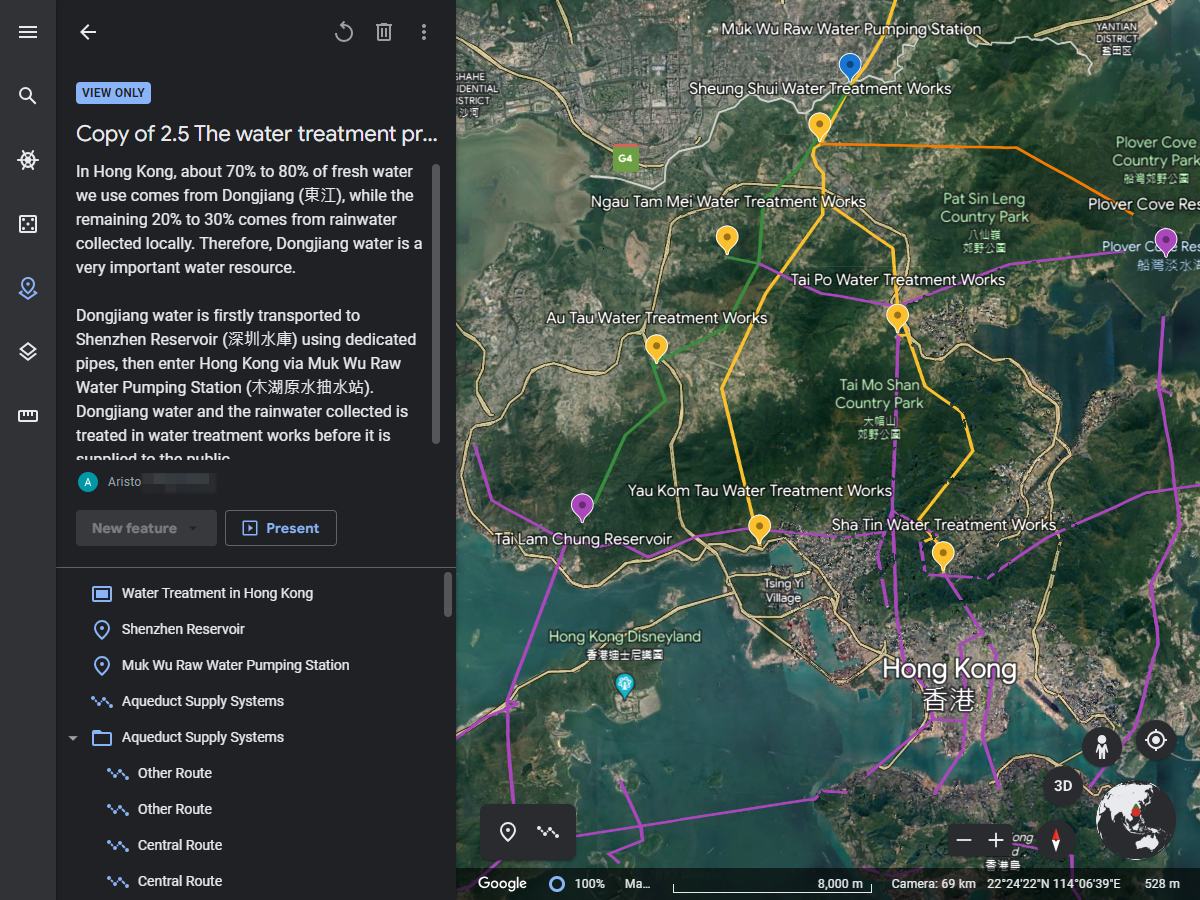
| 學生瀏覽連結 Students browser the link |
|---|
|
新增班別
Add class
登入Plickers帳戶後,點擊「New Class」後輸入班別名稱,然後點擊「Create Class」建立班別。
After signing in with a Plickers account, click ‘New Class’ and enter a class name, then click ‘Create Class’ to create the class.
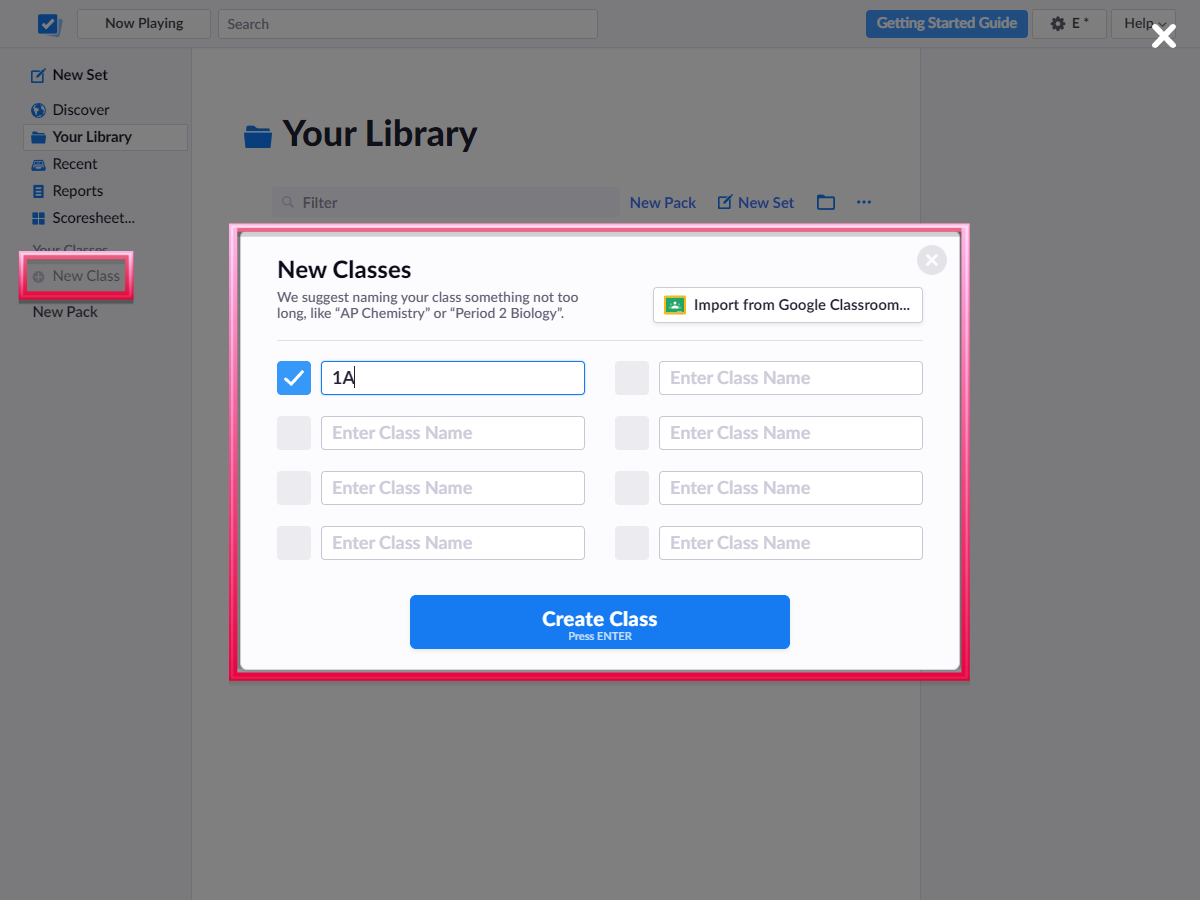

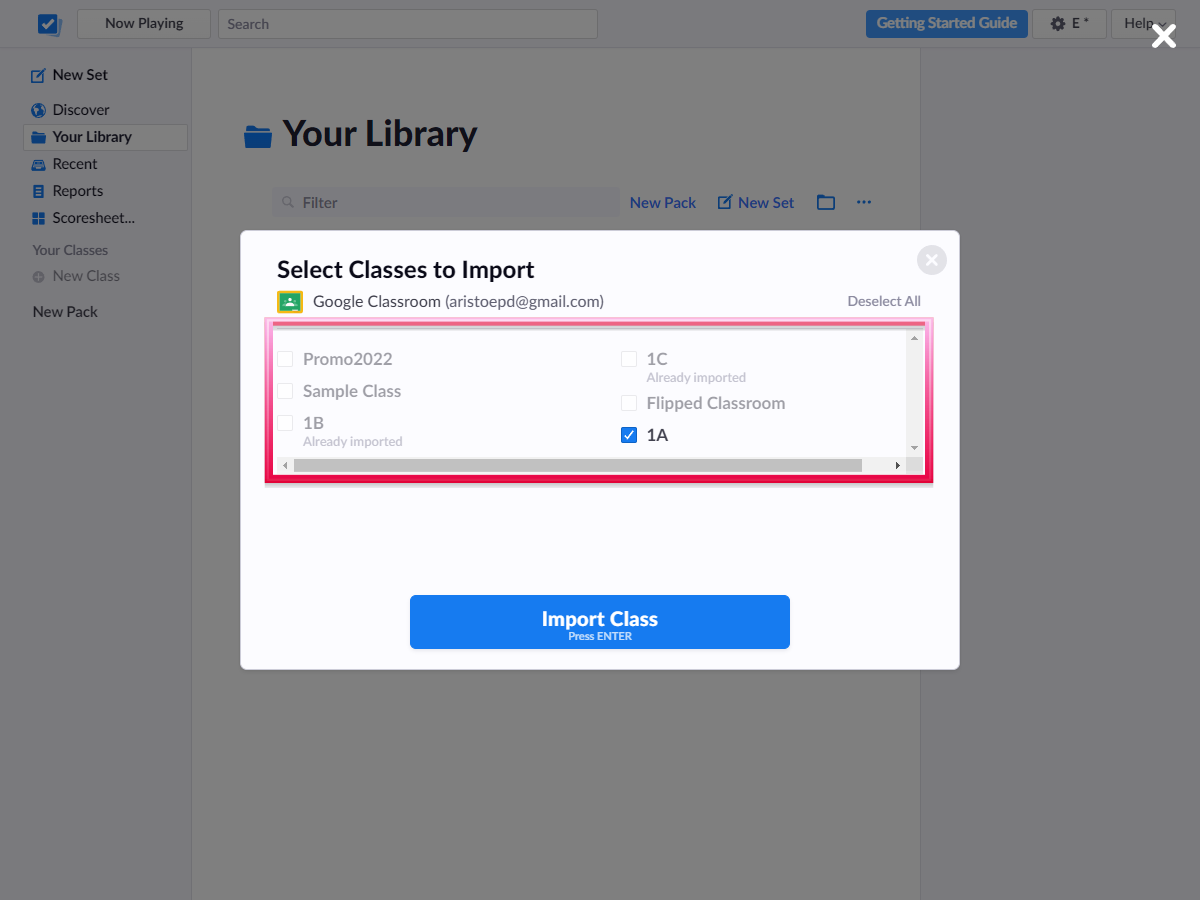
如學校現正使用Google Classroom,教師可點擊「Import from Google Classroom」,並登入Google帳戶。選擇Google Classroom班別後點擊「Import Class(es)」來匯入Google Classroom的班別和學生資料到Plickers新班別。
If the school is using Google Classroom, teachers can click on the ‘Import from Google Classroom’ button and sign in with their google accounts. Select a class from Google Classroom and click ‘Import Class(es)’ to import the class and student information into a new class in Plickers.

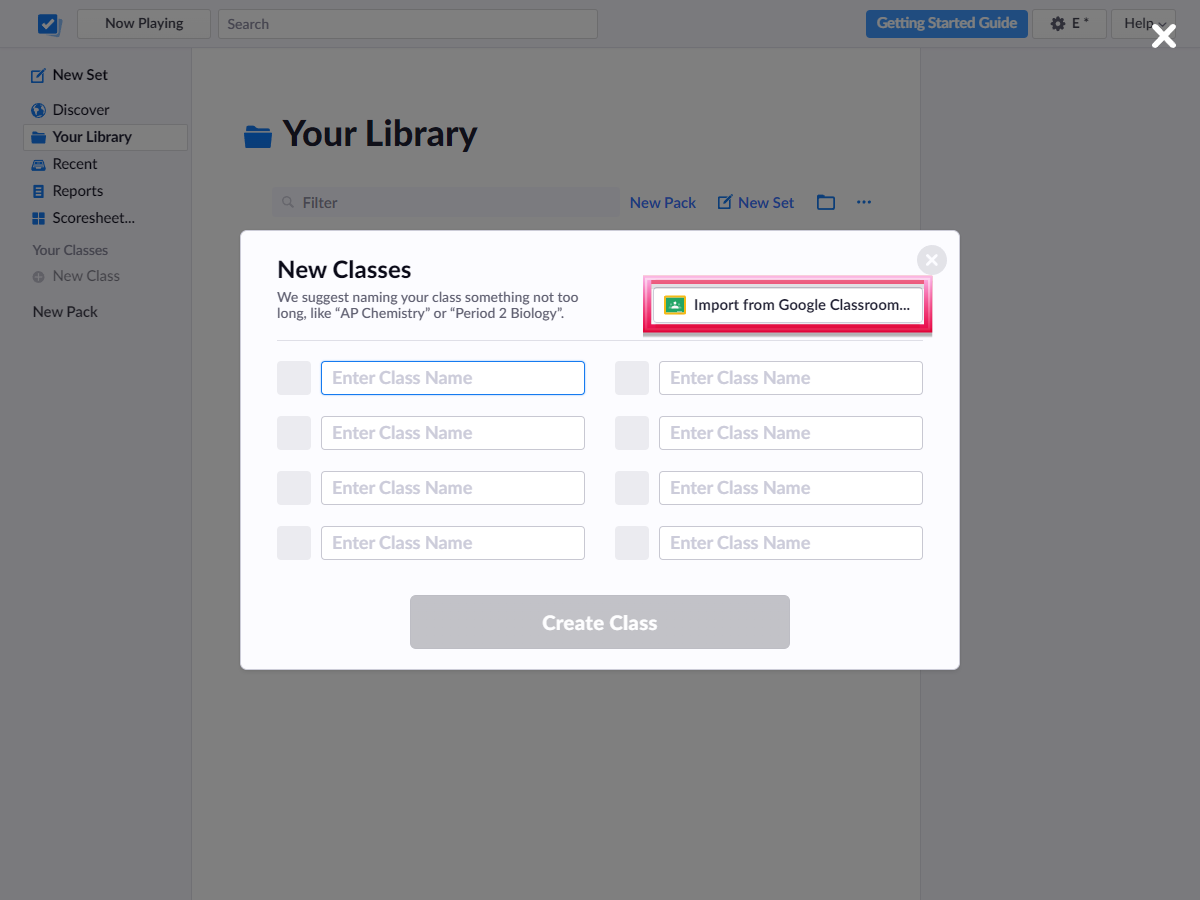

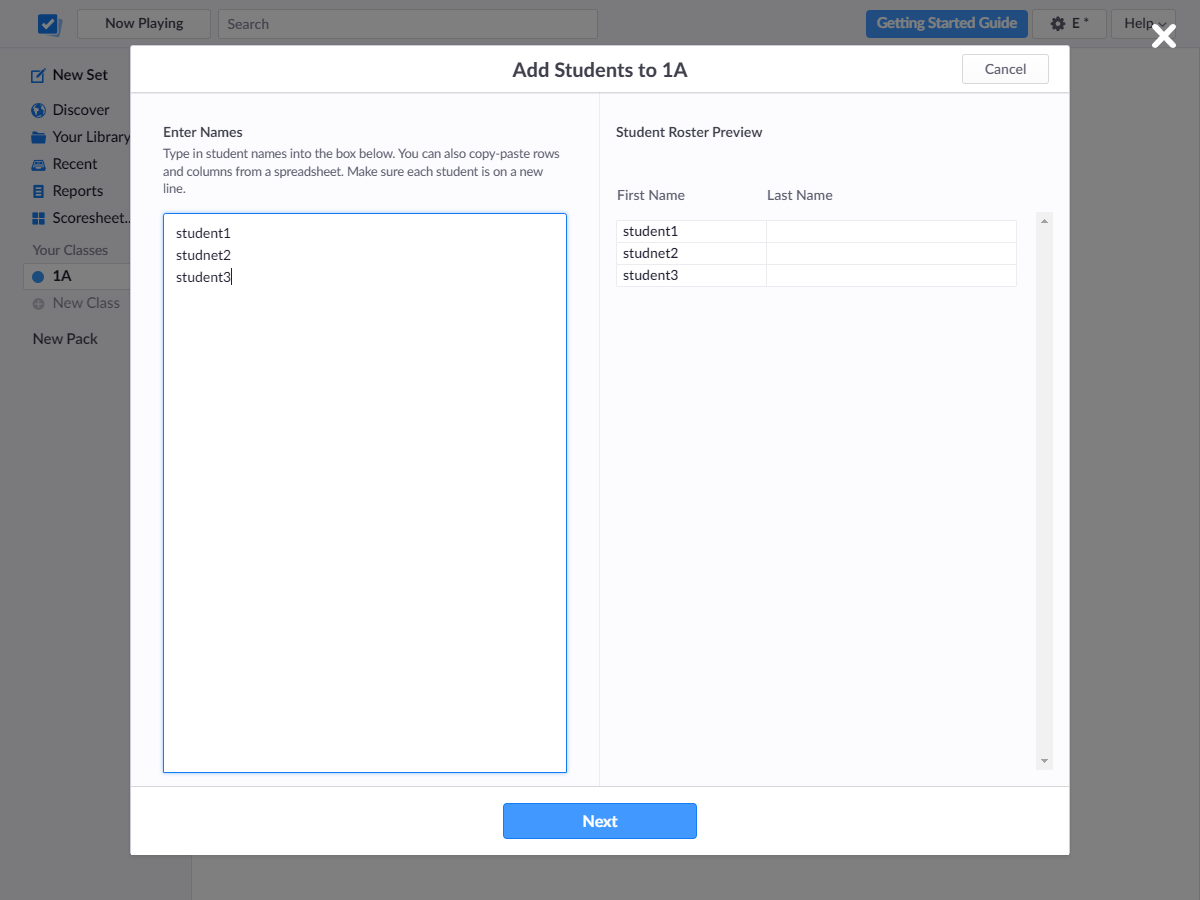
新增學生
Add students
建立班別後點擊「Add Students」,然後輸入學生姓名以新增學生。
After creating a class, click on the ‘Add Students’ button and enter the students’ names to add students.


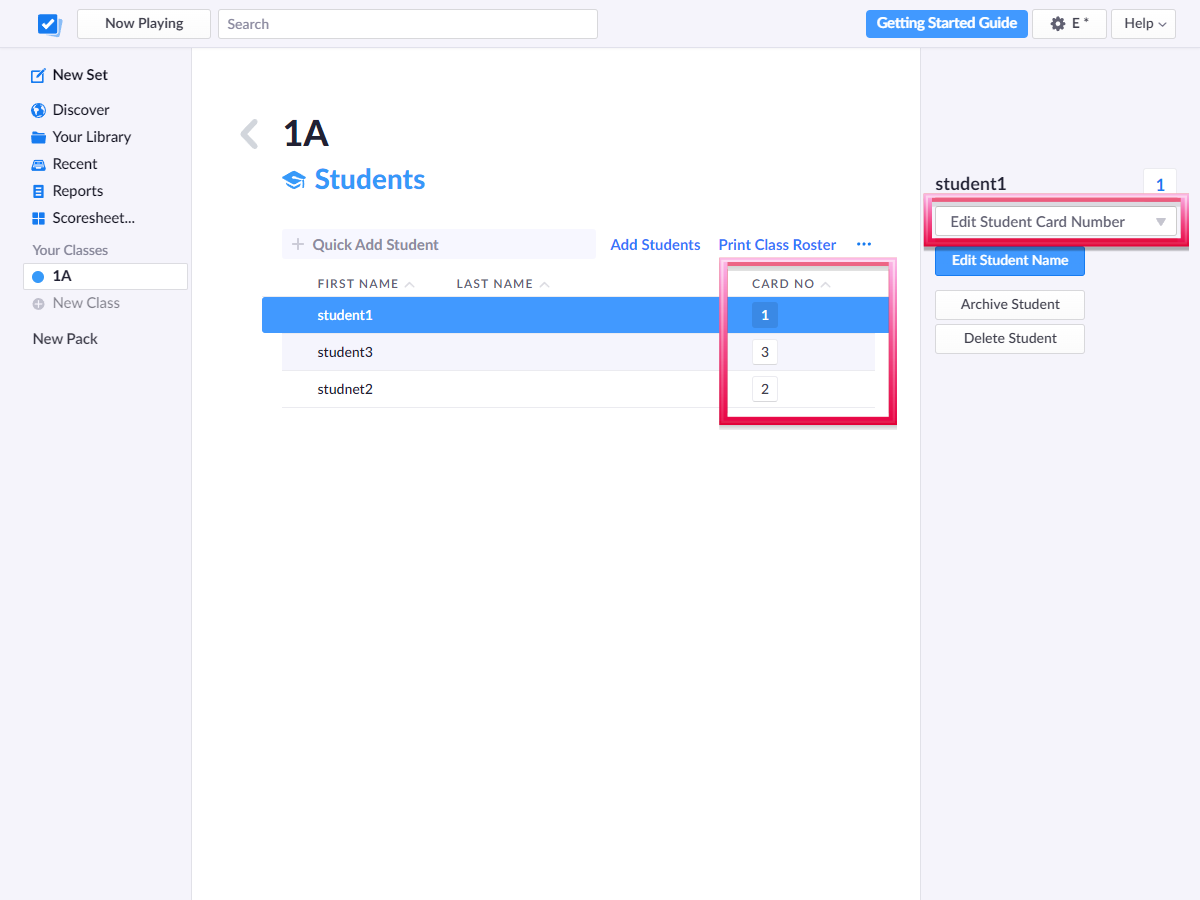
新增學生後,每位學生都會於「Card No」欄內顯示相應的編號,教師亦可點選學生名字後於右方「Edit Student Card Number」選項中修改該學生的編號。
After adding students, every student will be assigned with a number under the ‘Card No’ column. Teachers can select a student and click on the ‘Edit Student Card Number’ from the right pane to change the Card Number of that student.

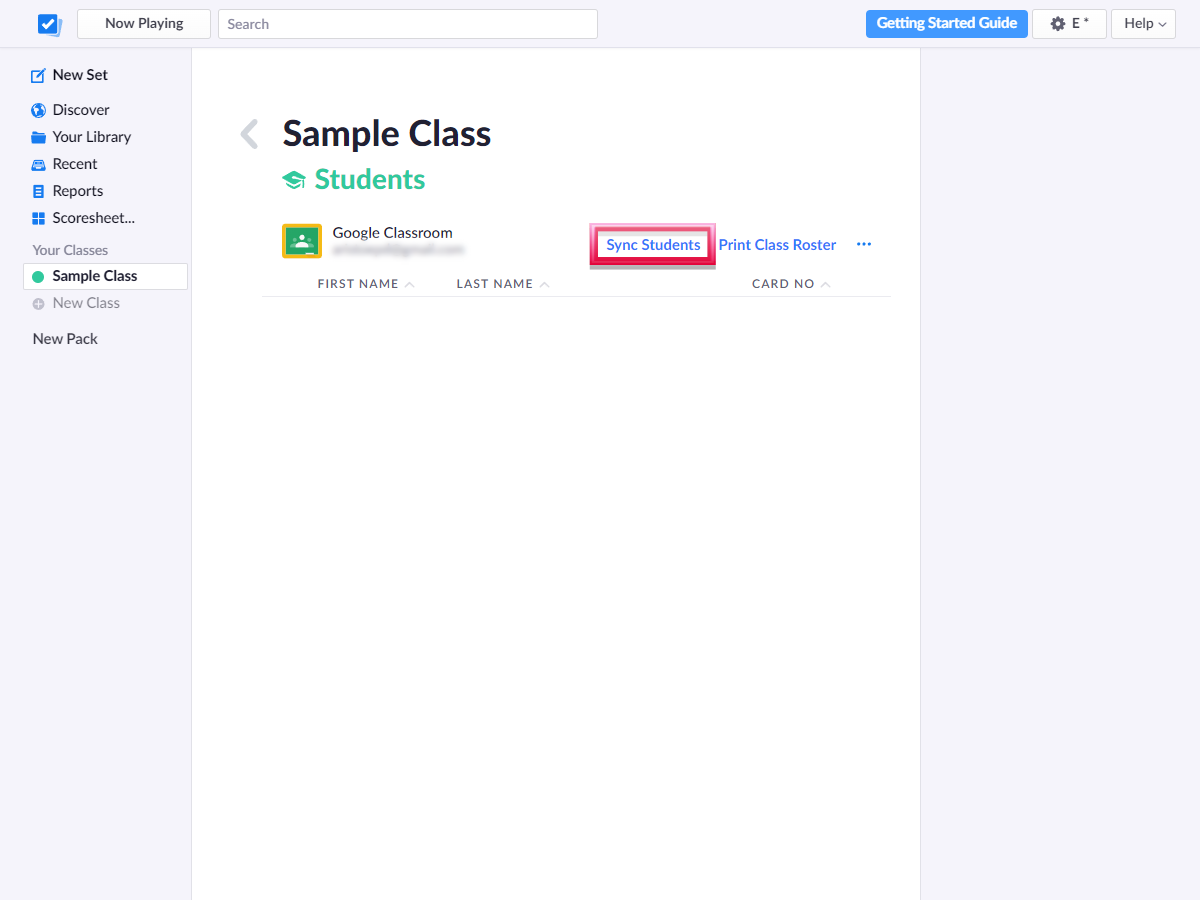
如教師經「Import from Google Classroom」來新增班別和學生,需先到Google Classroom更新學生資料,再在Plickers頁面點擊「Sync Students」。
If teachers add the classes and students from the ‘Import from Google Classroom’ function, teachers should update the student information in Google Classroom and click ‘Sync Students’ to update.

學生答案卡
Plickers cards for students
教師在開始前需要先從Plickers網站下載並列印一套學生答案卡,然後派發予學生。詳情請按此。
To get started, teachers should download a set of Plickers cards from Plickers website and distribute them to the students. Click here for details.
| 「標準版」 (Standard Set):1至40號 Standard Set: Card number 1-40 | |
|---|---|
| 標準字型 Standard font | 加大字型 Jumbo (oversized) Set |
| 「增量版」 (Expanded Set):1至63號Expanded Set: Card number 1-63 | |
|---|---|
| 標準答案卡 Standard Set | 加大版答案卡 Jumbo (oversized) Set |
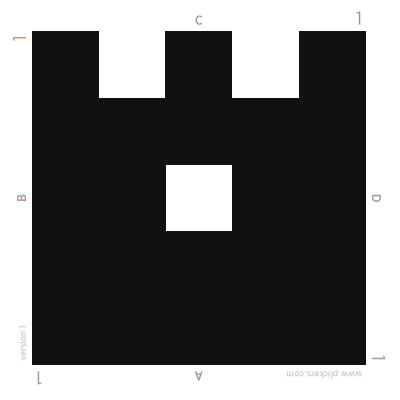
每張答案卡都有一個獨特的黑色符號,符號的四角都印有編號(1至40號或1至63號),與班別內的學生名單所對應。另外,符號四邊各有A、B、C、D四個選項,學生在進行Plickers練習時可依所選答案將答案卡舉上,教師便可透過掃描學生所舉的答案卡方向來辨識所選答案。
例子: 「標準版」 (Standard Set) - 1號答案卡
Every Plicker card has a unique black symbol. The card number is printed on the four corners of the card (1 to 40 or 1 to 63), which should match with the student list in the class. Moreover, there are four answers (A, B C and D) printed on the four edges of the card. Students should hold up their cards so that their desired answer is located at the top edge of their card. Teachers can then scan the students’ cards and let Plickers analyze the selected answers from the direction of every card.
Example: ‘Standard Set’ - Plicker card No. 1
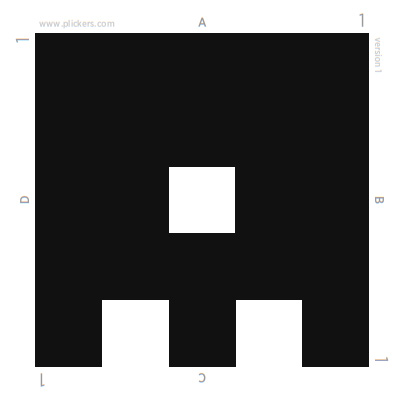
所選答案:A
Selected answer: A
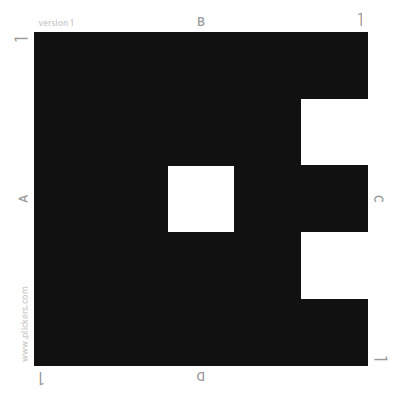
所選答案:B
Selected answer: B
所選答案:C
Selected answer: C
所選答案:D
Selected answer: D
註︰不同班別的學生可以使用同一套答案卡,只需在開始練習前指定班級即可。
Note: Students from different classes can use the same set of cards. Teachers can set the desired class to use the cards before the exercise.
下載Plickers應用程式
Download the Plickers mobile app
教師須先在平板電腦或智能手機內下載Plickers應用程式,才可掃描答案卡。
Teachers need to use a tablet or smartphone with the Plickers mobile app to scan the cards.
| iOS 版本 iOS version | Android 版本 Android version |
|---|---|


|


|
開啟練習頁面
Open the quiz page
在雅集Plickers頁面開啟練習連結,如未登入Plickers將會顯示登入介面,登入後將會進入至練習頁面。
(註︰教師必須使用自己的帳戶登入Plickers。如未有帳戶,可按此登記。)Open the Plickers quiz page from Aristo website. If teachers haven’t signed in Plickers yet, a sign-in web page will be shown. The quiz will be shown after signing in.
Note: Teachers should use their own accounts to sign in Plickers. Click here to register a new account if needed.


開始練習
Start the quiz
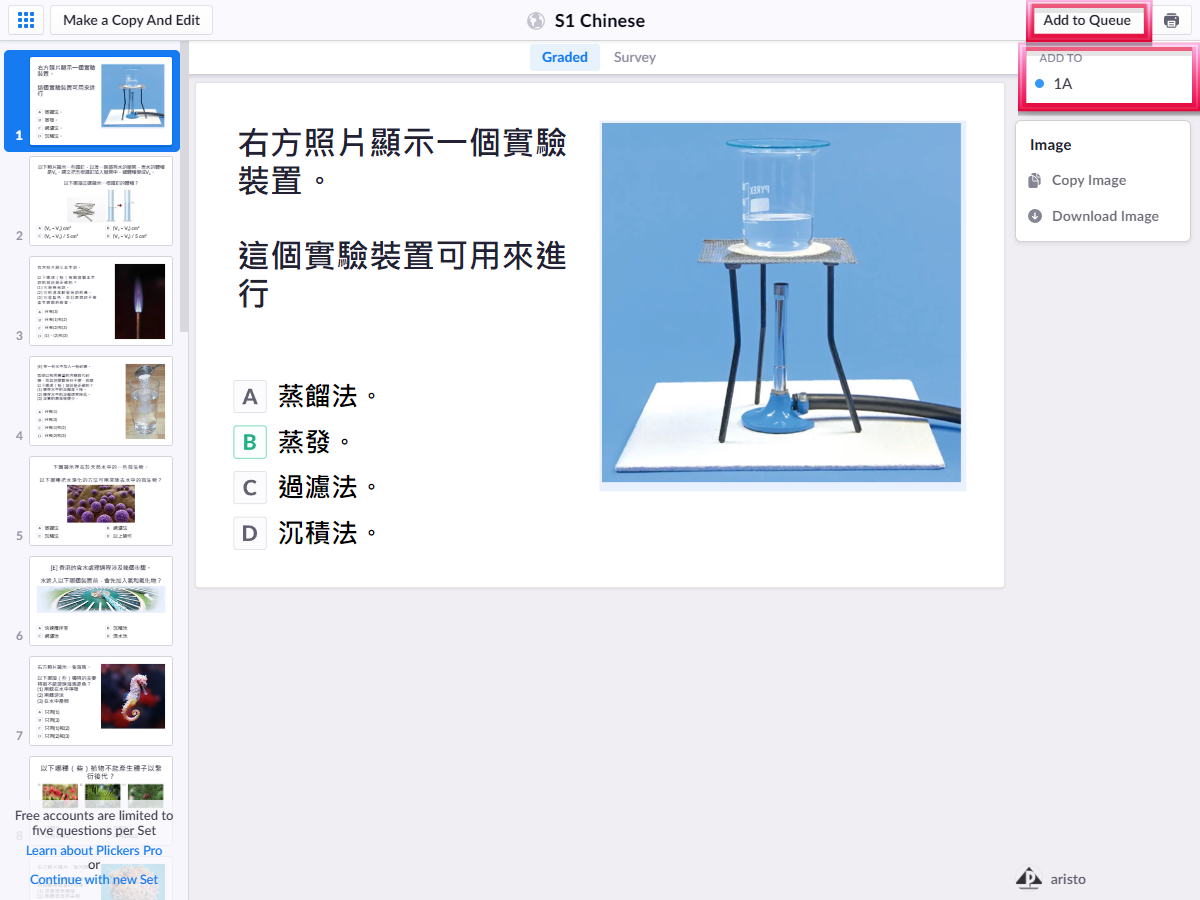
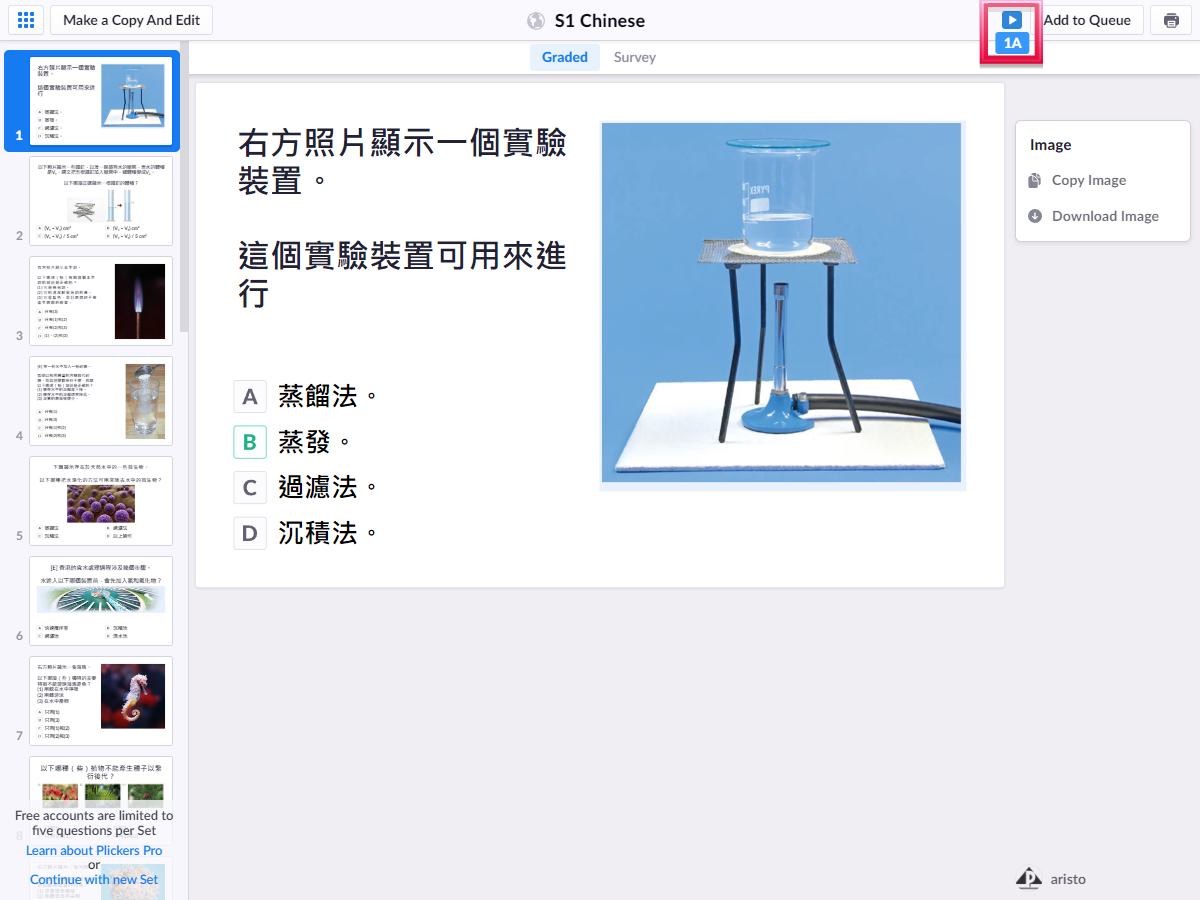
直接開始︰點擊「Add to Queue」後選擇班別即可將練習加至稍後進行的清單中,然後點擊旁邊剛選擇的班別即可開始練習。
Click to start: Click ‘Add to Queue’ and select a class to add this quiz into the queue of this class, then click the class name near this button to start the quiz.


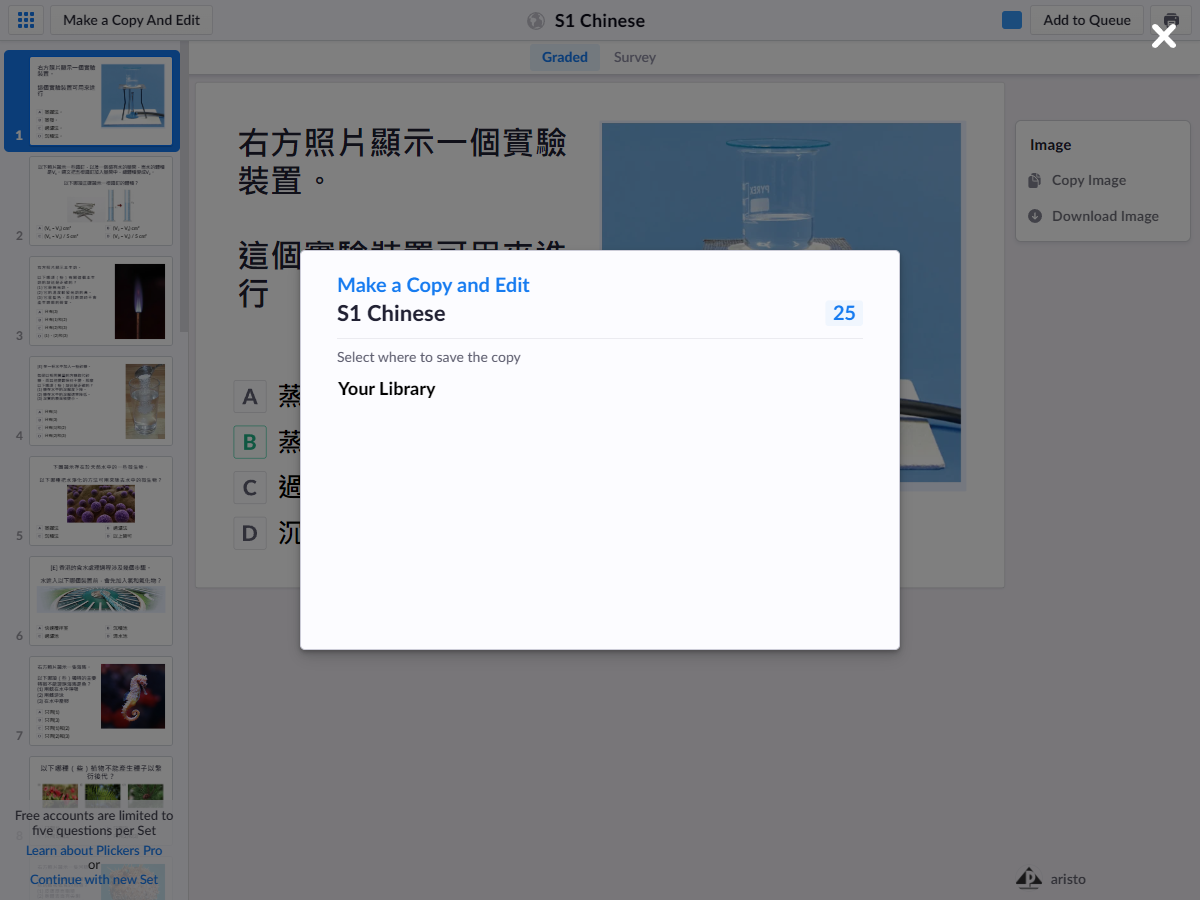
修改題目︰點擊「Make a Copy and Edit」,選擇儲存的位置後,練習將會複製並儲存至教師的個人Plickers帳戶中。教師可在相應的位置中找到該練習並按「Edit」修改。
Edit the questions: Click ‘Make a Copy and Edit’ and select a folder to save this quiz. The quiz will be copied and saved into the teachers’ own accounts. Teachers can find the quiz from the chosen folder and click ‘Edit’ to modify it.


註︰免費的Plickers帳戶每組(Set)的題目上限為5條。當一組已有5條或以上的題目,免費帳戶將無法新增題目。
若教師現正使用免費的Plickers帳戶,仍可複製本社預製的練習及修改題目,包括更改文字、刪減題目及更改問題次序。除非教師自行刪減題目至4條或以下,否則將無法新增題目至本社預製的練習。
Note: A free Plicker account can only have 5 questions in one ‘Set’. If there are more than 5 questions, the free account user will not be able to add new questions.
If teachers are using a free Plickers account, they can also copy and edit our quiz, such as updating the text, deleting questions or modifying the question sequence. Teachers will not be able to add new questions, unless they have deleted the questions to four or less.
從「Your Library」開啟練習
Start the quiz from ‘Your Library’
在教師的個人Plickers帳戶中點擊「Your Library」,然後點選需要開啟的練習,按「Play Now」開始。
Click on the ‘Your Library’ from the teachers’ own Plickers accounts, then select a quiz and click ‘Play Now’ to start.


學生作答
Answering a question
練習開始後,問題和答案選項將會顯示在教師的裝置上。學生回答問題時將答案卡舉起,將所選的答案向上,有符號的一邊面向教師,而且不能遮蓋符號的黑色部分。
After starting a quiz, the questions and answers will be shown on the teacher’s device. Students should hold up their cards, while the symbol should be facing their teacher, so that their desired answer is located at the top edge of their card. Students should not cover any part of the symbol too.
| 教師裝置畫面Sample screen on the teacher’s device |
|---|

|
| 學生回答的模擬情況Sample situation when students are answering |
|---|


|
掃描答案
Scan the answers
開啟Plickers應用程式,點擊畫面下方彈出的練習視窗,進入問題頁面後點擊下方的圓圈按鈕開啟掃描頁面。
Start the Plickers mobile app and tap the exercise at the bottom of the screen. Enter the question page and tap the circle at the bottom to start the scanner.


將鏡頭掃向學生舉起的答案卡,系統會自動辨識答案。
Use the camera to scan the cards held by the students, the system will analyze the answers automatically.


即時查看作答紀錄
View the instant results
在掃描頁面中,按左下方的 圖案可以查看各選項的回覆人數。
On the scanning page, tap on the button at the bottom left to check the number of responses on each option.


按右下方的 圖案可以查看每位學生的作答情況。
Tap on the button at the bottom right to check the progress of every student.

按下方中央的 圖案即完成掃描,畫面亦會顯示出該題的整體作答情況。
Tap on the button at the bottom to stop scanning. The page will then show the overall responses of that question.

查看作答報告
Check the answer report
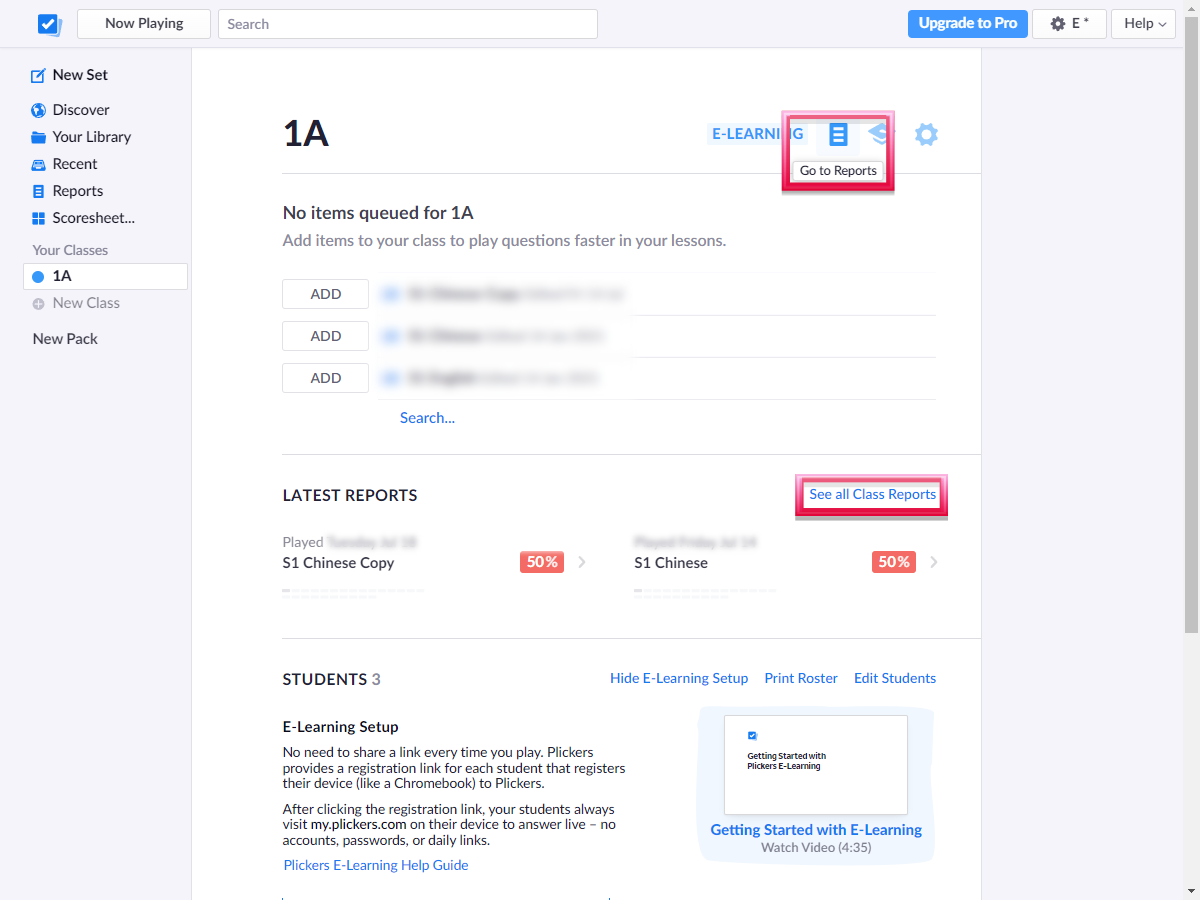
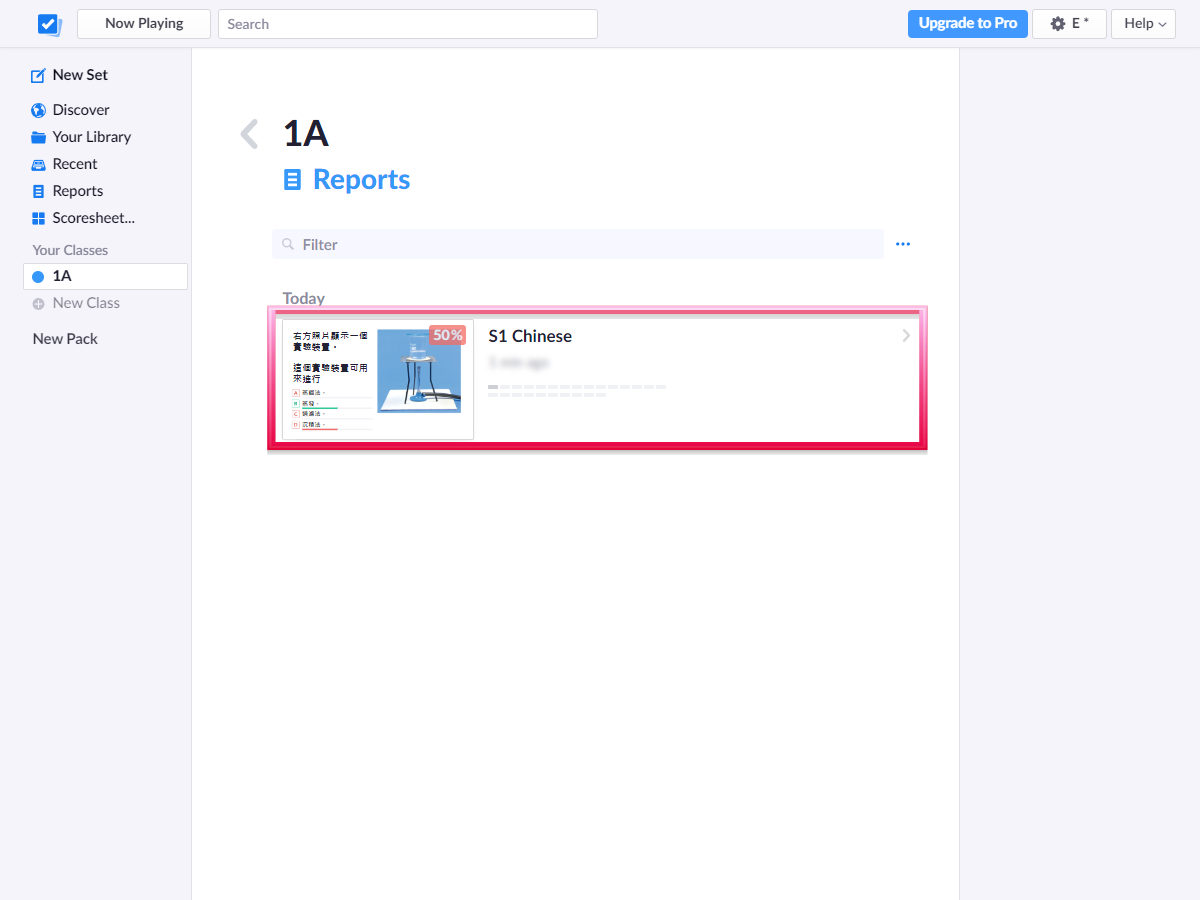
完成練習後,在「Your Classes」中點選班別,在班別名稱右方點擊「Go to Reports」圖案或在「LATEST REPORTS」欄目中點擊「See all Class Reports」可開啟報告頁面,然後查看所需報告。
After completing the quiz, click ‘Your Classes’ and select a class, then click the ‘Go to Reports’ icon or ‘See all Class Reports’ from ‘LATEST REPORTS’ to open the report page and check the reports.


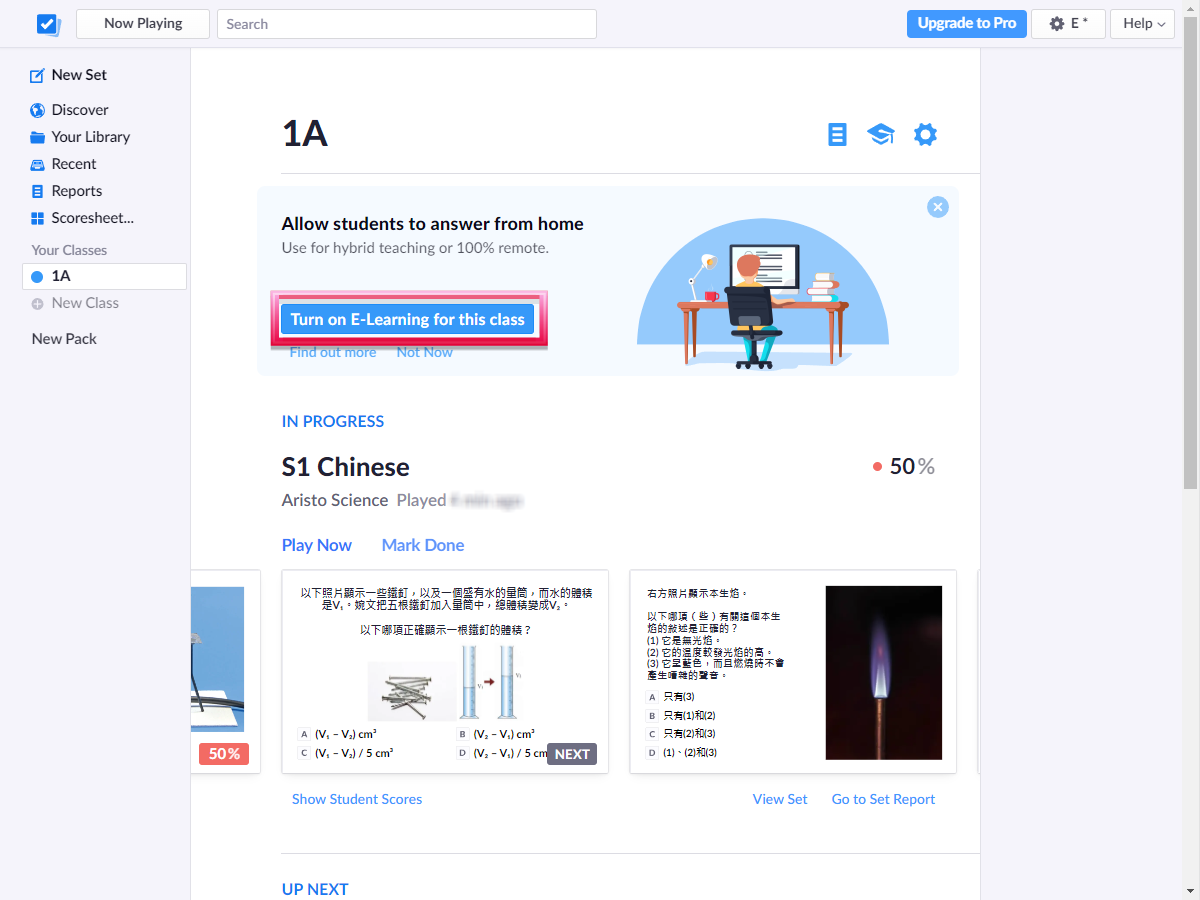
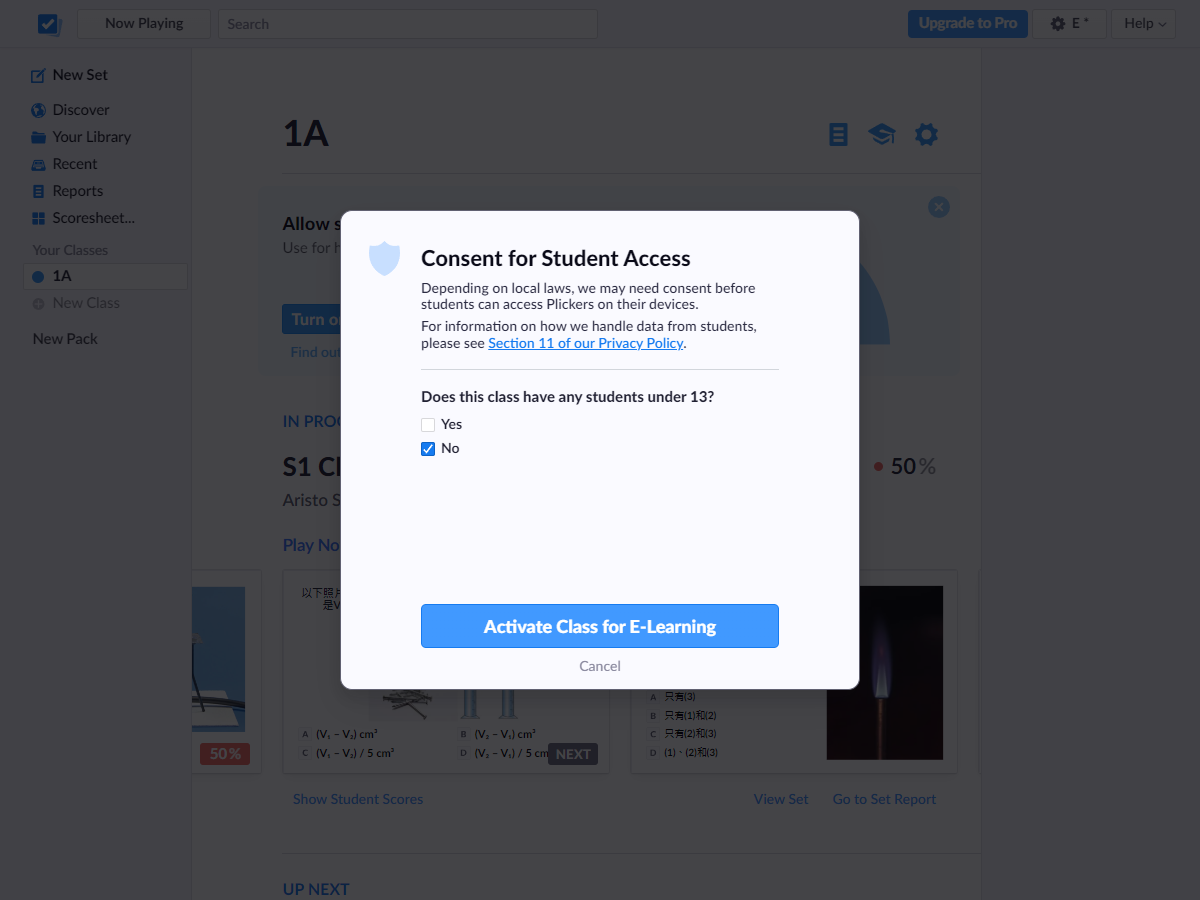
甚麼是「E-Learning」模式?
What is ‘E-Learning’ mode?
使用「E-Learning」模式可讓學生使用桌上電腦、平板電腦或智能電話來進行Plickers練習,而不需使用答案卡。
By using ‘E-Learning’ mode, students can use a desktop computer, tablet or smartphone to join a Plicker quiz, no Plickers cards will be needed.
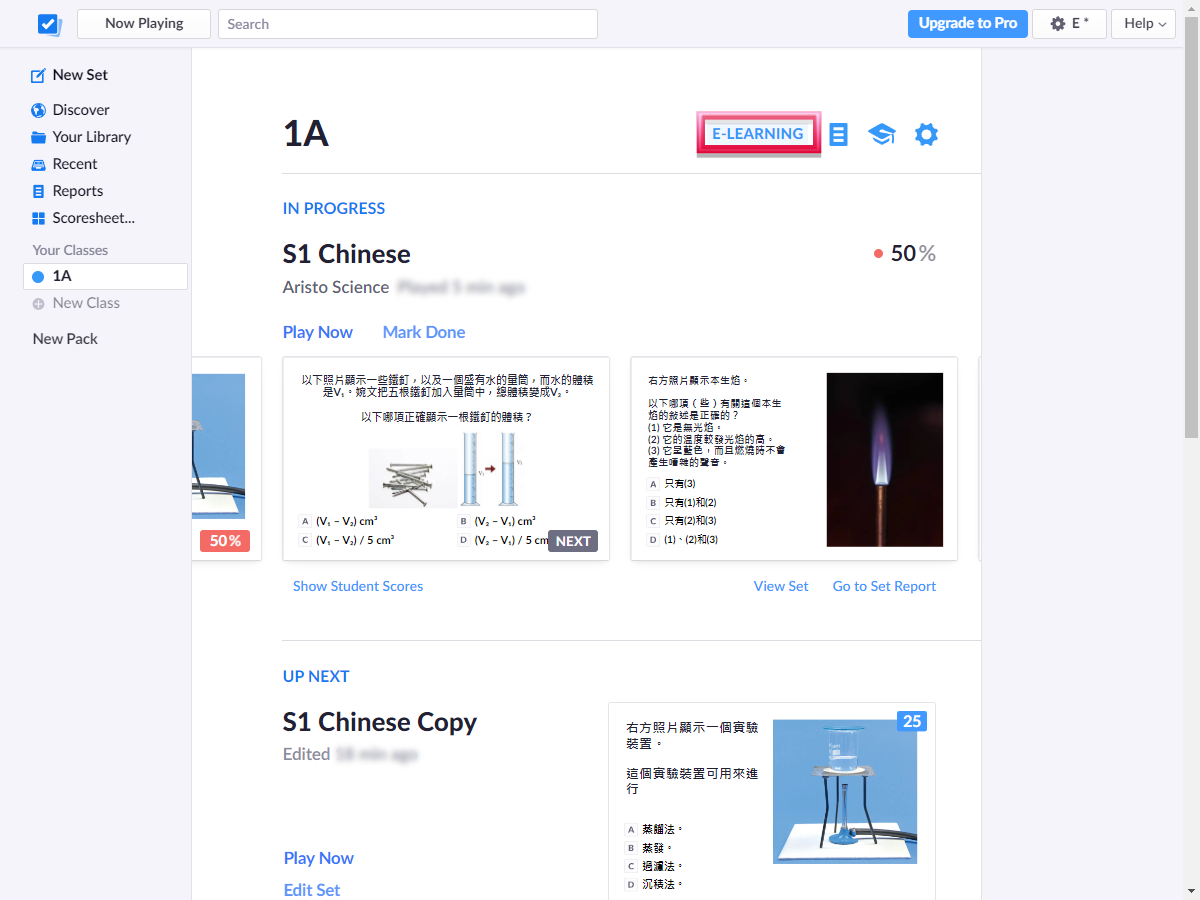
開啟「E-Learning」模式
Start ‘E-Learning’ mode
在所選班別頁面點擊「Turn on E-Learning for this class」,班別名稱右方會出現「E-LEARNING」標誌,表示已經開啟「E-Learning」模式。
On the homepage of the selected class, click on the ‘Turn on E-Learning for this class’. After that, an ‘E-LEARNING” logo will appear next to the class name, which indicates that the ‘E-Learning’ mode has been activated.


發放學生連結
Send the links to students
頁面中會顯示學生連結,教師可以點擊來複製連結,然後發放予學生自行開啟。教師亦可按「Bulk Copy all Student Links」來複製所有學生連結。
The page will show the links for students to join. Teachers can click to copy the links and share with the students. Teachers can also click ‘Bulk Copy all Student LInks’ to copy all the links.

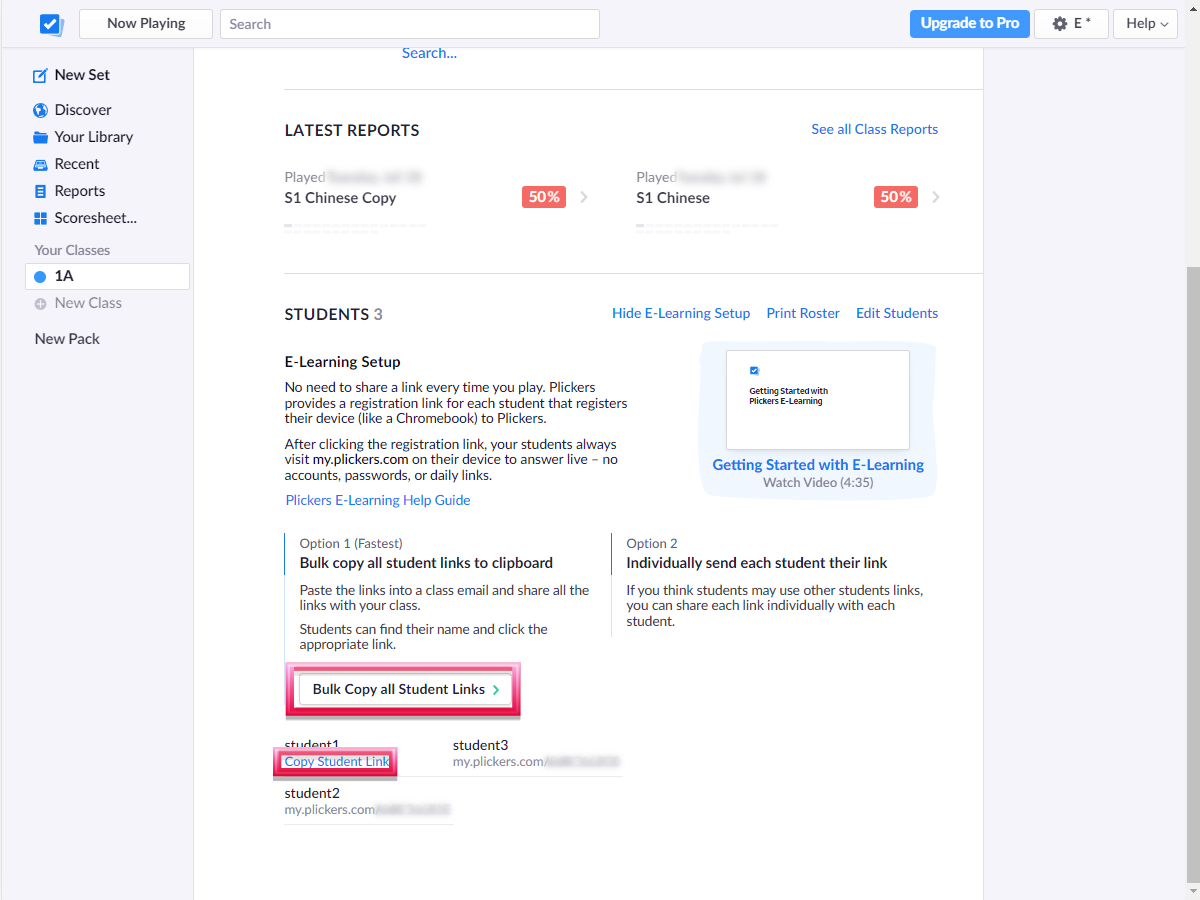
註︰教師只需向每個班別的學生發放一次學生連結,學生每次均可以使用同一個連結開啟該班別的練習。
Note: Teachers only need to share the links once to all students in a class. The students will use the same link to open the quizzes of their class.
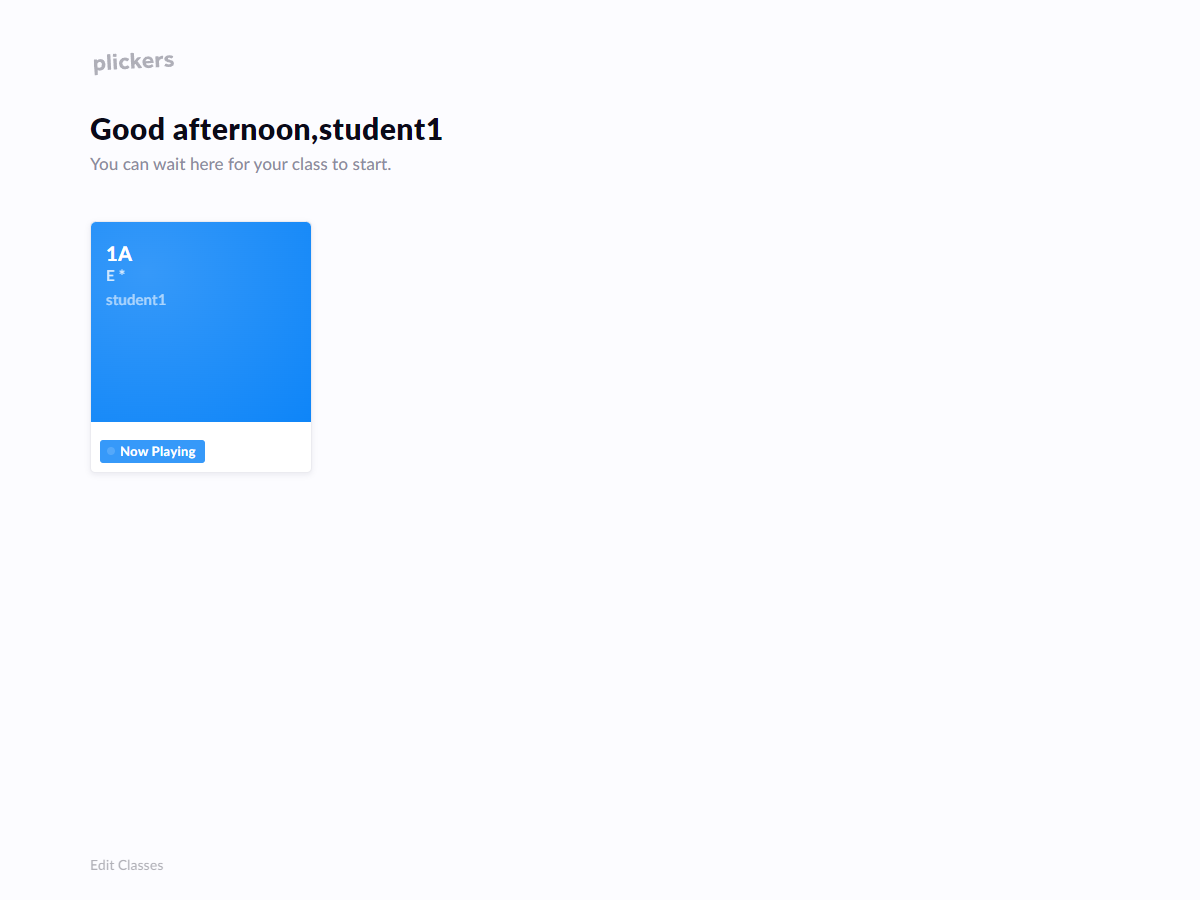
學生加入課堂
Let student join the class
學生開啟連結後點擊班別,然後等待教師開始練習。
After opening the link, students can click on the class and wait for their teacher to start the quiz.

教師可在班別頁面中按「Play Now」開始,開始練習後亦可在畫面的右上方切換模式,包括使用答案卡作答、使用E-Learning模式和答案卡與E-Learning混合模式。
Teachers can click ‘Play Now’ from the class homepage to start the quiz and switch the quiz mode from the upper right, such as using cards, E-Learning or a hybrid mode with cards and E-Learning.

| 使用答案卡作答Answer by using cards | |
|---|---|
| 學生使用答案卡作答Students answer by using their cards | 教師掃描答案卡來收集答案Teachers collect answers by scanning the cards |
|
|
|
| 使用E-Learning模式作答Answer by E-learning mode | |
|---|---|
| 學生使用E-Learning模式作答Students use E-Learning mode to answer | 學生所選的答案會直接顯示在教師報告上The answers will be shown directly on teacher’s report |

|
|
(暫只提供中文版本)
(Only the Chinese version is provided now.)


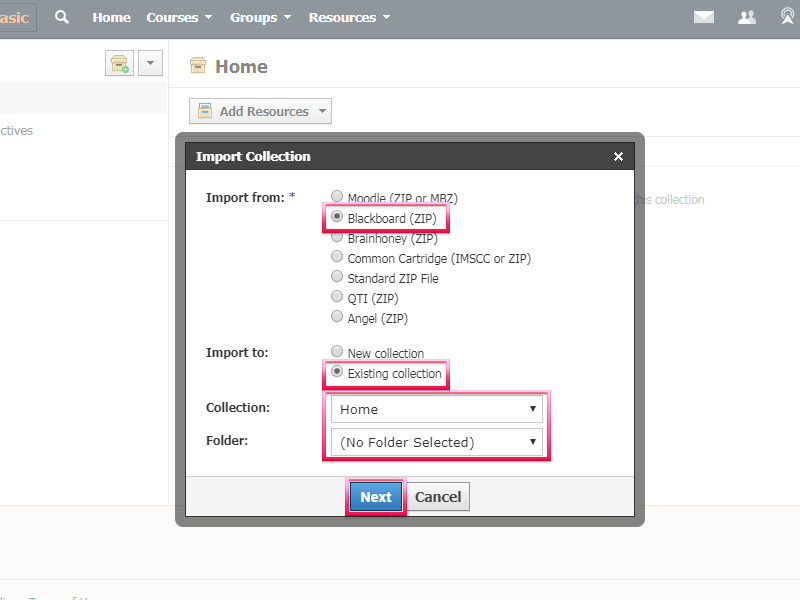
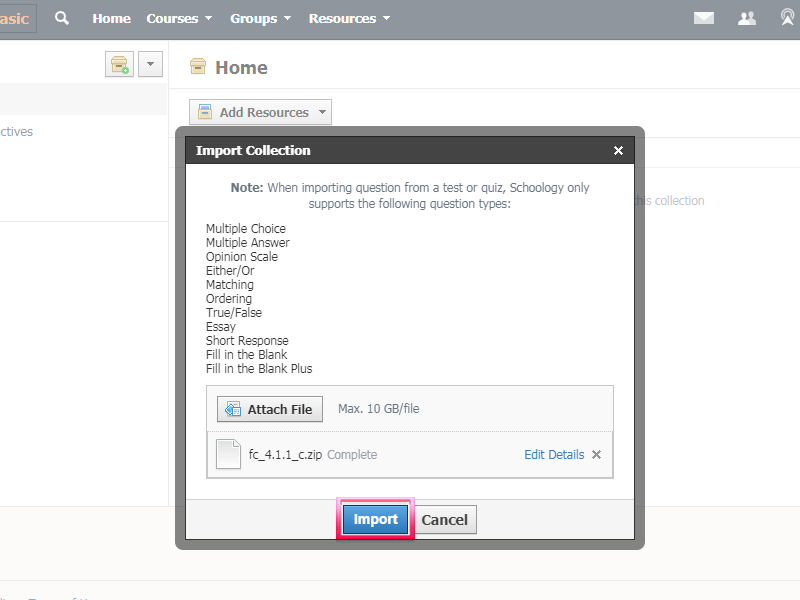
以下是建議選項: The suggested options are as follows:
- Import From(匯入檔案的格式):Blackboard (ZIP) [必選]
- Import To(匯入的檔案將放置在哪個系列):Existing Collection
- Collection(系列的名稱):Home
- Folder(放在系列內哪個文件夾):(No Folder Selected)
- Import From: Blackboard (ZIP) [required]
- Import To: Existing Collection
- Collection: Home
- Folder: (No Folder Selected)


搜尋功能
Search function
(1) 按課本及章次排列;
(2) 輸入關鍵字。 Find an e-Quiz activity by
(1) sorting by book and chapter
(2) entering a keyword


進行練習
Carrying out an activity


搜尋功能
Search function
(1) 按課本及章次排列;
(2) 輸入關鍵字。 Find an e-Quiz activity by
(1) sorting by book and chapter
(2) entering a keyword


查看學生的進度
Checking students’ progress
預覽練習
Previewing the activity


查看報告
Viewing the report
(1) 點擊「報告」可查看成績報告。 After selecting an activity:
(1) Click ‘Report’ to view students’ results.


(3) 點擊「整體報告」可下載成績報告的Excel檔案。
(2) Select a class and an activity to generate a performance report.
(3) Click ‘Overall report’ to download the Excel file of the performance report.


練習設定
Quiz settings


製作自設班別
Creating a customized class


在雅集資源頁面開啟「數學元宇宙」。
Click the following icon to open ‘Aristo Math·ta·verse’.
輸入角色名字及選擇角色外貌,然後按「CONTINUE」。
Enter your name and choose the avatar, then click ‘CONTINUE’.

設定完成後便可以操作角色。
Control the character to explore ‘Aristo Math·ta·verse’.


教師可以透過點擊右上方「Share」取得邀請連結,然後將邀請連結發放給學生,讓學生進入「數學元宇宙」。
Copy the link by clicking ‘Share’ and send the link to students for joining ‘Aristo Math·ta·verse’.

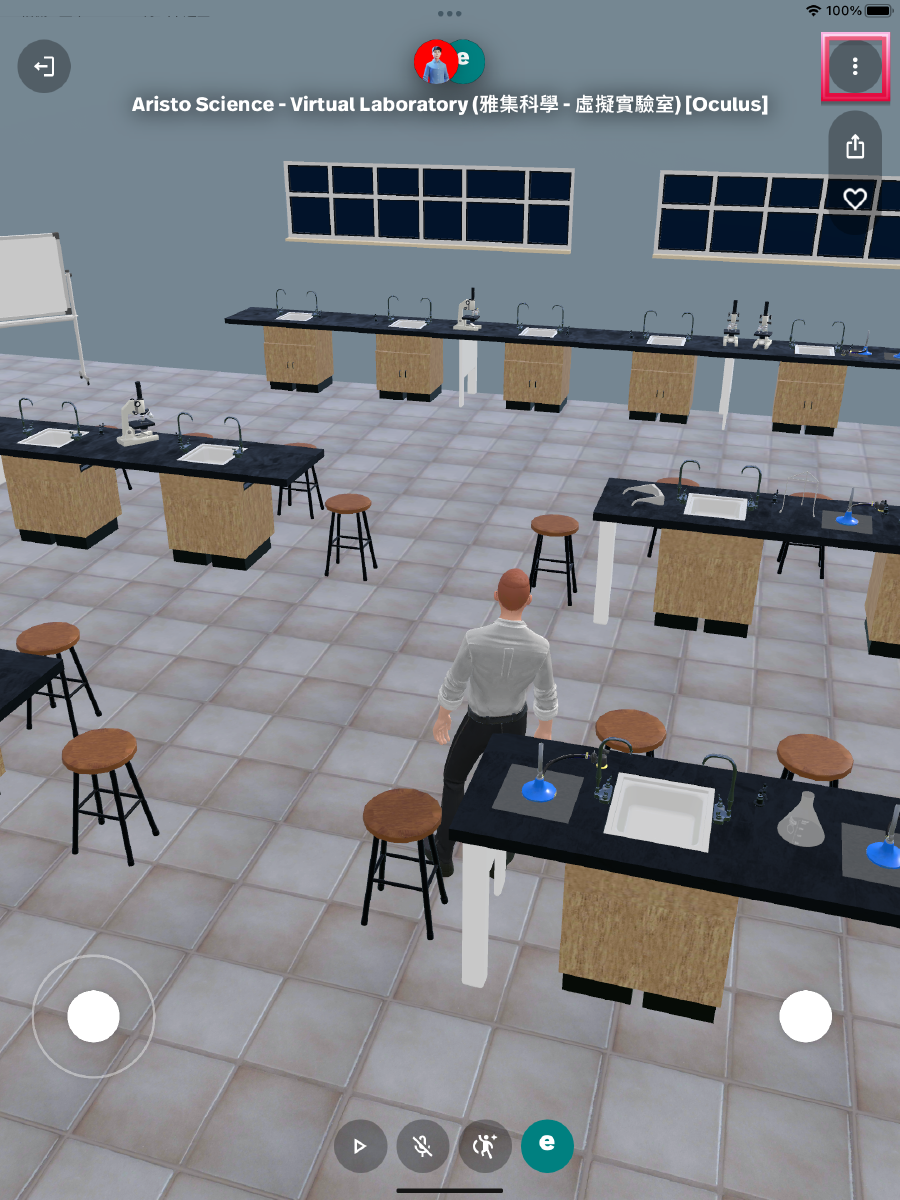
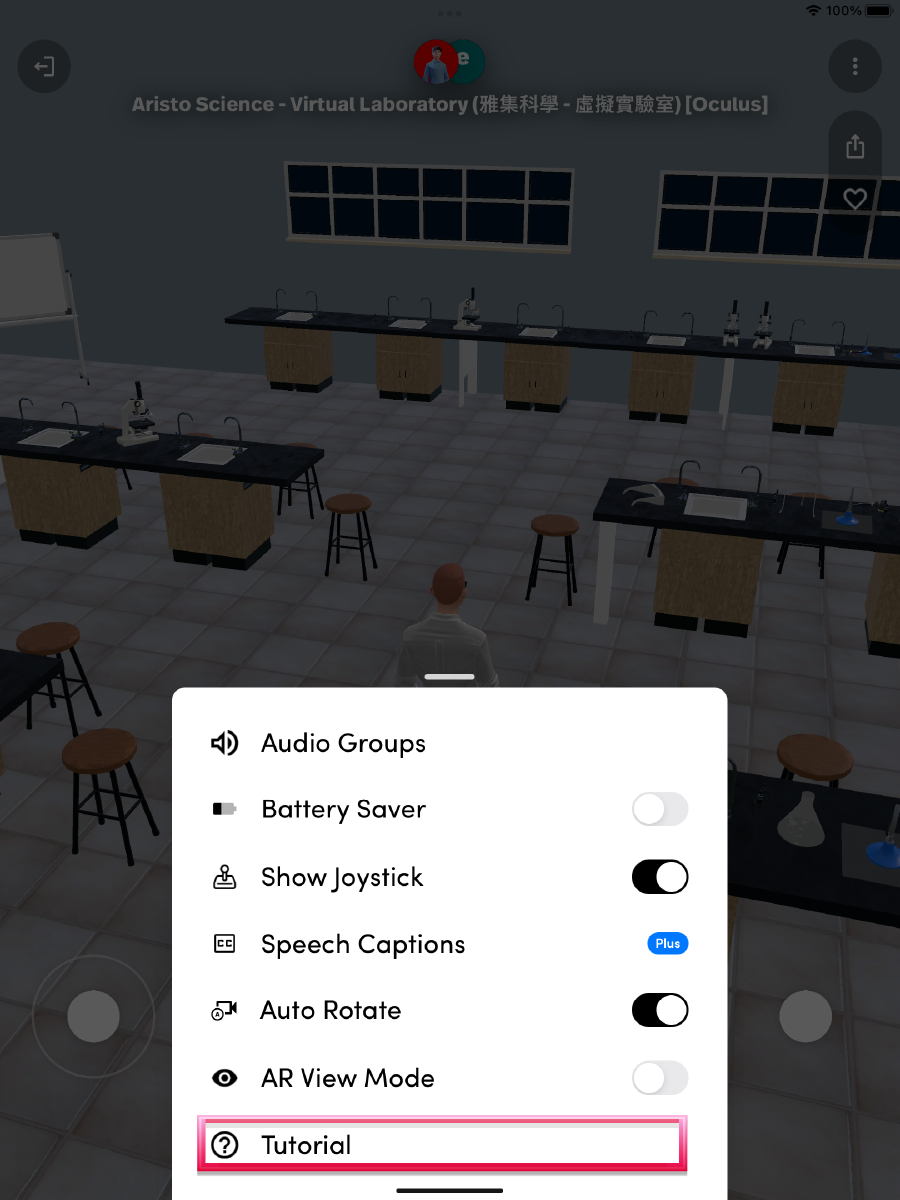
先按右上方的「三點」按鈕,再按「Controls」就可以開啟Spatial使用指引。
Click the ‘three dots’ button at the top right corner, then click ‘Controls’ to open the controls help menu.


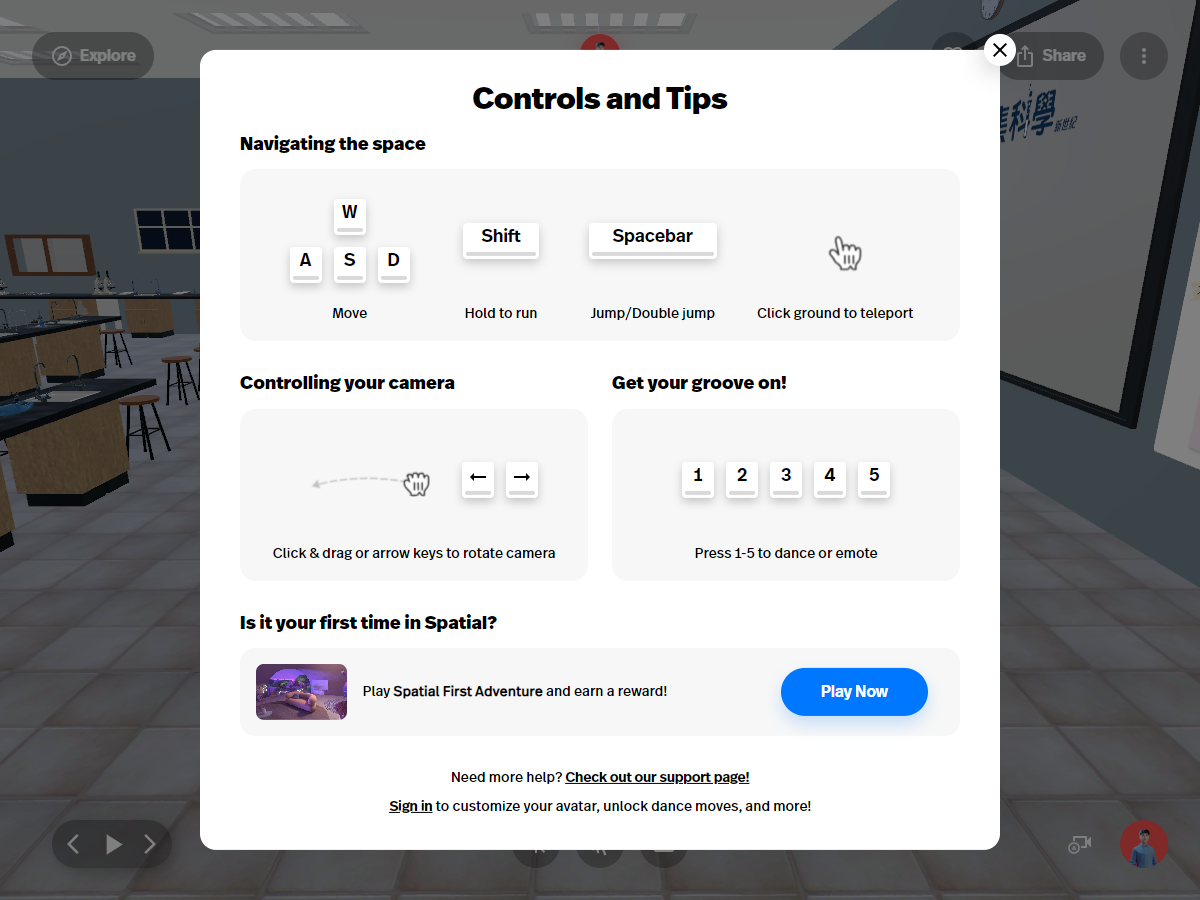

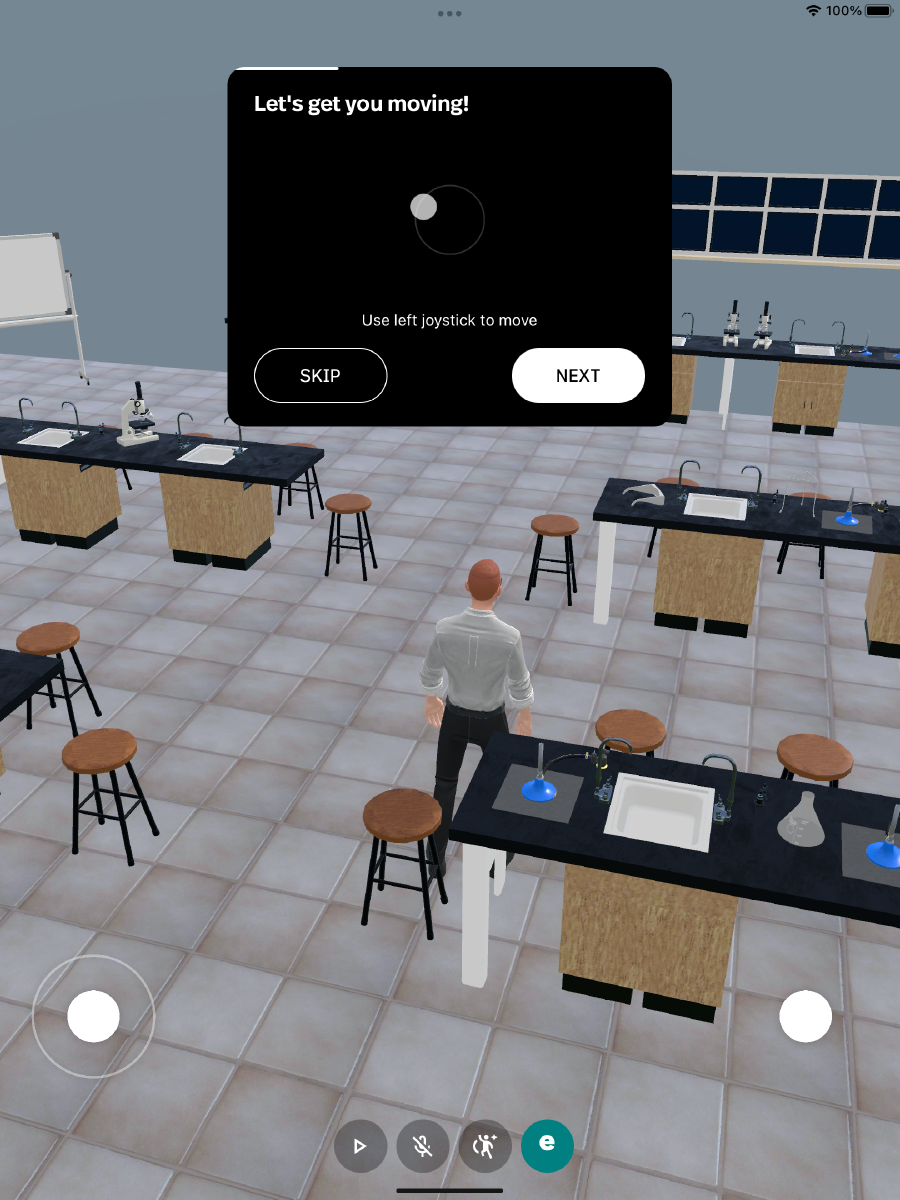
透過向前轉動滑鼠滾輪可以轉做第一身視角遊覽元宇宙。
Roll the scroll wheel forward to explore Aristo Math·ta·verse in first-person view.

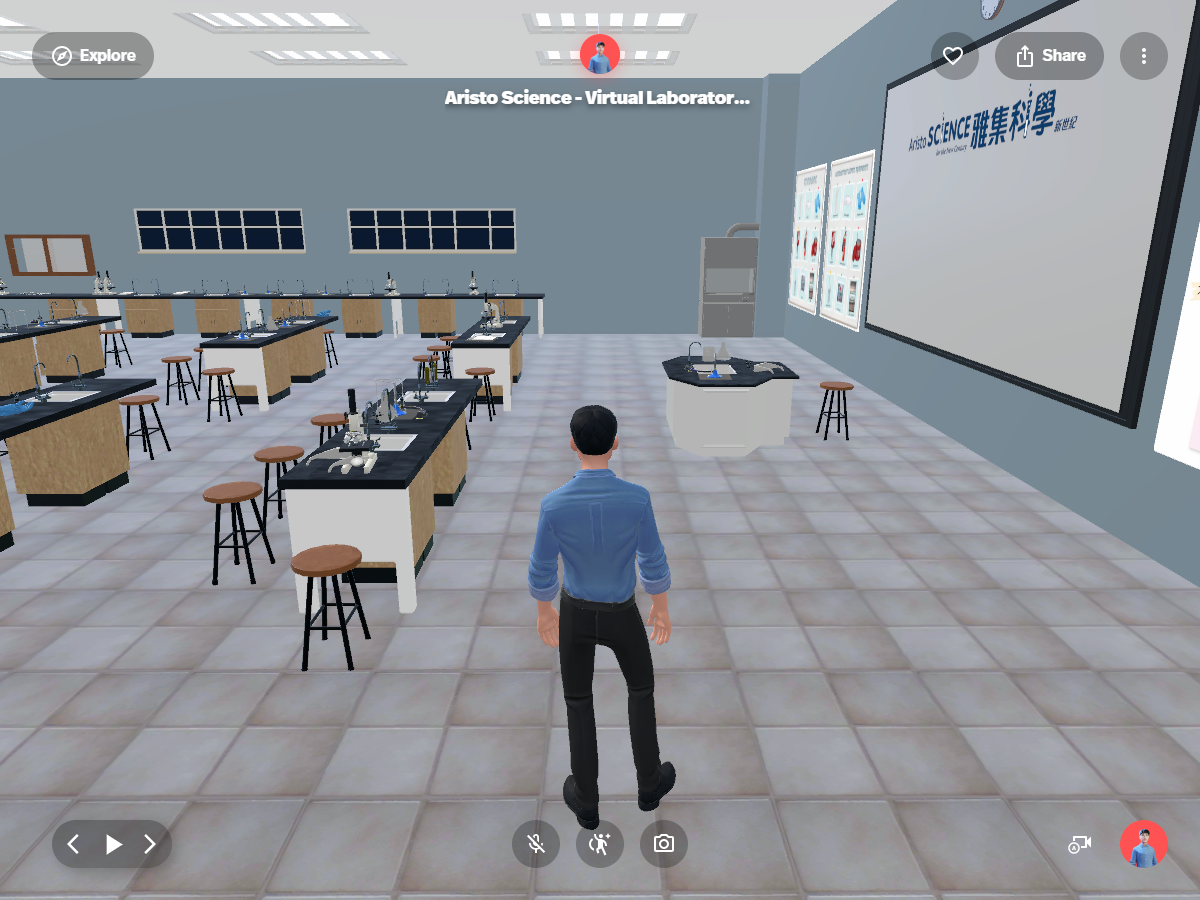

正下方的圖示:
Icons at the bottom:

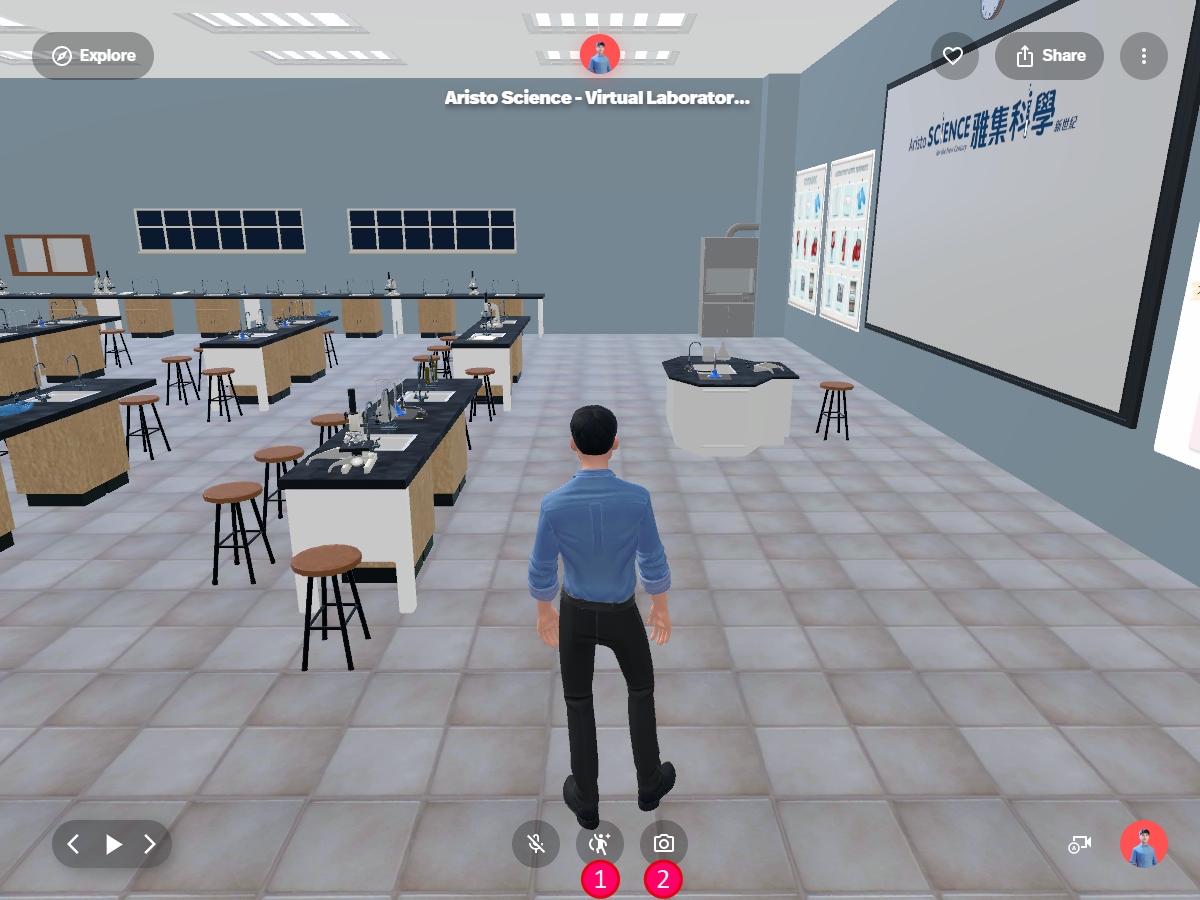
| 1 |
反應圖示:透過角色在Spatial元宇宙中給予反應。 ‘Reaction’ icon: Give reactions in Aristo Math·ta·verse through the avatar. |
| 2 |
相機圖示:為Spatial元宇宙拍照或錄影。 ‘Camera’ icon: Take photos or videos in Aristo Math·ta·verse. |
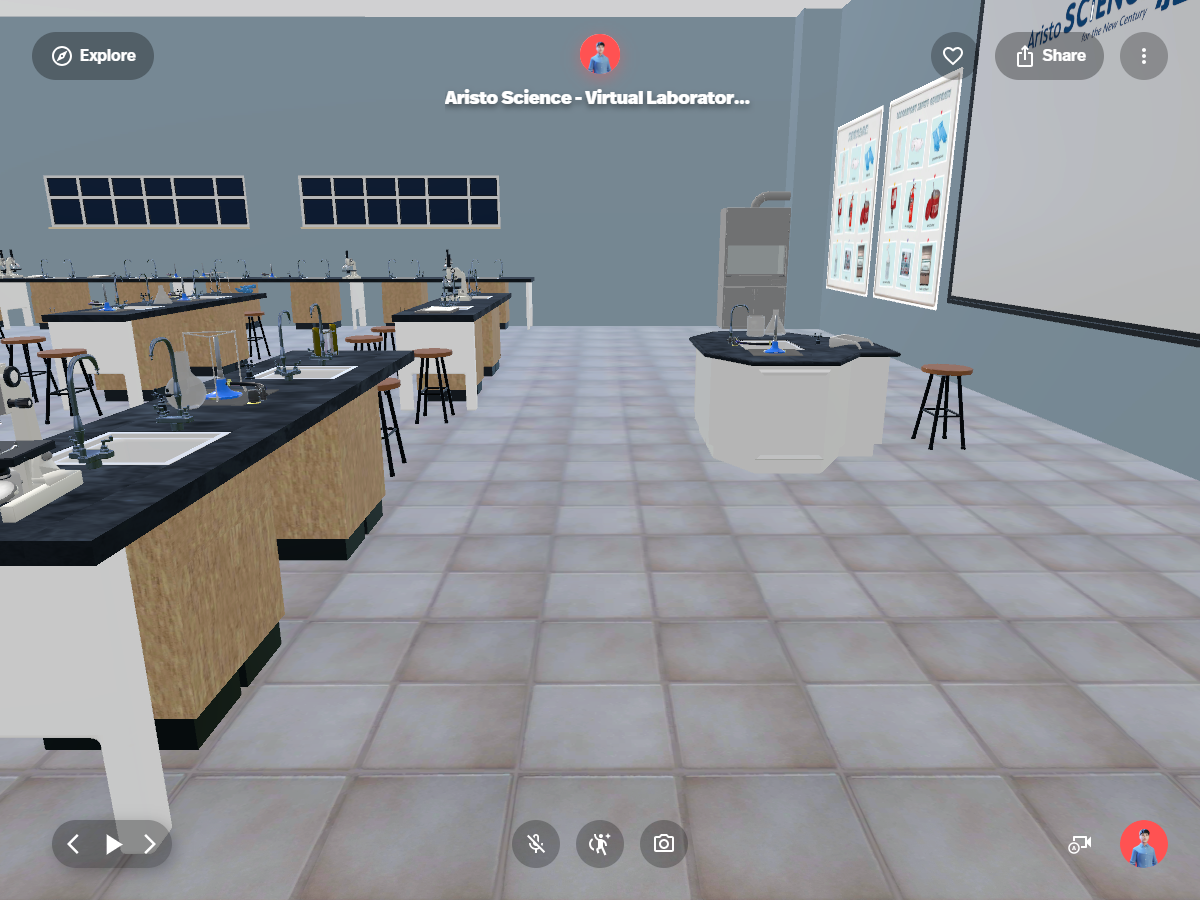
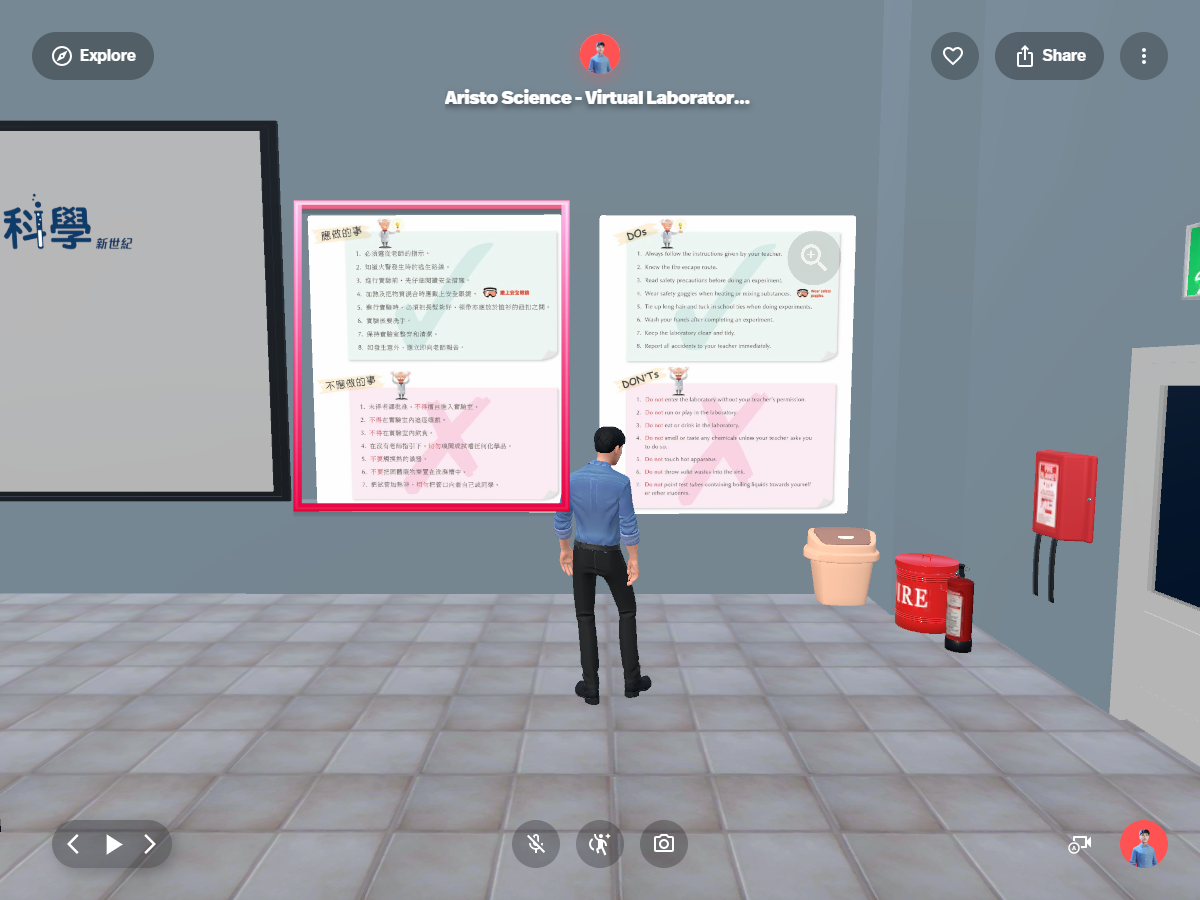
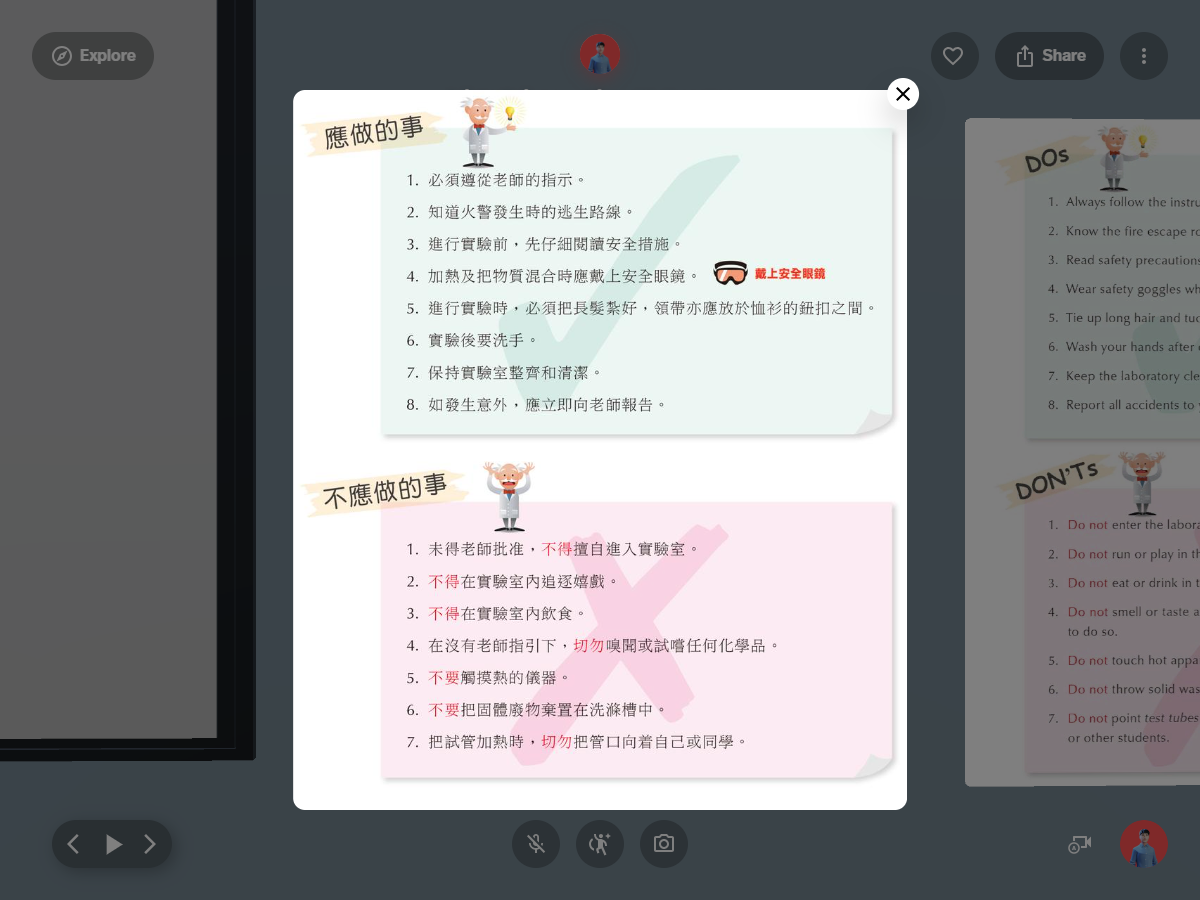
點擊牆上的圖畫預覽補充資料。點擊後能放大圖片。按「Esc」可以返回角色控制畫面。
Click the pictures on the wall to enlarge the picture on the page. Press ‘Esc’ to go back to the character controlling view.


透過App Store或Play Store下載Spatial應用程式:
Install the Spatial application from App store or Play Store:
| iOS版 iOS version | Android 版 Android version |
|---|---|


|


|
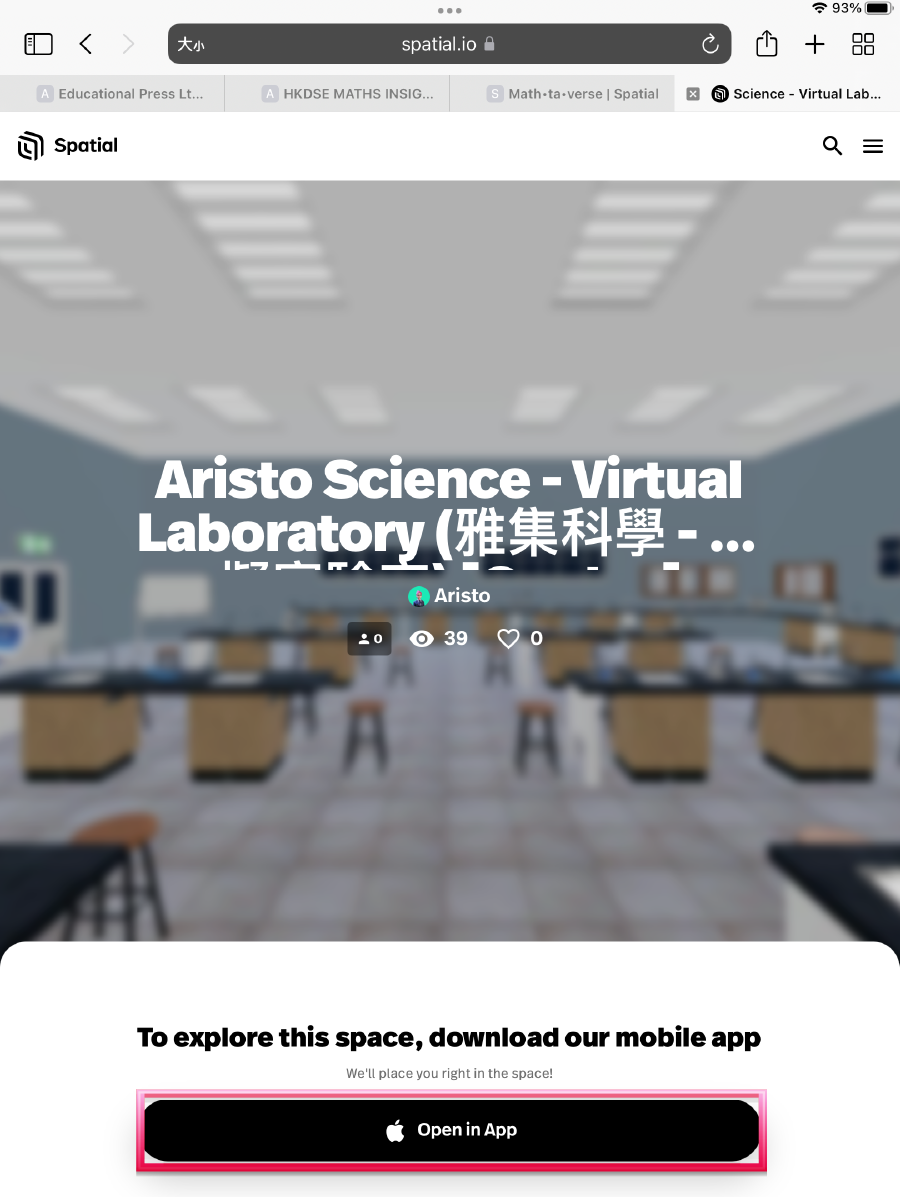
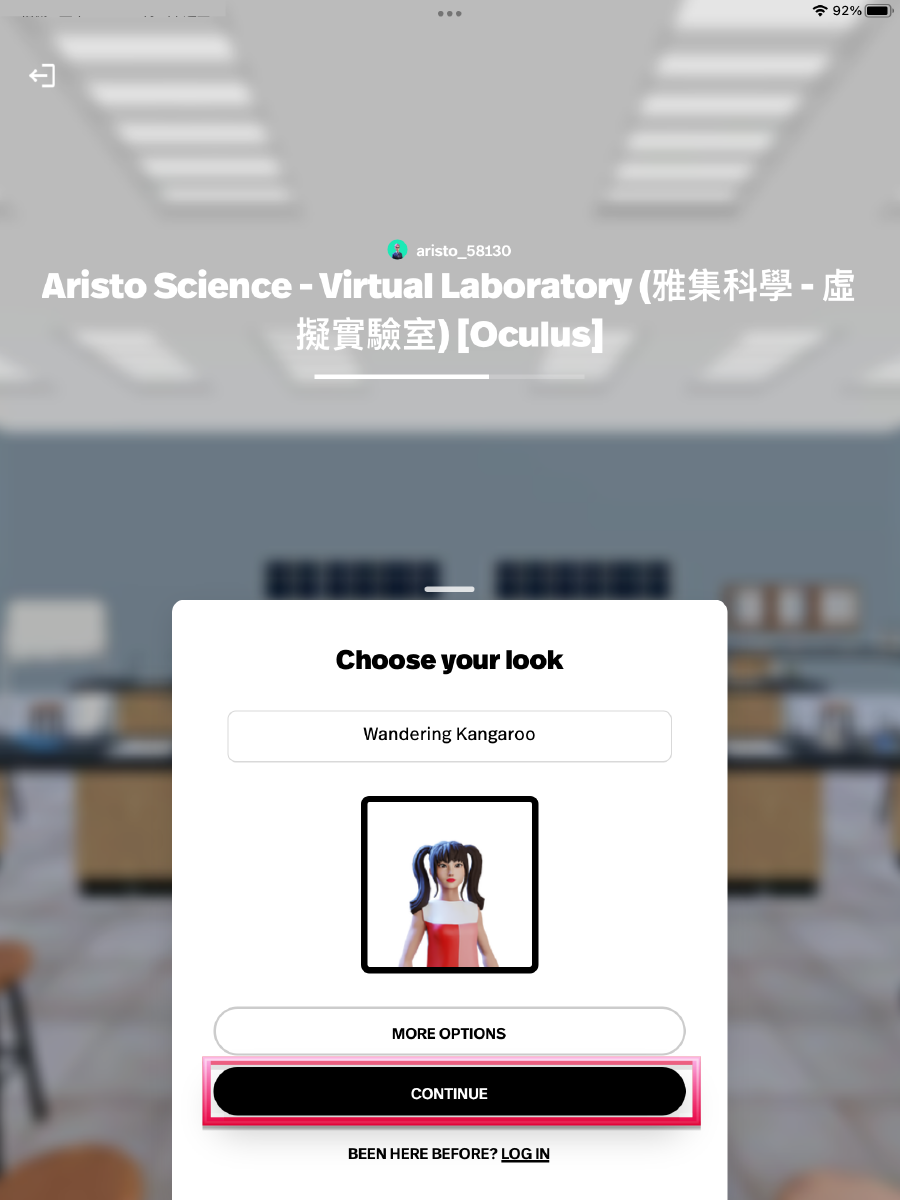
透過鏈接打開網站,點擊「OPEN IN APP」打開Spatial應用程式,設定角色造型後進入元宇宙。
Access the website through the link for ‘Aristo Math·ta·verse’, click ‘OPEN IN APP’ to open the application. Click ‘CONTINUE’ to enter the Math·ta·verse after setting up character name and avatar.


點擊右上方的「三點」按鈕,再按「Tutorial」就可以開啟Spatial使用教程。
Click ‘three dots’ button, then click the ‘Tutorial’ to open the tutorial for Spatial.


流動裝置界面功能如下:
Basic Controls:


| 1 | 移動搖桿:控制角色移動。 White joystick: To control character movement. | 2 | 白色按鈕:控制角色跳躍。 White button: To instruct character jumping. |
| 3 | 人物圖示:設換角色外型。 Character icon: To set the avater. |