STEM連繫 (S1–S2)STEM connection (S1–S2)在學校設立一個氣象站Building a Weather Station in your school
學習技能:Learning skill:
立體打印3d printing
虛擬實境VR
micro:bitmicro:bit
ArduinoArduino
DIYDIY
任務Task
設計和製作不同的儀器,在學校設立一個氣象站,並撰寫自己的天氣報告!
Design and make different instruments to build a Weather Station in your school and make your own weather report!
背景知識
Background knowledge
1. 溫度計1. Thermometer(溫度計)
2. 濕度計2. Hygrometer(濕度計)

- Evaporation (Section 2.1)


- Design and make your own hygrometer

基本原理︰Basic principle:
一種常見的濕度計配有兩支水銀温度計,其中一支是濕球温度計,另一支則是乾球温度計。當濕球温度計上的水蒸發時,温度會下降,兩個温度計的讀數差可用來顯示大氣中的相對濕度。
另一種濕度計則利用有機物料(例如頭髮)的膨脹和收縮來顯示四周的濕度。
One common type of hygrometer is equipped with two mercury thermometers, where one has a wet bulb and the other has a dry bulb. When water on the wet bulb evaporates, the temperature will drop. The difference between the two temperature readings indicates the relative humidity in the atmosphere.
Another type of hygrometer makes use of an organic material (like hair) that expands and contracts in response to the surrounding humidity.
3. 風向標和風速計3. Wind vane(風向標)and Anemometer(風速計)
4. 雨量計4. Rain gauge(雨量計)
5. 氣壓計5. Barometer(氣壓計)
老師會把全班分成數組。試和你的組員合作設計和製作氣象站內的不同儀器!Your teacher will divide the class into groups. Collaborate with your groupmembers to design and make different instruments in a Weather Station !
第一部分—設計和製作溫度計Part A—Design and make a thermometer
1.
在互聯網搜尋製作温度計的不同方法。列出你的設計所需的物料。
Search the Internet for different methods of making a thermometer. List the materials your group will choose to make it.
2.
在以下的空位內繪畫你的設計,並在各部分加上標註。試簡單描述製作温度計的步驟。
Draw your design below. Label all the parts. Also, briefly describe how you will make the thermometer.
3.
和組員合作完成温度計。
Collaborate with your group members to make the thermometer.
第二部分—設計和製作濕度計Part B—Design and make a hygrometer
1.
在互聯網搜尋製作濕度計的不同方法。列出你的設計所需的物料。
Search the Internet for different methods of making a hygrometer. List the materials your group will choose to make it.
2.
在以下的空位內繪畫你的設計,並在各部分加上標註。試簡單描述製作濕度計的步驟。
Draw your design below. Label all the parts. Also, briefly describe how you will make the hygrometer.
3.
和組員合作完成濕度計。
Collaborate with your group members to make the hygrometer.
第三部分—設計和製作風向標Part C—Design and make a wind vane
1.
在互聯網搜尋製作風向標的不同方法。列出你的設計所需的物料。
Search the Internet for different methods of making a wind vane. List the materials your group will choose to make it.
2.
在以下的空位內繪畫你的設計,並在各部分加上標註。試簡單描述製作風向標的步驟。
Draw your design below. Label all the parts. Also, briefly describe how you will make the wind vane.
3.
和組員合作完成風向標。
Collaborate with your group members to make the wind vane.
第四部分—設計和製作風速計Part D—Design and make an anemometer
1.
在互聯網搜尋製作風速計的不同方法。列出你的設計所需的物料。
Search the Internet for different methods of making an anemometer. List the materials your group will choose to make it.
2.
在以下的空位內繪畫你的設計,並在各部分加上標註。試簡單描述製作風速計的步驟。
Draw your design below. Label all the parts. Also, briefly describe how you will make the anemometer.
3.
和組員合作完成風速計。
Collaborate with your group members to make the anemometer.
第五部分—設計和製作雨量計Part E—Design and make a rain gauge
1.
在互聯網搜尋製作雨量計的不同方法。列出你的設計所需的物料。
Search the Internet for different methods of making a rain gauge. List the materials your group will choose to make it.
2.
在以下的空位內繪畫你的設計,並在各部分加上標註。試簡單描述製作雨量計的步驟。
Draw your design below. Label all the parts. Also, briefly describe how you will make the rain gauge.
3.
和組員合作完成雨量計。
Collaborate with your group members to make the rain gauge.
第六部分—設計和製作氣壓計Part F—Design and make a barometer
1.
在互聯網搜尋製作氣壓計的不同方法。列出你的設計所需的物料。
Search the Internet for different methods of making a barometer. List the materials your group will choose to make it.
2.
在以下的空位內繪畫你的設計,並在各部分加上標註。試簡單描述製作氣壓計的步驟。
Draw your design below. Label all the parts. Also, briefly describe how you will make the barometer.
3.
和組員合作完成氣壓計。
Collaborate with your group members to make the barometer.
第七部分—micro:bitPart G—micro:bit
如果學校有micro:bit和相關的感應器,你可以利用它們來設立氣象站!
If micro:bits and suitable sensors are available at your school, you can also build your weather station by micro:bits!
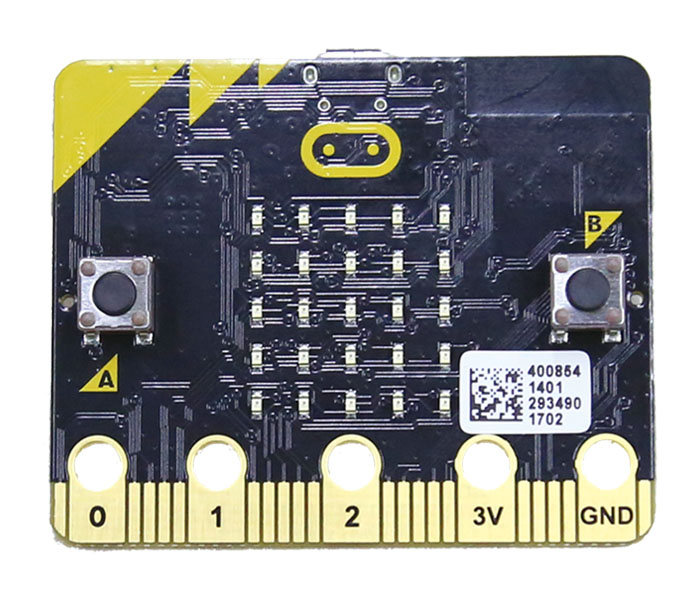
micro:bit

weather:bit

天氣計weather meter
在互聯網搜尋所需的感應器、程式碼和如何正確連接它們。然後,和組員合作,利用micro:bit設立氣象站!
Search the Internet for the ways to connect them and the codes required to run them. Then, collaborate with your group members to make a weather station by micro:bits!
第八部分—附加資源Part H—Further resources
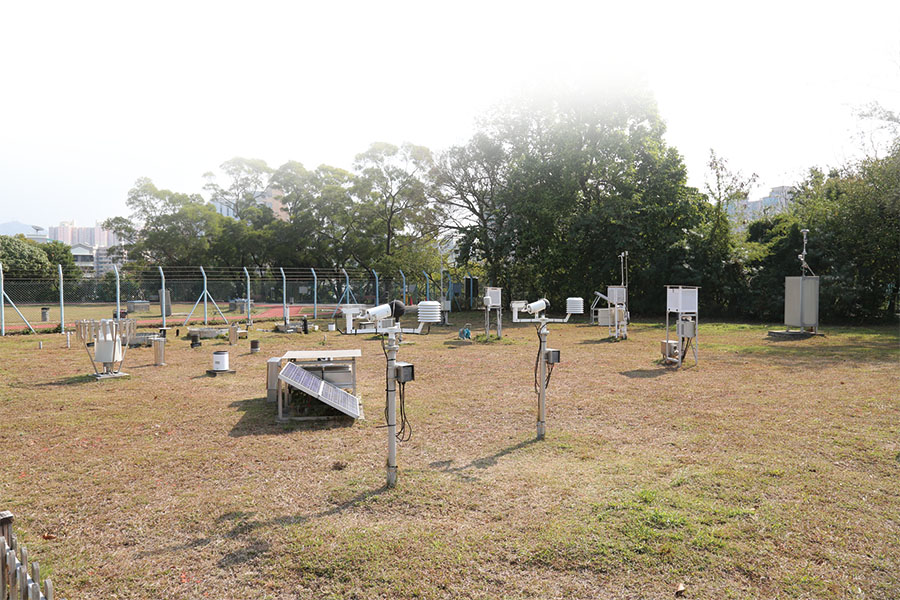
虛擬實境(VR)VR
你想看看香港天文台實際使用的天氣探測儀器嗎?你現在可以觀看京士柏氣象站的虛擬實境(VR),看到在氣象站使用各種儀器的真實情況,並與他們的設計進行比較。
Do you want to see the instruments used in a real weather station of the Hong Kong Observatory? You can now watch a VR of King's Park Meteorological Station! You can see the real instruments and compare the designs of these instruments with the ones you have made.
3D 打印3D printing
如果學校有3D打印機,你可以在我們的網站下載可供3D打印的模型。如果你會使用3D製圖軟件(例如
Blender),更可以設計和製作自己的3D打印模型。
If 3D printers are available at your school, you can download free models for 3D printing from our website. If you are familiar with 3D graphic tools (e.g.
Blender), you can also design your own 3D-printed models.
ArduinoArduino
如果學校有Arduino,你可把它和3D打印技術結合來製作一個雨量計。透過合適的感應器,你更可以測量空氣中的微粒數量和紫外輻射的強度!在互聯網搜尋所需的感應器、程式碼和如何正確連接它們。
If Arduino is available at your school, you can combine it with a 3D printed rain gauge to measure the amount of rainfall. With suitable sensors, you can even measure the amount of particulates in air and the intensity of ultraviolet radiation! Search the Internet to check which sensors are needed, the code required and how to connect them in a correct way.
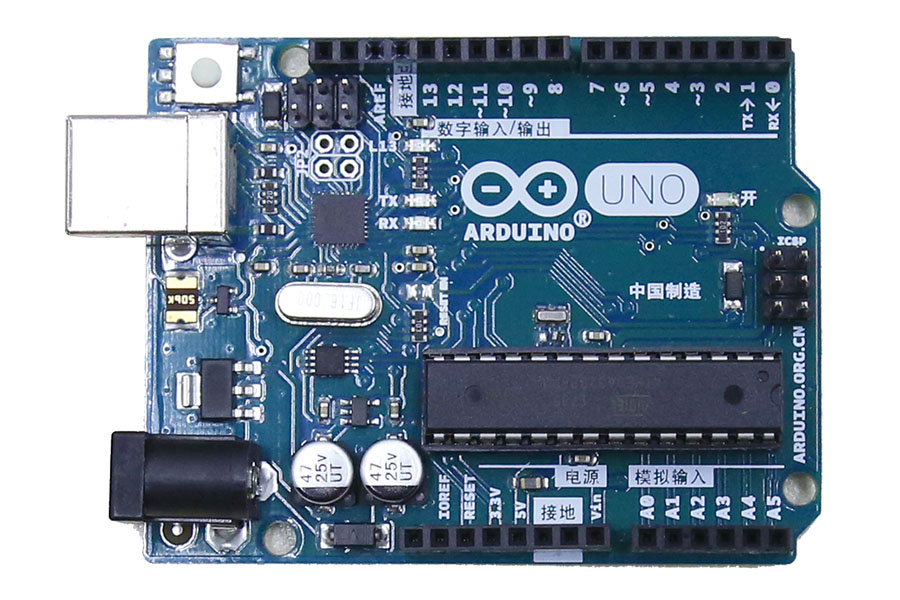
ArduinoArduino

UV感應器UV sensor
第九部分—評價和改良Part I—Evaluate and redesign
1.
利用自製的儀器,監測天氣一星期,並把數據製作成天氣報告,和香港天文台的數據作比較。
4.
討論後,若時間許可,試改良設計。你需在課堂後提交
學生工作紙。
1.
Monitor the weather for a week using the instruments you have made. You can then make a weather report.
2.
Present and display the instruments in class.
3.
Ask your teacher to evaluate your instruments:
3.
If time allows, modify your designs after the discussion. You need to submit
Student’s Worksheets to your teacher after the lesson.